ROS1 基础
最近更新:
本章介绍了 reComputer Jetson 上的 ROS 1 Noetic 开发工作流程,包括工作区、包、常用工具、主题/服务通信、自定义消息和 TF。
长时间运行的示例保存在
./code/下,相关图形保存在./images/下。
内容
7.2.1.1 ROS 1简介
ROS 1(机器人操作系统1)是一个开源机器人软件框架,由Open Robotics 维护。它不是传统意义上的操作系统,而是为机器人应用程序提供通信机制、工具链和通用功能库,大大降低了机器人软件开发的难度。它提供操作系统所需的服务,包括硬件抽象、底层设备控制、常用功能的实现、进程间消息传递和包管理等。它还提供了获取、编译、准备和跨计算机运行代码所需的工具和库函数。
ROS 1 发布
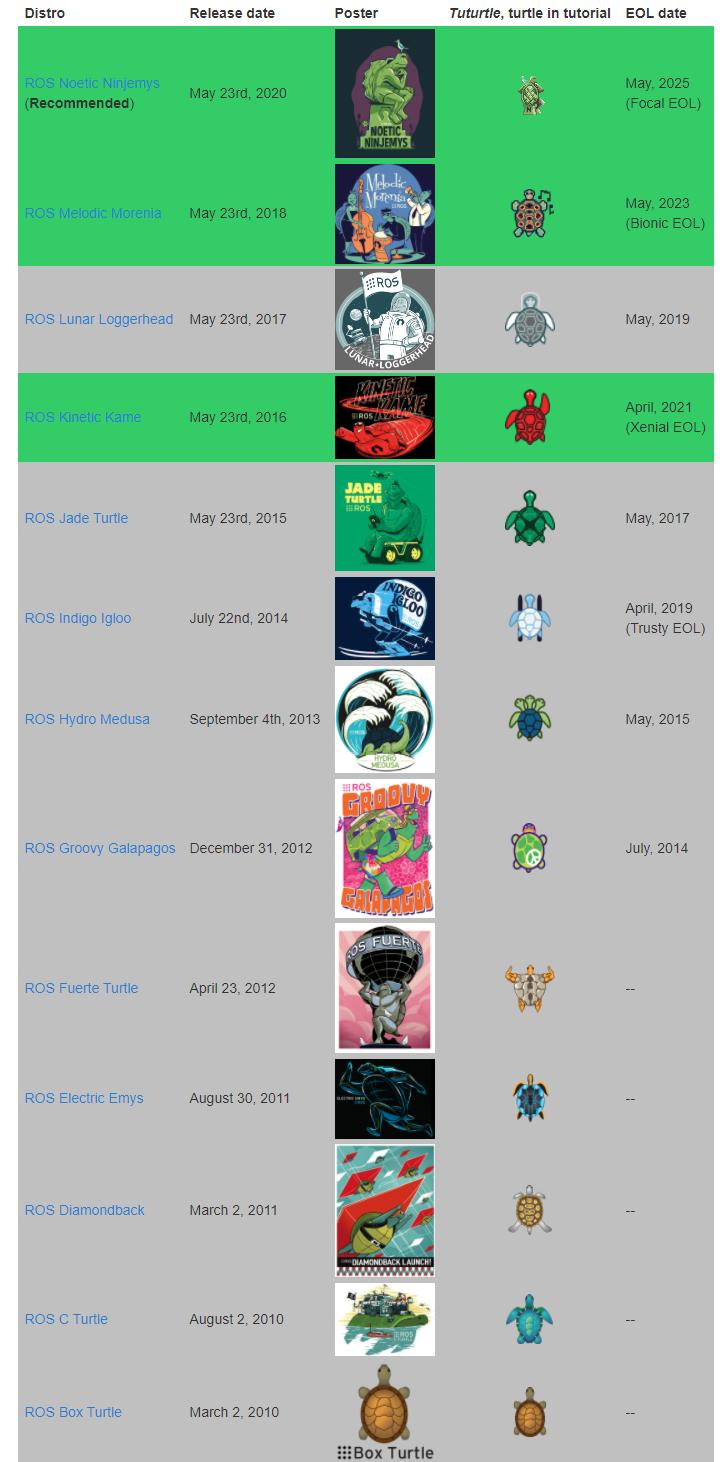
常见ROS 1版本如下:
| 版本名称 | Ubuntu | 维护状态 |
|---|---|---|
| Kinetic | 16.04 | 已停止维护 |
| Melodic | 18.04 | 已停止维护 |
| Noetic | 20.04 | 最后一个 ROS 1 版本 (LTS) |
本章后续示例将基于 ROS 1 的 noetic 版本。
ROS的主要目标是为机器人研发提供代码重用支持。 ROS 是一个分布式进程框架(即“节点”),这些进程被封装在易于共享和发布的包中。 ROS还支持类似于代码存储库的联合系统,同样可以实现工程协作和传播。这种设计允许工程项目的开发,实现从文件系统到用户界面的完全独立决策(不受ROS限制)。同时,所有作品都可以集成到基本的ROS工具中。
ROS 1的主要特点
(1)分布式结构(每个工作进程被视为一个节点,使用节点管理器进行管理),
(2) 多语言支持(例如C++、Python等),
(3)弹性好(既可以写一个节点,也可以通过roslaunch将很多节点组织成一个更大的项目),
(4)开源代码(ROS遵循BSD协议,对个人和商业应用及修改完全免费)。
ROS 1 总体架构
开源社区层面:这包括开发人员、代码、算法之间的知识共享。
文件系统级别:可在硬盘驱动器上找到的代码和可执行文件的描述。
计算规模:体现流程与流程、流程与系统之间的沟通。
启动ROS 1开发环境
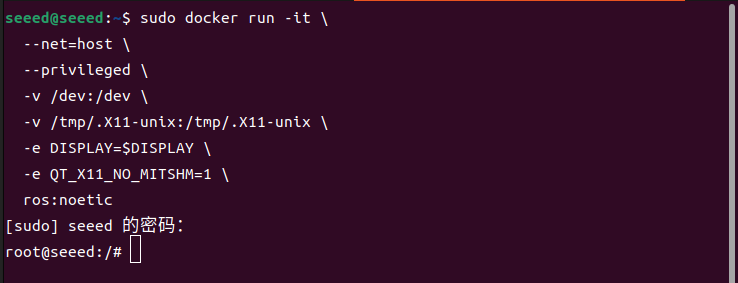
SeeedStudio Jetson Orin Nano Super DevKit 是 Ubuntu 22.04 的本地系统版本,不支持 ROS 1 使用,但在 JetPack 6 中进行了预先评估,但如果您使用的是我们提供的 BSP JetPack 6,则可以使用以下命令在 Jetson 设备的终端窗口中启动包含 ROS 1 的 Docker 容器,使用 Ubuntu 22.04:
xhost +
sudo docker run -it \
  --net=host \
  --privileged \
  -v /dev:/dev \
  -v /tmp/.X11-unix:/tmp/.X11-unix \
  -e DISPLAY=$DISPLAY \
  -e QT_X11_NO_MITSHM=1 \
  ros:noetic
如果您购买的Jetson设备没有预先评估ROS 1开发环境,请参考此处进行安装。
计算图表配置文件
节点
节点是ROS 1中最基本的计算实现模块,通常对应一个独立运行的进程。 ROS系统不是单个程序,而是多个节点协同工作的分布式系统。
在ROS 1中,每个节点通常具有相对单一且独特的功能,例如:
传感器数据采集(凸轮、雷达、IMU)
算法处理(定位、建筑、道路规划)
控制输出(调速、电控)
数据转发和调试(日志、可视化)
ROS 1节点的特点
独立进程 每个节点通常是一个独立的Linux进程,节点之间通过ROS通信机制进行交互。
解开设计的束缚 节点之间不直接调用该功能,而是通过Topic、Service、Action、Parameter等进行通信,以方便系统扩展和维护。
名称唯一 每个节点在 ROS 计算器中必须有一个唯一的名称,例如: g。 /turtle_velocity_publisher
可分发运行 Node可以运行在不同的主机上,只要它们连接到同一个ROS Master即可。
由 ROS Master 管理的生命周期 节点在启动时向ROS Master注册自己的信息(名称、发布/订阅等),并由每个节点运行。
ROS 1 中点的常用通信方式
主题。 节点用于通过高频数据流的发布/订阅模型进行现成的通信。
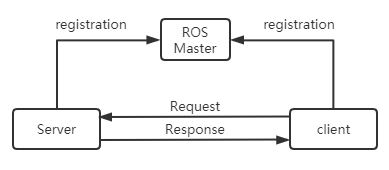
服务 基于请求-响应的同步通信。
行动 适用于耗时任务,支持反馈和取消。
参数服务器(参数服务器) 用于存储系统运行参数。
节点是主要的计算执行过程。 ROS由许多节点组成。
输入部分时按[Tab]填写即可。
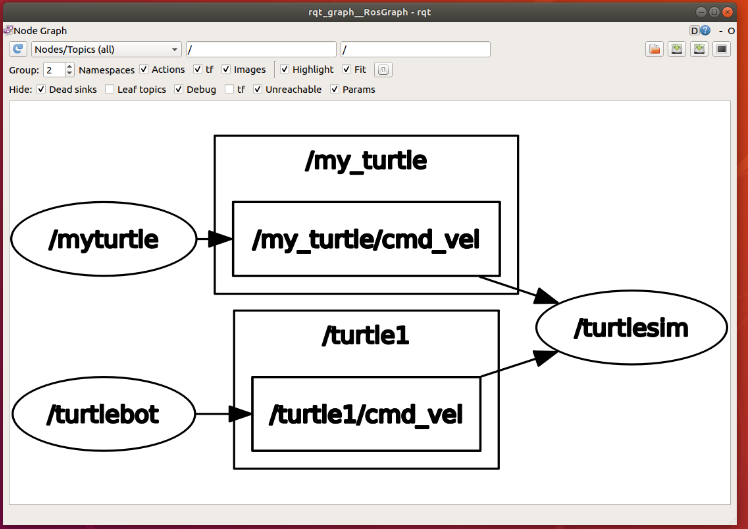
以下是节点图的示例:
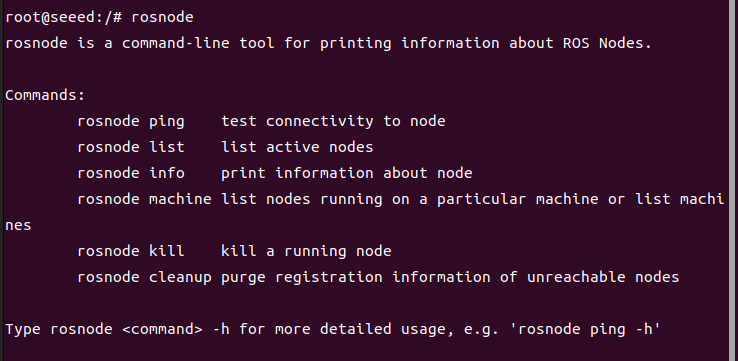
当我们在命令行中输入[rosnode],然后双击Tab,我们就可以在命令行下方找到这些关键字。
ROS命令行工具rosnode:
开发调试经常需要当前节点和节点信息,所以记住这些常用命令。如果不行的话,也可以通过rosnode帮助查看rosenode命令的使用。
留言
节点之间的逻辑链接和数据交换都是通过消息来实现的。
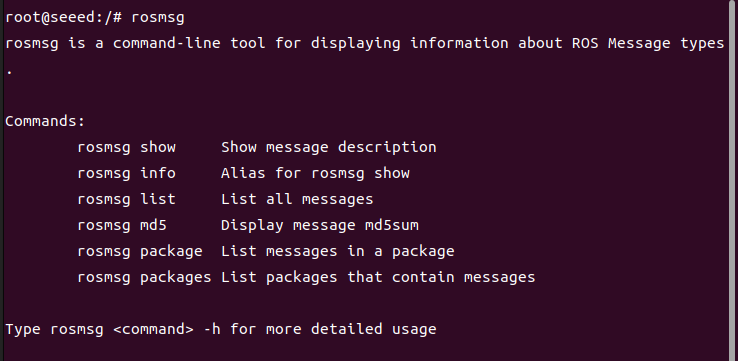
当我们在命令行中输入[rosmsg]并双击Tab键时,我们会在命令行下方找到这些关键字。
ROS命令行工具rosmsg:
主题
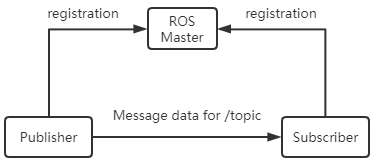
主题是一种传递信息的方式(发布/订阅)。每条消息都发布在相应的主题上,并且每个主题都是强类型的。
ROS的主题消息可以使用TCP/IP或UDP传输,ROS默认使用TCP/IP。基于TCP传输如TCPROS,是一个长连接;基于UDP的UDPROS是一种低延迟、高效的传输方式,但容易丢失数据,适合远程操作。
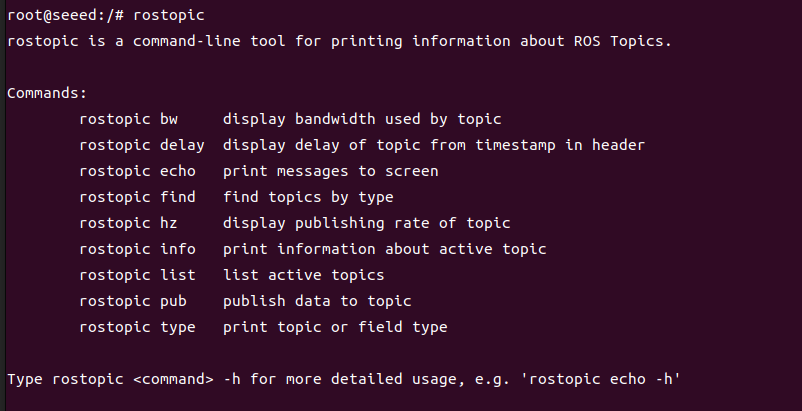
当我们在命令行中输入[rostopic],然后双击Tab键,我们就在命令行下方找到了这些关键字。
ROS 命令行工具rostopic:
服务
该服务还必须具有请求响应模型的唯一名称。当一个节点提供服务时,所有节点都可以使用ROS客户端开发的代码与其进行通信。
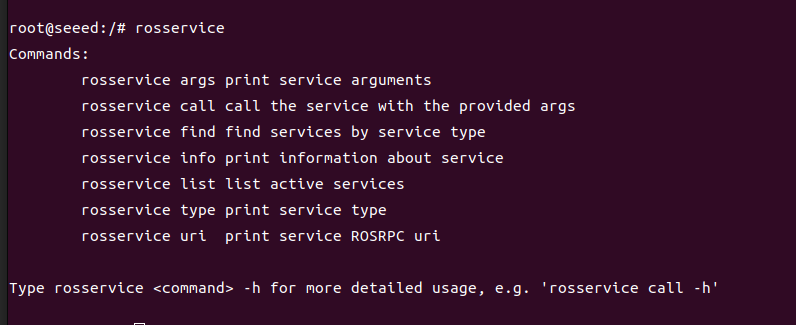
当我们在命令行中输入[rosservice],然后双击Tab键,我们就在命令行下方找到了这些关键字。
ROS命令行工具rosservice:
消息日志包
消息记录包是一种用于保存和回放ROS消息数据的文件格式,存储在.bag文件中。它是存储数据的重要机制。
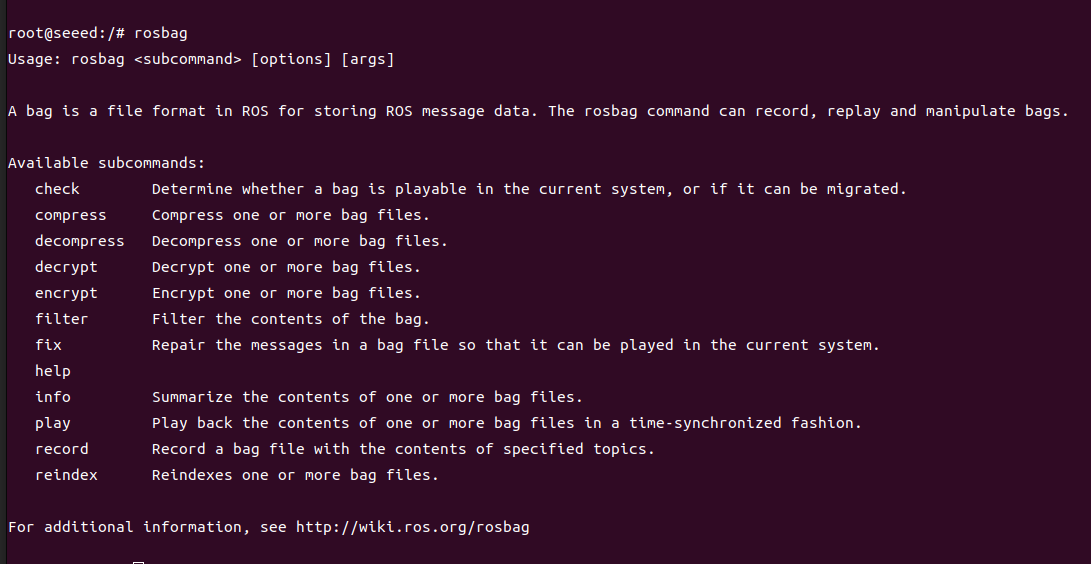
当我们在命令行中输入[rosbag]并双击Tab时,我们会在命令行下方找到这些关键字。
ROS命令行工具rosbag:
参数服务器
参数服务器是可在线访问的共享多变量字典,并通过关键字存储在节点管理器上。
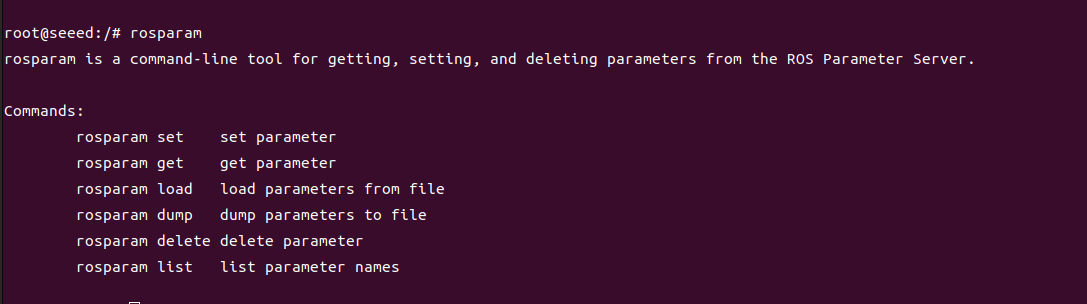
当我们在命令行中输入[rosparam]并双击Tab键时,我们会在命令行下方找到这些关键字。
ROS命令行工具rosparam:
节点管理器(主)
节点管理器用于主题、服务名称注册和查找等。整个ROS系统中如果没有节点管理器,节点之间将无法进行通信。
文件系统级别
可以配置包之间的依赖关系。如果包 A 依赖于包 B,则 B 在 ROS 构建系统中必须比 A 旧,并且 A 可以使用 B 中的头文件和库文件。
文档系统级别的概念如下:
功能包清单:
这个列表表明了包的依赖关系、源文档的文档等。包的package.xml文件是包的列表。
功能包:
软件包是ROS系统中软件组织的基本形式,包含运行节点、配置文件等。
ROS包相关命令
集成功能套件
可以形成多个封装的组合。
消息类型
在 ROS 节点之间发送消息需要事先提供信息注释。 ROS 中提供了标准类型消息,也可以进行定义。消息类型描述存储在包下的msg文件中。
服务类型
定义了ROS中每个进程提供的服务请求和响应的数据结构。
开源社区级别
发行版:ROS发行版是一系列集成包,可以通过版本号独立安装。 ROS 版本扮演着与 Linux 版本类似的角色。这使得 ROS 软件的安装变得更加容易,并可以通过软件池维护一致的版本。
存储库:ROS 依赖于共享的开源和软件存储库网站或主机服务,不同机构可以在其中发布和共享自己的机器人软件和程序。
ROSWiki:ROSWiki 是记录 ROS 系统信息的主要论坛。任何人都可以注册帐户、贡献自己的文件、提供更正或更新、准备课程和其他行为。
Bug Ticket 系统:如果您发现问题或想要提出新功能,ROS 会提供执行此操作的资源。
邮件列表(Mailing list):ROS用户邮件列表是ROS沟通的主要渠道,允许交流从ROS软件更新到ROS软件使用的问题或信息,论坛也是如此。
ROS 回答:用户可以使用此资源提出问题。
通信机制概述
主题
ros中广泛使用公共-订阅通信模式。 Topic 通常用于单向流式通信。主题通常具有强类型定义:一种类型的主题只能接受/发送特定数据类型的消息。发布者没有要求类型一致性,但是订阅者在接受时检查了md5的类型,然后就出错了。
服务
Service用于处理ros通信中的同步通信,使用语义服务器/客户端。每种服务类型都有两部分:请求和响应。对于serviceserver,roses不检查别名,只有最后注册的服务器才有效并连接到客户端。
行动
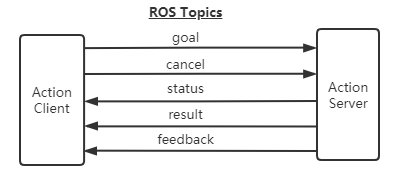
Action使用多个主题来定义任务,其中包括目标(Goal)、反馈(feedback)和结果(result)。 action的编译会自动产生七个结构体:Action、ActionGoal、ActionFeedback、ActionResult、Goal、Feedback和Result。
动作特点:
问答沟通机制
持续反馈
可能会在任务中被终止。
基于ROS的信息机制实现
操作界面:
目标:发布任务目标
取消:请求取消
状态:通知客户端当前状态
反馈:任务运行周期反馈的控制数据
结果:将作业结果发送给客户端,仅一次。
沟通模式比较
通用组件
启动启动文件; TF坐标转换;维兹;凉亭; QT工具箱; (a) 导航;动起来!
Launch:Launch 文件是在 ROS 中同时激活多个节点的一种方式。它还会自动激活ROS Master Node Manager,并启用每个节点的配置,这极大地方便了多个节点的操作。 TF-坐标转换:机器人的工作环境中往往有大量的组件,不同组件的位置和姿态涉及到机器人设计和机器人应用。 TF是一个允许用户随着时间的推移跟踪多个坐标的包,使用树形数据结构,缓冲时间并维护多个坐标之间的坐标对等关系,可以帮助开发人员随时更改坐标,在坐标、向量之间的完成点等。
QT Toolbox:为了方便可视化调试和展示,ROS提供了Qt架构的后台图形工具包——rqt common plugins,里面包含了很多实用的工具:日志输出工具(rqt console)、计算机可视化工具(rqt graph)、数据映射工具(rqtplot)、参数动态配置工具(rqt reconfigure)
Rviz:rviz是一款基于ROS软件框架的三维可视化工具,与各种机器人平台良好兼容。在rviz中,XML可以用来描述机器人、周围物体等的尺寸、质量、位置、材质、关节等,并呈现在界面中。同时rviz可以图形化方式实时显示机器人传感器信息、机器人运动状态、周围环境变化等。
Gazebo:Gazebo是一个强大的三维物理模拟平台,具有强大的物理引擎、高质量的图形渲染、方便的编程和图形界面,最重要的是免费开源。虽然Gazebo中的机器人模型与rviz中使用的机器人模型相同,但需要在模型中添加机器人和周围环境的物理属性,例如质量、摩擦系数、弹性系数等。通过插件添加模拟环境,机器人的传感器信息也可以以视觉形式呈现。
导航:导航是ROS 2D导航套件,简单来说,它根据信息流和机器人的整体位置(例如输入的里程表)计算出安全可靠的机器人速度控制命令。
电影:电影!功能套件是最常用的工具套件,主要用于轨迹规划。动起来!对于一些需要在规划中使用的文档配置助手是至关重要的。
所有 ROS 1 版本
参考链接:http://wiki.ros.org/Distributions
ROS版本(ROS Publication)是指ROS软件包,类似于Linux版本(例如Ubuntu)。 ROS版本的推出旨在让开发者能够使用相对稳定的代码存储库,直到他们准备好升级所有内容。因此,ROS 开发人员通常只会在每个版本推出后才修复该版本的 bug,同时提供少量的核心包改进。截至2019年10月,ROS主要发行版本名称、发布日期及其生命周期如下表所示:
参考连接
ROS官方维基:
ROS 官方指导:http://wiki.ros.org/ROS/Tutorials
ROS安装:https://wiki.ros.org/noetic/Installation/Ubuntu(如果ROS已经预装则跳过此步)
数字
7.2.1.2 准备工作区
工作区目录
ROS的文档结构,不是每个文件夹,都是强制性的,是根据业务需求设计的。
关于工作空间
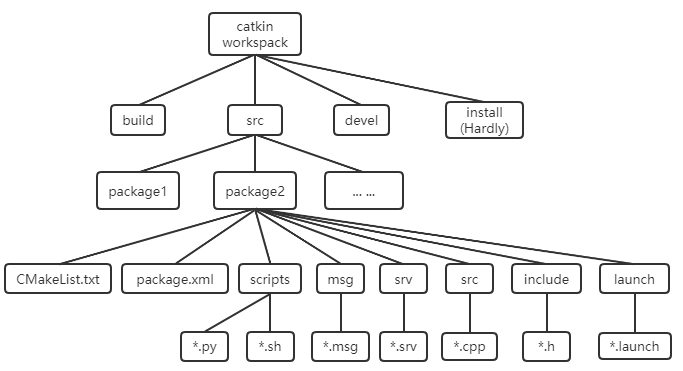
工作空间是ROS项目文档管理和组织的地方。可视化描述是一个包含ROS各种项目作品的仓库,方便系统的管理。是可视化图形界面中的文件夹。我们自己的ROS代码通常都在工作区中。主要有以下四个一级目录:
src:源空间; ROS Catkin包(源码包)
buld:编译空间; Catkin (CMake) 缓存信息和中间文件
空间开发;目标文件的输出(包括头文件、动态链接库、静态链接库、可实现文档等)、环境变量
安装:安装空间
顶层workspace(可以随意命名)和src(必须是src)文件夹需要自己创建;
bueld 和 devel 文件夹由 catkin make 命令自动创建;
安装文件夹是由 Catkin make install 命令自动创建的,该命令几乎不使用,并且通常不创建。
注意:使用catkin make之前,工作空间必须返回顶层。 (a) 同一工作空间下不允许存在包;不同工作空间中允许存在同名的包。
mkdir -p ~/catkin_ws/src  # create
cd catkin_ws/             # enter the workspace
catkin_make               # build
source devel/setup.bash   # source the workspace environment
套餐
包是特定的文件结构和文件夹组合。实现相同功能的程序代码通常放在一个包中。只有CMakeLists.txt和package.xml是[必需的],其余路径取决于是否需要包。
创建功能包
cd ~/catkin_ws/src
catkin_create_pkg my_pkg rospy rosmsg roscpp
【rospy】、【rosmsg】、【roscpp】是依赖库,可以根据业务需要添加,也可以添加其他,创建时无需重新配置,忘记了添加需要配置。
文件结构
|-- CMakeLists.txt  # (required) build rules for the current package.
|—— package.xml     # (required) package metadata and ROS dependencies.
|—— include directory    # stores C++ header files
|—— config directory     # stores parameter files
|—— launch directory     # stores launch files (.launch or .xml)
|—— meshes directory     # stores robot or simulation 3D models (.sda, .stl, .dae, etc.)
|—— urdf directory       # stores robot model descriptions (.urdf or .xacro)
|—— rviz directory       # rviz files
|—— src directory        # C++ source code
|—— scripts directory    # executable scripts, such as shell scripts (.sh) and Python scripts (.py)
|—— srv directory        # custom services
|—— msg directory        # custom topics
|—— action directory     # custom actions
CMakeLists.txt 简介
一般
CMakeLists.txt 最初是 CMake Build System 的基于规则的文档,而 Catkin Builds 很大程度上遵循了 Builds 的 CMake 风格,但在 ROS 项目中添加了一些宏定义。所以在写法上,Catkin的CMakeLists.txt和CMake基本是一样的。
这个文档直接定义了包依赖的流程、编译哪些目标、如何编译等。所以CMakeLists.txt非常重要,因为它规定了从源代码到目标文件的规则,而catkin构建时首先找到每个包下的CMakeLists.txt,然后根据规则进行编译和构建。
格式
CMakeLists.txt的基本语法与CMake相同,其中Catkin添加了少量宏,整体结构如下:
典型的柳絮 CMakeLists.txt 包括以下部分:
cmake_minimum_required(VERSION 3.0.2)
project(package_name)
find_package(catkin REQUIRED COMPONENTS roscpp rospy std_msgs)
catkin_package()
include_directories(${catkin_INCLUDE_DIRS})
add_executable(node_name src/node_name.cpp)
target_link_libraries(node_name ${catkin_LIBRARIES})
定义自定义消息、服务或操作的包也使用 add_message_files()、add_service_files()、add_action_files() 和 generate_messages()。
增强已启用
如果你使用C++和Boost,你需要在Boost上调用Find package()并指定Boost的哪些方面被用作组件。例如,如果您想使用 Boost 线程,您会说:
查找包
柳絮包()
Catkin package()是catkin提供的一个CMake宏。这是为系统构建分配catkin特定信息所必需的,这些信息用于生成pkg-config和CMake文件。
必须在使用 addlibrary() 或 addexecutable() 声明任何对象之前调用此函数。该函数有五个可选参数:
INCLUDE DIRS - 导出包含路径
LIBRARIES - 从项目导出的库
CATKIN DEPENDS - 该项目所基于的其他catkin项目
DEPENDS - 项目所依赖的非catkin CMake 项目。为了更好地理解,请看这个解释。
CFG EXTRAS - 其他配置选项
完整的宏文档可以在这里找到。
例如:
catkin_package(
   INCLUDE_DIRS include
   LIBRARIES ${PROJECT_NAME}
   CATKIN_DEPENDS roscpp nodelet
   DEPENDS eigen opencv)
这表明包文件夹中的“include”文件夹是导出头文件的位置。 CMake 环境变量 ${PROJECT NAME} 评估之前传递给 project() 函数的任何内容,在这种情况下它将是“机器人大脑”。 “roscpp”+“nodelet”是构建/运行该包需要存在的软件包,“eigen”+“opencv”是构建/运行该包需要存在的系统相关条目。
包括路径和库
在指定目标之前,您需要指定可以为所述目标找到资源的位置,特别是头文件和库:
包含路径 - 可以找到头文件(最常见的是 C / C ++)的位置
库路径 - 哪些库位于活动目标中?
包括董事
链接董事
包括董事()
包含目录的参数应该是图形包调用以及需要包含的任何其他目录。如果你使用catkin和Boost,你的includedirectors()应该如下:
包括董事
第一个参数“include”表示包中的include/目录也是路径的一部分。
链接董事()
示例:
链接董事 (~)
CMake linkdirectors() 函数可用于添加其他库路径,但不建议这样做。所有catkin和CMake包在找到打包时都会自动将链接信息添加到taget target_link_libraries()中的库中。
有关在链接目录() 中使用目标target_link_libraries() 的详细示例,请参阅cmake 的阵容。
可执行的目标
要指定必须构建的可执行文件,我们必须使用 addexecutable()CMake 函数。
edd executeable这将构建一个名为 MyProgram 的目标可执行文件,它由三个源文件构建:src /main.cpp、src / some file.cpp 和 src /other file.cpp。
库目标
当包需要构建可重用库目标时,请使用 add_library()。许多简单的教程包只需要可执行文件。
add_library(${PROJECT_NAME} src/library_file.cpp)目标链接库
在 add_executable() 或 add_library() 之后使用 target_link_libraries() 将目标链接到 catkin 和其他所需的库。
target_link_libraries(node_name ${catkin_LIBRARIES})例子:
(foo src/foo.cpp)
Add library (moo src/moo.cpp)
This links fly against libmoo.so
请注意,在大多数情况下,不需要使用链接目录(),因为信息是通过 find package()自动引入的。
信息、服务和行动
在构建和使用 ROS 包之前,消息 (.msg)、服务 (.srv) 和操作 (.action) 文件需要特殊的预处理器构建器。这些宏的关键要素是生成特定于编程语言的文档,以便他们可以以自己选择的编程语言使用信息、服务和操作。构建系统将使用所有可用的生成器(例如 gencpp、genpy、genlisp 等)进行绑定。
提供了三个宏来分别处理消息、服务和操作:
add_message_files()
add_service_files()
add_action_files()
这些宏后面必须跟有结果宏:
generate_messages()
如果您从未接触过 CMake 的语法,请阅读 CMake 实践:https://github.com/Akagi201/learning-cmake/blob/master/docs/cmake-practice.pdf。掌握CMake对于理解ROS项目非常有帮助。
Package.xml简介
概述
包列表是名为 Package.xml 的 XML 文件中的根文件夹,该文件必须包含任何兼容性包。 Package.xml也是catkin的package的必需包,是对package的描述,在早期的ROS版本(Rosbuild构建系统)中称为“manfect.xml”,用于描述pacakge的基本信息。如果您在互联网上看到一些包含 best.xml 的 ROS 项目,那么它可能是在 Hydro 版本之前。 pacakge.xml包含包的名称、版本号、内容描述、维护人员、软件许可证、编译构建工具、构建依赖、运行依赖等信息。
Package.xml 文件必须包含消息生成,run dependent 必须包含消息运行时。
格式
典型的 package.xml 包含包元数据和依赖项声明:
<package format="2">
  <name>package_name</name>
  <version>0.0.0</version>
  <description>Package description</description>
  <maintainer email="user@example.com">Maintainer Name</maintainer>
  <license>BSD</license>
  <buildtool_depend>catkin</buildtool_depend>
  <depend>roscpp</depend>
  <depend>rospy</depend>
  <depend>std_msgs</depend>
</package>
依赖关系
具有最少标签的包列表未指定对其他包的任何依赖关系。该包有六个依赖项:
构建依赖项
构建依赖项
执行依赖
测试依赖项
构建工具依赖项
文档工具依赖
附加标签
- 包的作者
例如:
“网站”
种子。
准备官方示例的工作区
请注意,ROS 1 操作需要在现有的 docker 容器中进行。
进入docker容器后,下载官方ROS示例(如果有):
git clone https://github.com/ros/ros_tutorials.git -b noetic-devel这是基于C++的ROS 1的案例:
cd ros_tutorials/
mkdir  src
cp roscpp_tutorials/ src/ -r
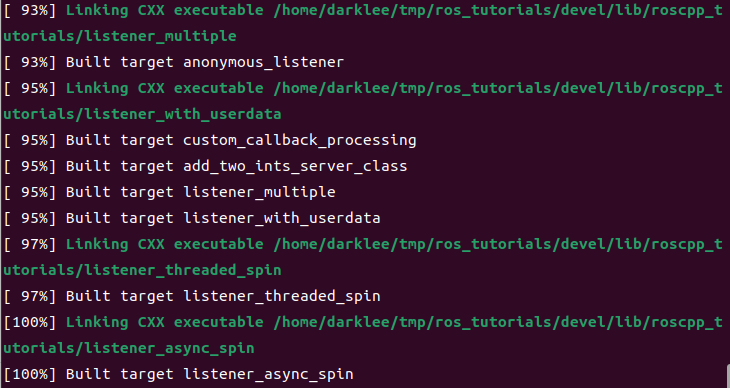
catkin_make # start building
编译完成如下:
编译完成后,需要初始化工作空间才能后续工作:
source devel/setup.bash数字
7.2.1.3 常用命令和工具
开始节点方法
启动文档
使用 roslanch 命令启动 lanch 文件至少有两种方法:
1)从ros包路径开始
格式如下:
roslaunch package_name launch_file_name
roslaunch pkg_name launchfile_name.launch
2.启动文件的绝对路径
格式如下:
roslaunch path_to_launchfile无论哪种方式启动lanch文件,都可以在后面添加参数,这是比较常见的。
--screen:使调试rose Node(如果有)的信息更容易输出到屏幕上,而不是保存在日志文件中
arg: =value: 如果lanch文件中给出了要给定的变量,则可以这样给出值,例如:
roslaunch pkg_name launchfile_name model:=urdf/myfile.urdf # the launch file has a `model` argument that must be set或者
roslaunch pkg_name launchfile_name model:='$(find urdf_pkg)/urdf/myfile.urdf' # use `find` to provide the path运行roslaunch命令首先检测系统的rosmaster是否正在运行,如果启动则使用现有的rosmaster;如果没有启动,可以先启动rosemaster,然后运行launch文件中的设置,就可以按照我们预先的配置来启动多个节点了。
需要注意的是,launch文件不需要编译,可以直接运行,如上所述。
玫瑰跑
节点管理器(master)必须被激活,master用于管理系统中的许多进程,每个节点启动时都会注册并管理节点与节点之间的通信。 master启动后,会通过master来注册每一个node节点。在Ubuntu终端中输入命令:
roscore节点启动,roserun+packname+nodename; rosrun 方法一次仅运行一个节点。
rosrun [--prefix cmd] [--debug] pkg_name node_name [ARGS]Rosrun 将寻找名为 Package 的可执行程序,该程序将引入可选的 ArGS。
###Python
如果是Python的代码,可以直接在py文件所在目录下启动,注意Python2和python3的区别。
###开始一只小乌龟
roscore    # start roscore in the first terminal
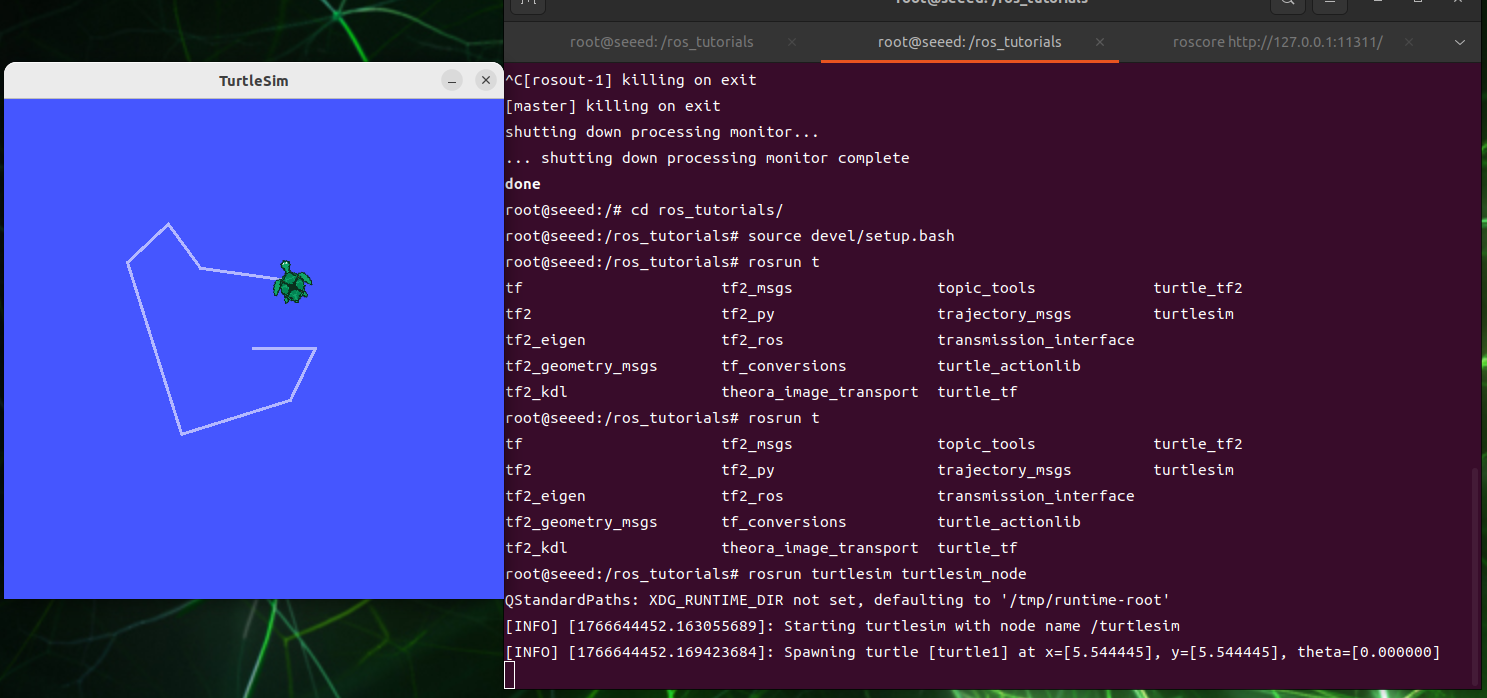
rosrun turtlesim turtlesim_node     # start the turtlesim node in the second terminal
rosrun turtlesim turtle_teleop_key  # start keyboard teleoperation in the third terminal
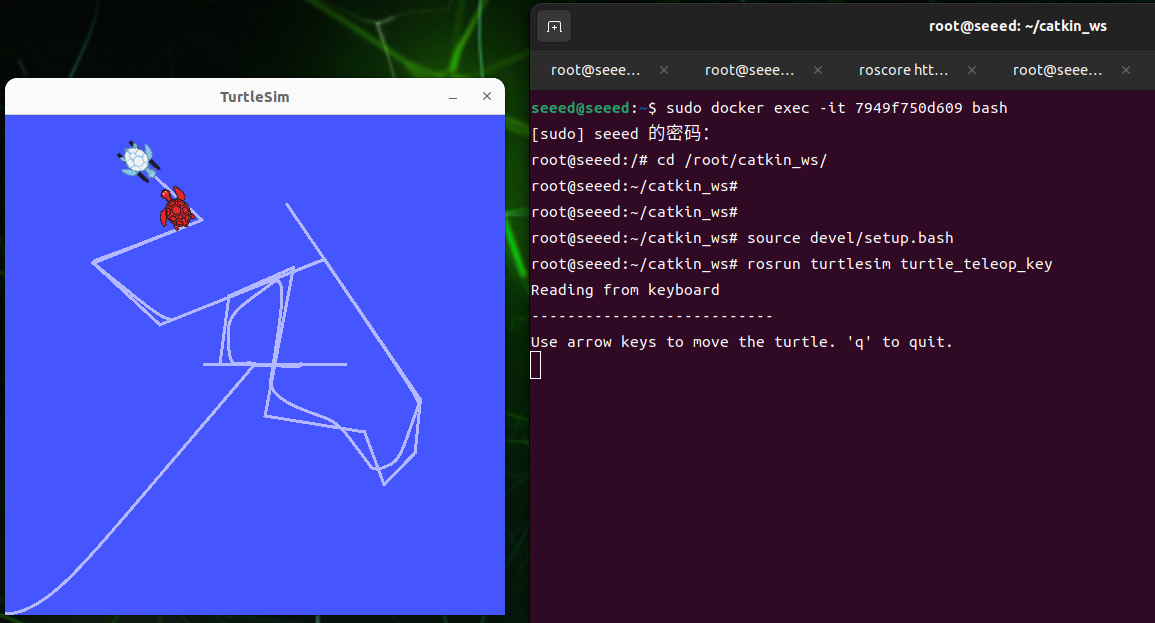
启动完成后,可以通过键盘输入操控小乌龟的移动,光标必须在【rosrunturtlesimturtleteleopkey】的命令下通过点击键盘【上】、【下】、【左】、【右】来控制小乌龟的移动。
rosrunturtlesimturtlesim节点终端会打印一些小海龟日志。
[ INFO] [1607648666.226328691]: Starting turtlesim with node name /turtlesim
[ INFO] [1607648666.229275030]: Spawning turtle [turtle1] at x=[5.544445], y=[5.544445], theta=[0.000000]
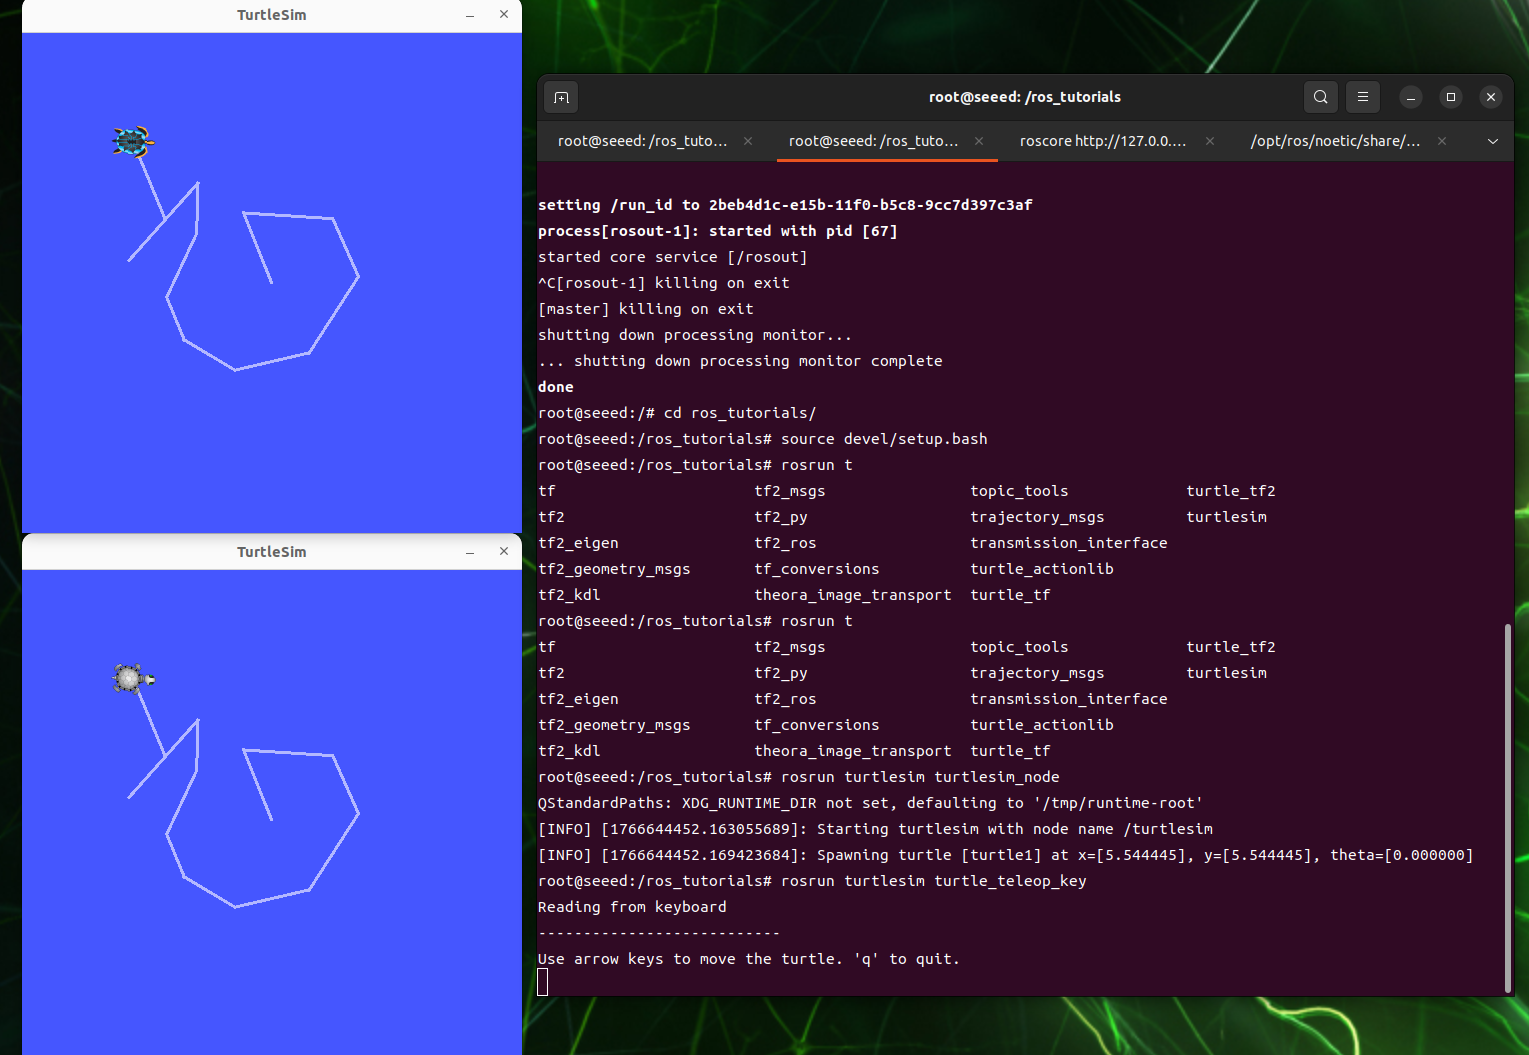
第二只海龟发射
在第一个终端中,通过启动文件启动节点:
roslaunch turtle_tf turtle_tf_demo.launch保持先前的键盘控制节点处于活动状态
此时,按下键盘【上】、【下】、【左】、【右】带动小乌龟运动;在另一次移动后可以观察到一只小乌龟。
启动文档
一般
ROS中的节点程序通常只执行单一功能,但完整的ROS机器人通常会同时运行许多节点程序,相互协作执行复杂的任务,这就需要在机器人激活时启动很多节点程序,如果一个节点一个节点启动就比较麻烦。 launch文件和roslaunch命令可以一次激活多个节点,方便“一键”设置丰富的参数。
文档格式
launch文件本质上是一个xml文件,可以在某些编辑器中高亮显示、可读、添加到头部或者不添加
什么? “0”? >
与其他xml格式的文件类似,launch文件都是由标签(tag)编写的,主要标签如下:
代码文件:7-2-1-3-common-commands-and-tools-example-01.xml
<launch>                <!-- root tag -->
<node>                  <!-- node and parameters to start -->
<include>               <!-- include another launch file -->
<machine>               <!-- target machine -->
<env-loader>            <!-- set environment variables -->
<param>                 <!-- define a parameter on the parameter server -->
<rosparam>              <!-- load YAML parameters into the parameter server -->
<arg>                   <!-- define an argument -->
<remap>                 <!-- set topic remapping -->
<group>                 <!-- set a group -->
</launch>               <!-- root tag -->
1.标签【节点】
标签[node]是launch文件的核心部分。
代码文件:7-2-1-3-common-commands-and-tools-example-02.xml
<launch>
    <node pkg="package_name" type="executable_file" name="node_name"/>
    <node pkg="another_package" type="another_executable" name="another_node"></node>...
</launch>
其中
pkg 是节点的包名
type 是包中的可执行文档,如果是 Python 编写的,可以是 .py;如果是 C++ 编写的,则可以是源文件编译后可执行文档的名称。
名称是节点启动后的名称,每个节点都有自己唯一的名称。
注意:roslaunch不能保证节点的启动顺序,因此launch文件中的所有节点都应该与启动顺序一样。
还可以设置更多参数,如下:
代码文件:7-2-1-3-common-commands-and-tools-example-03.xml
<launch>
    <node
        pkg=""
        type=""
        name=""
        respawn="true"
        required="true"
        launch-prefix="xterm -e"
        output="screen"
        ns="namespace"
    />
</launch>
按照上述顺序,
respawn:如果这个节点关闭了,是否会自动重启?
required:如果该节点关闭,其他所有节点是否都关闭
launch-prefix:是否打开新窗口执行。例如,当需要通过窗口控制机器人运动时,需要打开一个新的窗口用于节点的控制;或者当节点有一些信息输出不想与其他节点信息混合时。
输出:默认情况下,launch启动以下日志文件中的节点信息,可以通过此处设置参数将其显示在屏幕上
ns:将节点集成到不同的命名空间中,i。 e.在节点名称前添加 ns 前缀。为了实现这种类型的操作,节点名称和主题名称在节点源文件中使用相对名称定义,即。 e.没有符号/。
计算源名称分为:
-
基本名称,例如主题
-
全局名称,例如:/A/topic
-
亲属名称,例如A/主题
-
私人名称,例如〜主题
在发布或预订时有这行代码。
 ros::init(argc, argv, "publish_node");
 ros::NodeHandle nh;
 ros::Publisher pub = nh.advertise<std_msgs::string>("topic",1000);
2.标签[重映射]
通常作为节点标签的子标签出现来修改主题。在很多rosnode文件中,可能没有指定接收或发送主题,而只是用输入主题和输出主题来代替,从而在特定场景中使用抽象主题名称来代替主题名称。
简而言之,remap的作用就是方便将同一个节点文件应用到不同的环境,从外部使用remap topic,而不需要改变源文件。
remap的常见使用格式如下:
代码文件:7-2-1-3-common-commands-and-tools-example-04.xml
<node pkg="some" type="some" name="some">
    <remap from="origin" to="new" />
</node>- 包括
该标签用于在这个launch文件中添加另一个launch文件,类似于launch文件嵌套。基本格式:
“启动文件路径”
顶层文件路径可以给定具体路径,但一般为了程序可移植性,最好用find命令给出文件路径:
<include file=$(find package-name)"/>
对于上面的命令,$(find package-name)的值等于对应包在本机的路径。这样即使其他master被同一个包替换,也能找到相应的路径。
有时,launch引入的另一个nonde可能需要一个统一的名称或具有相似特征的节点名称,例如/my/gps、/my/lidar、/my/imu,或者节点具有统一的前缀,以便于搜索。这可以通过使用以下命令设置 ns(命名空间)属性来实现:
<include file=$(find package-name) "ns= "my"/>
- 标签
[arg] 可以重复参数,并且可以在多个位置轻松修改。三种常用方法:
<arg name= "foo": 一个语句 [arg] 但不是一个值。稍后,您可以通过命令行或 [include] 标签来赋值。
<arg name=“foo”default=“1”:默认值。:固定值。
通过命令行授予值
roslaunch包名 文件名.launch arg1:=value1 arg2:=value2
- 变量替换
启动文件中常用的有两种变体替换
$(find pkg):例如,$(find rospy)/manifest.xml。如果可能,强烈建议基于包的路径。
$(arg arg_name): set a default value; use it when no override is provided
例如:
代码文件:7-2-1-3-common-commands-and-tools-manifest.xml
<arg name="gui" default="true" />
<!-- set a default value; use it when no override is provided -->
<param name="use_gui" value="$(arg gui)"/>
另一个例子:
<node pkg="package_name" type="executable_file" name="node_name" args="$(arg a) $(arg b)" />设置完这个值后就可以在roslaunch启动时给args参数了
roslaunch package_name file_name.launch a:=1 b:=5- 标签
与[arg]不同,[param]是共享的,它的值不限于value,可以是一个文件,甚至是一行命令。
格式
代码文件:7-2-1-3-common-commands-and-tools-example-06.xml
<param name="param_name" type="type1" value="val"/>                         # type can be omitted; ROS infers it
<param name="param_name" textfile="$(find pkg)/path/file"/>                 # read file content as a string
<param name="param_name" command="$(find pkg)/exe '$(find pkg)/arg.txt'"/>
Example:
<param name="param" type="yaml" command="cat '$(find pkg)/*.yaml'"/>        # store command output in the parameter
[param]可以在全局上下文中,其名称为原始名称,也可以在较小的范围内,如Node,其总体名称为node/param。
例如,在全局上下文中,定义如下:
<param name="publish_frequency" type="double" value="10.0" />在节点范围内定义如下
代码文件:7-2-1-3-common-commands-and-tools-example-07.xml
 <node name="node1" pkg="pkg1" type="exe1">
    <param name="param1" value="False"/>
 </node>
如果列出服务商的[param]与rosepam列表,是
/publish_frequency
/node1/param1   # namespace prefix is added automatically
注意:虽然命名空间被添加到名称[param]中,但它仍然是全局的。
[罗斯帕拉]
[Param]只能对单个[Param]进行操作,并且只能以三种形式:value、textfile、common,返回单个[Param]内容。 [Rosparam] 允许批量操作并包括参数设置命令,例如。 g。转储、删除等
load:从 YamL 文件中加载一批参数,格式如下:
<rosparam command="load" file="$(find rosparam)/example.yaml" />删除:删除一些参数
<rosparam command="delete" param="my_param" />[param] 类似授予操作
<rosparam param="my_param">[1,2,3,4]</rosparam>或者...
代码文件:7-2-1-3-common-commands-and-tools-example-08.xml
<rosparam>
a: 1
b: 2
</rosparam>
[Rosparam]也可以放在[node]中,此时节点命名空间。
- 团体
如果你希望多个节点有相同的设置,例如在同一个命名空间中,重新映射同一个主题,你可以使用[group]。所有常用标签都可以在[group]中使用,例如
代码文件:7-2-1-3-common-commands-and-tools-example-09.xml
<group ns="rosbot">
    <remap from="chatter" to="talker"/>       # applies to following nodes in this group
    <node... />
    <node... >
        <remap from="chatter" to="talker1"/>  # each node can override the remap
    </node>
</group>
TF坐标转换
tf 是一个允许用户随时跟踪多个坐标的包。 tf 维护了实时缓冲区结构中坐标之间的关系,并允许用户在任意两帧之间的任意时间点转换点、向量等。
Tf 包是将一个坐标系中一个点的坐标转换为另一个坐标系中的坐标的包。传感器可以看到坐标系,机器可以看到坐标系,障碍物可以看到一个点。
激活两只小乌龟后,执行以下操作。
tf常用工具
1.查看框架工具
它能够监听当前时间通过ROS广播的所有tf坐标,并绘制树图来指示坐标之间的连接,生成一个名为frame.pdf的文件并将其保存到当前本地位置。
rosrun tf view_frames2.rqt tf树工具
尽管视图框架可以将当前的坐标关系保存在离线文件中,但它无法实时反映坐标关系,因此可以使用rqt tf tree实时更新坐标关系
rosrun rqt_tf_tree rqt_tf_tree3.tf回显工具
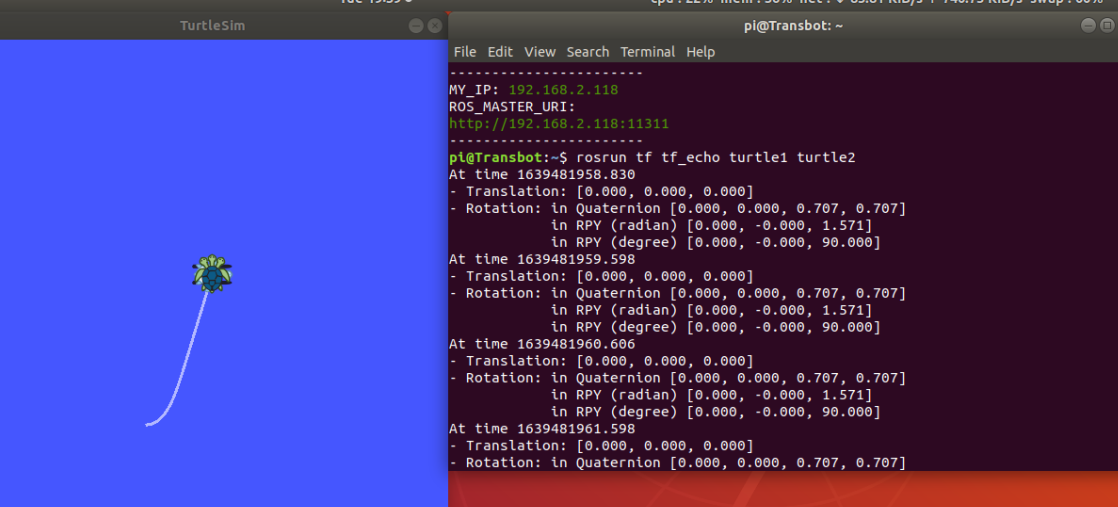
使用tf echo工具,您可以看到两个无线电参考系统之间的关系。
rosrun tf tf_echo <source_frame> <target_frame>打印从源帧到目标帧的旋转变换;例如:
rosrun tf tf_echo turtle1 turtle2- 静态转换发布者
释放两个坐标之间的静态坐标,不改变相对位置。命令格式:
static_transform_publisher x y z yaw pitch roll frame_id child_frame_id period_in_ms
static_transform_publisher x y z qx qy qz qw frame_id child_frame_id period_in_ms
在启动时使用:
代码文件:7-2-1-3-common-commands-and-tools-example-10.xml
<launch>
<node pkg="tf" type="static_transform_publisher" name="link1_broadcaster" args="1 0 0 0 0 0 1 link1_parent link1 100" />
</launch>
5.roswtf插件
一个用于分析当前 tf 配置并尝试识别常见问题的插件。
roswtf通用坐标系
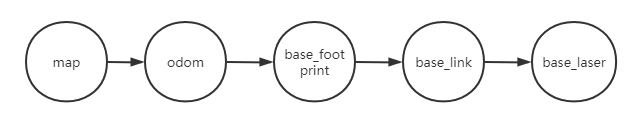
通常的坐标是框架ID,带有地图、奥多姆、基础链接、基础足迹、基础激光等。
世界坐标(地图)
地图坐标是世界的固定坐标系,Z 轴指向上方。移动平台相对于地图系统的姿态不应随时间发生显着变化。地图坐标不是连续的,这意味着地图系统中移动平台的姿态可以随时分离。典型设置,定位模块基于传感器监测,不断重新计算机器人在世界坐标中的位置,从而消除偏差,但当新的传感器信息到来时可能会发生跳跃。地图坐标作为长期全球参考很有用,但跳跃使它们成为本地传感器和传感器的不良参考。
奥多姆
Odom是一个全局坐标系,通过里程计记录机器人当前的运动姿态。移动平台在奥多姆坐标中的位置可以无边界地自由移动,这使得奥多姆坐标无法作为长期的全局参考。这是为了区分基于编码器(或视觉等)计算的坐标和里程的概念。但也有一个关系,odom主题变换矩阵就是odom->base链接的tf关系。奥多姆和地图坐标在机器人运动开始时重合。但随着时间的推移,不会出现重叠,偏差就是里程表的累计误差。 amcl等一些协校正包中给出了位置估计(定位),可以通过Map->base链接的tf得到,因此位置与里程位置的差值就是odom与Map坐标的差值。如果您的 odom 计算没有错误,则 map-odom tf 为零。奥多姆坐标系作为短期局部参考很有用,但偏差使其无法作为长期参考。
基础坐标(基础链接)
机器人家庭系统(矩阵)坐标与机器人中心重叠,机器人中心通常是机器人旋转的中心。
基础足迹:原点是基础链接原点在地面上的投影,有一些差异(z 值)。
坐标关系
在机器人系统中,我们使用一棵树来连接所有坐标,因此每个坐标都有一个父系且随机的子坐标,如下所示:Map->odom->base link-world-coordinate 是 odom-坐标的父亲,odom-coefficient 是基本链接的父亲。虽然直观上,Map 和 odom 应该连接到基本链接,但这是不允许的,因为每个系统中只能找到一个父级。
坐标系权限
从奥多姆到基本链接的转换由里程计源计算并发布。然而,定位器模块不会发布地图到基本链接的传输(转换)。相反,定位器模块接收 odom 到基本链接的变换,并使用此信息将地图发布到 odom 的变换。
rqt(QT工具)
打开命令行窗口,输入rosrun rqt,双击Tab键,即可查看ROS中QT工具包含的内容,如下图:
那么我们就以小乌龟为例,简单介绍一下用到的一些QT工具:
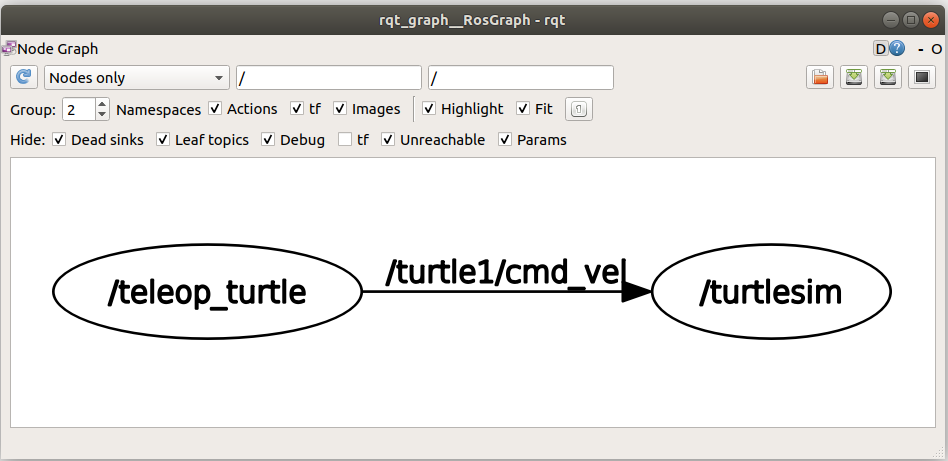
1.rqt图形计算器可视化
打开命令行窗口,输入以下命令,弹出对话窗口。
Rosrun rqt gram rqt gram
从图像中可以清楚地看出,/teleop_turtle 节点通过 /turtle1/cmd_vel 主题传输到 /turtlesim 节点。
/teleop_turtle 是具有 Publisher 功能的节点。
/turtlesim 是具有订阅者功能的节点。
这篇文章是我们赞比亚特别报道的一部分。
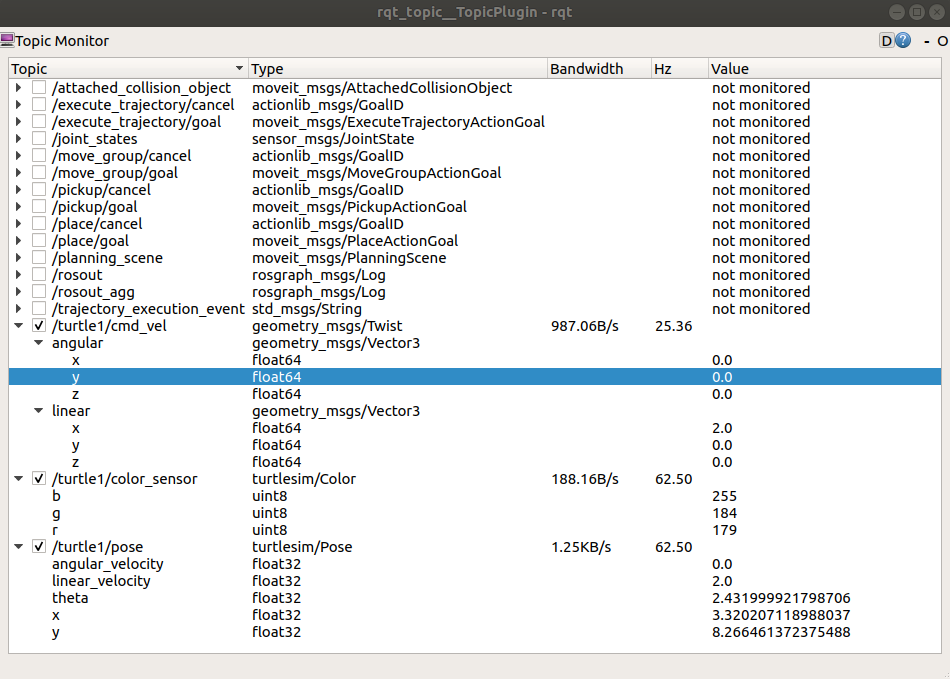
2.rqt主题查看主题
rosrun rqt 主题 rqt 主题
通过这个工具,我们可以清晰地看到小乌龟的一些变化的实时信息。
3.rqt发布者
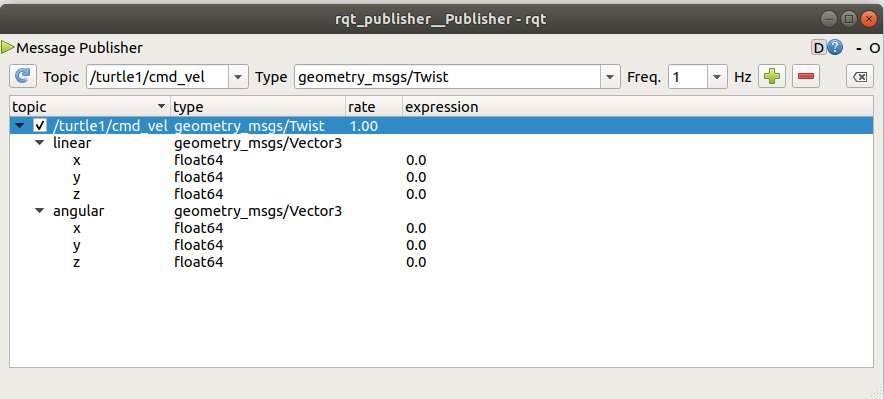
rqt 发布者提供了一个 GUI 插件来发布具有固定或计算字段值的任何消息。打开命令行窗口,输入以下命令,弹出对话窗口。
rosrun rqt_publisher rqt_publisher点击Topic右侧的选择框,找到我们需要的/turtle1/cmd_vel主题,点击右侧添加数字,如下:
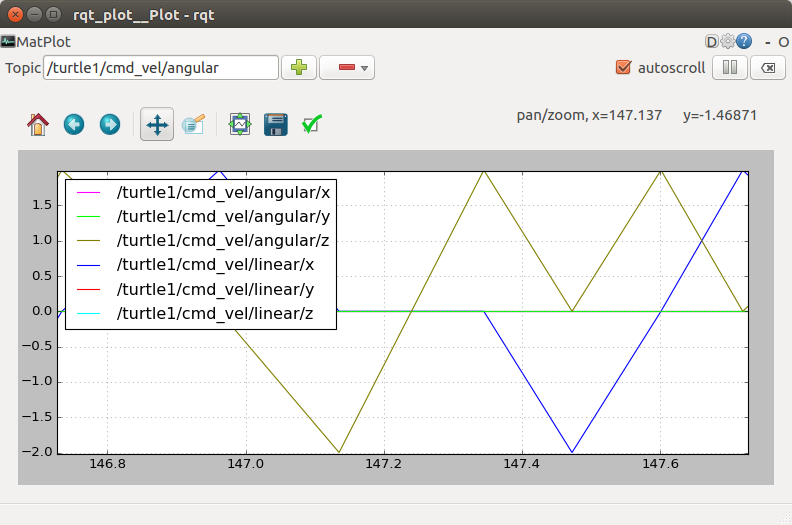
4.rqt绘图数据映射
参考说明如下:
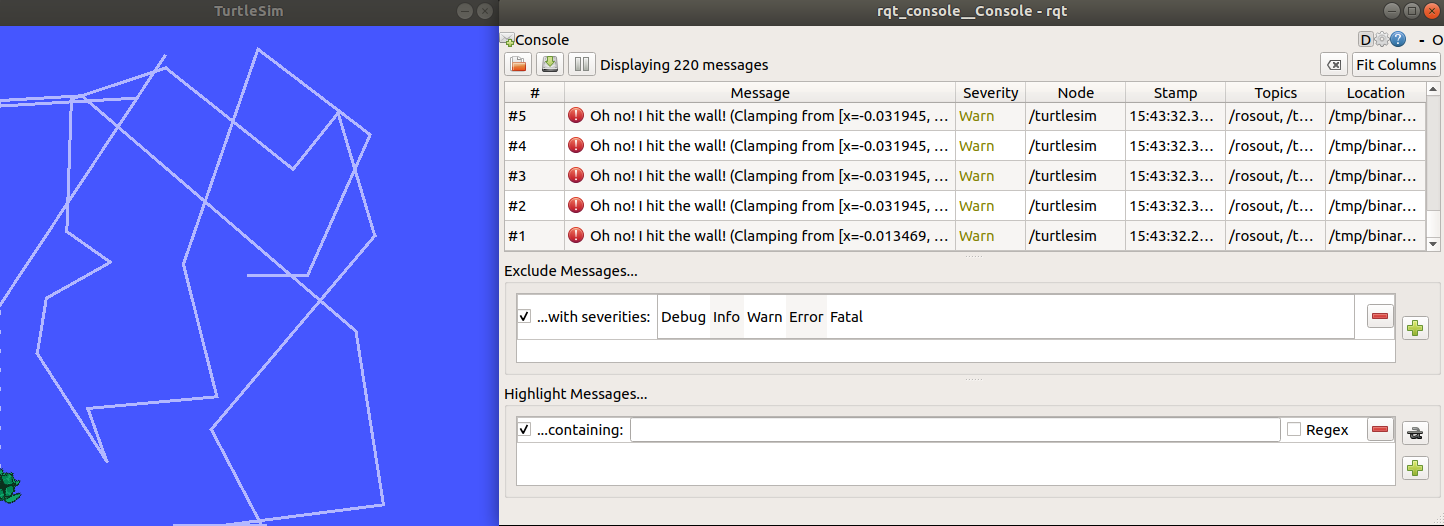
rosrun rqt_plot rqt_plot6.rqt控制台日志输出
RS Log(日志)系统的功能是生成日志消息,这些日志消息显示在屏幕上、发送到特定主题或存储在特定日志文件中,以方便调试、记录、报警等。
ROS中的日志消息根据严重程度可以分为5个级别:DEBUG、INFO、WARD、ERRO、FATL。只要程序能运行,就无需关注,但ERRO和FATAL的出现则说明程序存在严重问题,无法运行。
rosrun rqt_console rqt_console日志输出工具是ROS Loging框架的一部分,它显示节点的输出信息,我们可以在地图上看到乌龟撞到了墙。
常用API
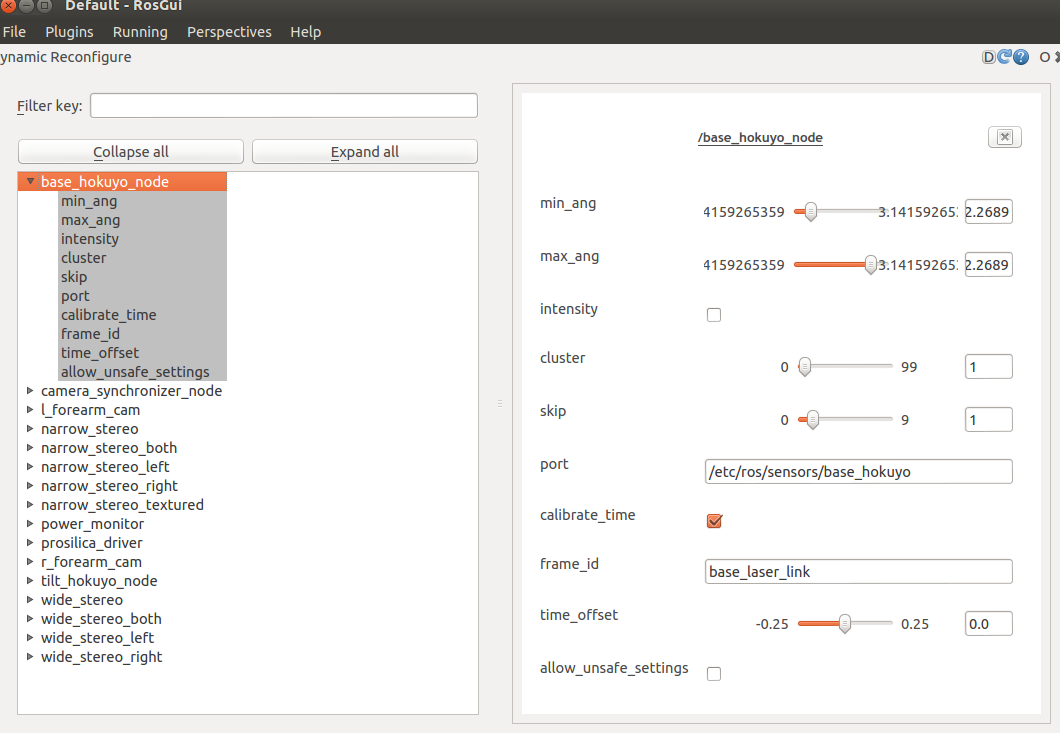
- rqt reconfigure动态参数配置
参考说明如下:
rosrun rqt_reconfigure rqt_reconfigure图片来源ROS wiki:
Rviz
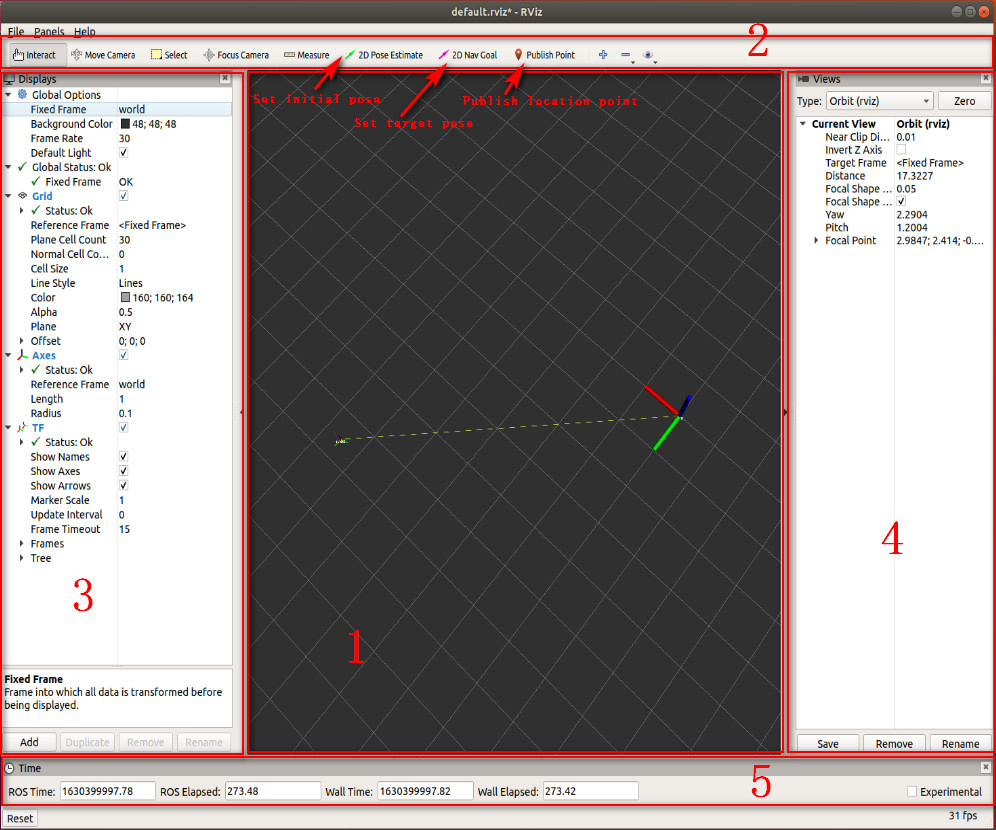
rviz是一个图形化工具,可以方便地以图形方式执行ros程序。使用起来也更简单。
[设置初始帖子]、[设置目标帖子]
rviz接口主要包括:
1:用于视觉显示数据的3D视图区域,目前尚不可用,因此为黑色。
2:工具栏,提供视角控制、目标设置、分布位置等工具。
3:显示项目列表,显示当前选择的显示插件,可以配置各个插件的属性。
4:视角设置,可进行多种观察。
5:时间显示区,显示当前系统时间和ROS时间。
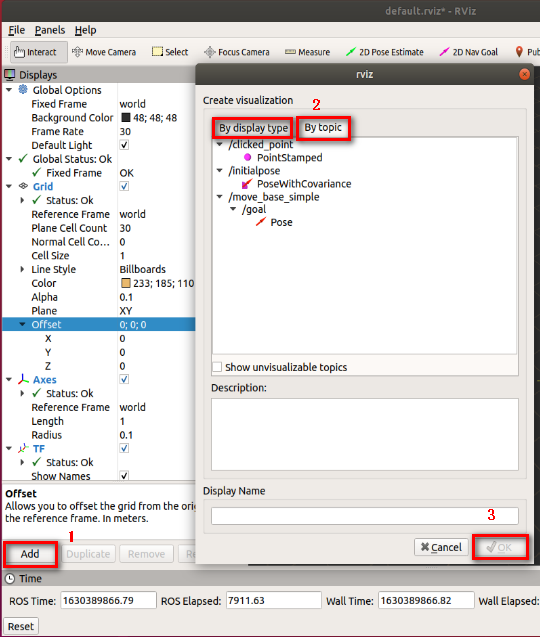
添加显示
步骤1:点击【添加】按钮。将会弹出一个框。
第二步:按显示类型添加【按显示类型】,虽然坐标只有修改相应的主题才能显示;您也可以通过选择主题[by topic]直接添加,这样就可以正确显示。
第三步:点击【确定】。
常用ROS命令
数字

7.2.1.4 发布者
出版商
根据定义,发布者充当发布者。这条消息可以由下位机发送给本机的传感器信息,然后打包发送给该主题的订阅者;还可以计算飞机上的数据,并将其打包发送给订阅该主题的订阅者。
创建工作区和主题工具包
创建工作区
mkdir -p ~/catkin_ws/src
cd ~/catkin_ws/src
catkin_init_workspace
编译工作区
cd ~/catkin_ws/
catkin_make
更新环境变量
source devel/setup.bash###检查环境变量
echo $ROS_PACKAGE_PATH创建包
cd ~/catkin_ws/src
catkin_create_pkg learning_topic std_msgs rospy roscpp geometry_msgs turtlesim
解释说明:学习主题是功能套件的名称
构建包
cd ~/catkin_ws
catkin_make
source ~/catkin_ws/devel/setup.bash
创建发布者
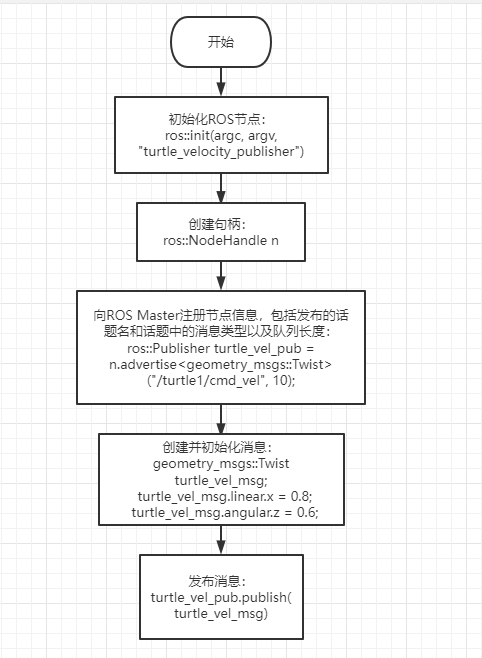
创建步骤
ROS节点的初始化
- 创建句柄
3)向ROS Master注册节点信息,包括发布信息的名称和类型以及队列的长度
- 创建并初始化消息数据
五、按一定频率回收消息
C++ 实现
1)在包的src文件夹下创建一个C++文件(文件后缀为.cpp),名为turtledevelopmentpublisher.cpp (vim 基础使用回忆:14 次使用 Vim 编辑器)
touch turtle_velocity_publisher.cpp # create the file
vim turtle_velocity_publisher.cpp # edit the file
2)将下面的程序代码复制到turtledevelopmentpublisher.cpp文件中
代码文件:7-2-1-4-publisher-turtle_velocity_publisher.cpp
/*Create a turtlesim velocity publisher.*/
#include <ros/ros.h>
#include <geometry_msgs/Twist.h>
int main(int argc, char **argv){

    ros::init(argc, argv, "turtle_velocity_publisher");//Initialize the ROS node.

    ros::NodeHandle n;//Create a node handle.

    //Create a publisher for /turtle1/cmd_vel with geometry_msgs::Twist messages and queue size 10.
    ros::Publisher turtle_vel_pub = n.advertise<geometry_msgs::Twist>("/turtle1/cmd_vel", 10);

    ros::Rate loop_rate(10);//Set the loop rate.

    while (ros::ok()){
            //Initialize a message with the same type as the publisher.
        geometry_msgs::Twist turtle_vel_msg;
        turtle_vel_msg.linear.x = 0.8;
        turtle_vel_msg.angular.z = 0.6;

        turtle_vel_pub.publish(turtle_vel_msg);// Publish the velocity message.

        //Print the published velocity.
        ROS_INFO("Publsh turtle velocity command[%0.2f m/s, %0.2f rad/s]", turtle_vel_msg.linear.x, turtle_vel_msg.angular.z);

        loop_rate.sleep();//Sleep according to the loop rate.
    }
    return 0;
}
编辑后的项目目录结构如下:
catkin_ws/
├── CMakeLists.txt
└── src/
    ├── CMakeLists.txt
    └── learning_topic/
        ├── CMakeLists.txt
        ├── package.xml
        └── src/
            └── turtle_velocity_publisher.cpp
3)程序流程图,对应1.3.1内容
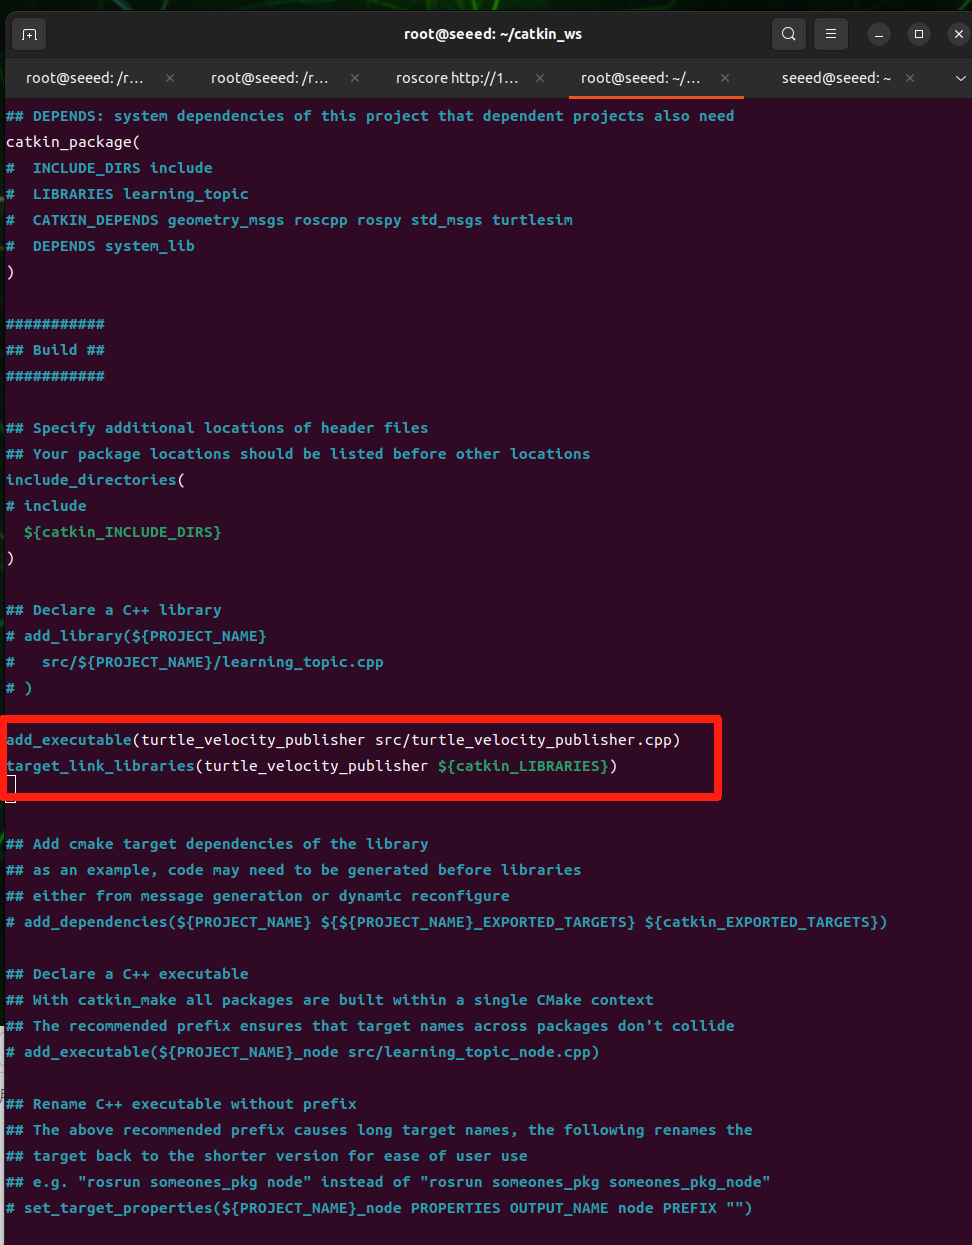
4)在catkin ws/src/learning_topic/CMakeLists.txt中,在构建区域下,添加以下内容:
(vim 基础使用回忆:14 次使用 Vim 编辑器)
代码文件:7-2-1-4-publisher-example-02.cmake
add_executable(turtle_velocity_publisher src/turtle_velocity_publisher.cpp)
target_link_libraries(turtle_velocity_publisher ${catkin_LIBRARIES})
注意更改正确路径处的CMakeLists.txt
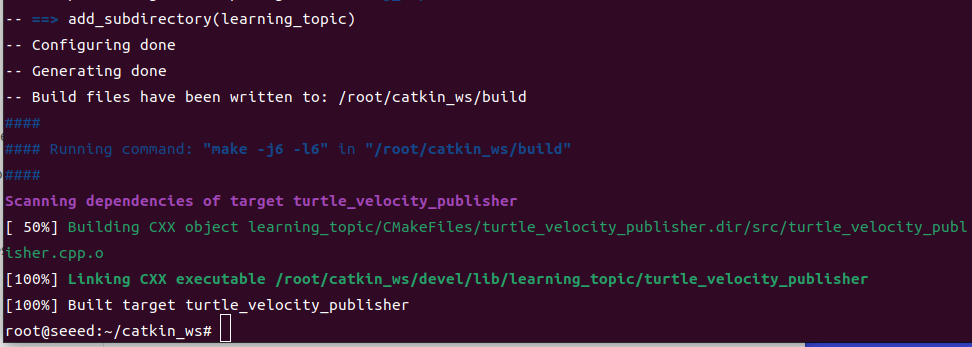
5、workspace目录下代码重新编译
cd ~/catkin_ws
catkin_make
source devel/setup.bash     # source the workspace so ROS can find the program
操作流程
打开第一个运行 roscore 的终端:
roscore运行小乌龟节点
rosrun turtlesim turtlesim_node运行发射器,继续向乌龟发送速度。
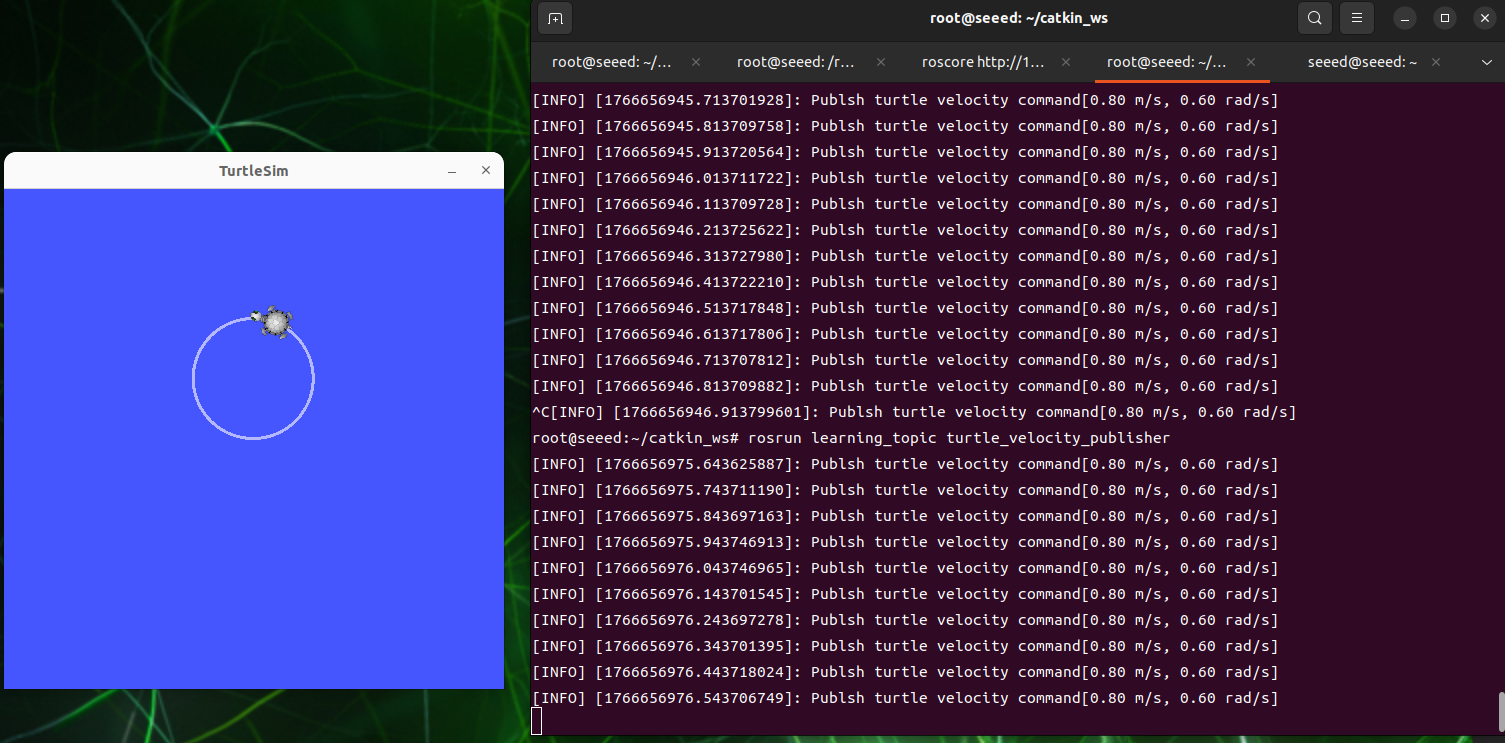
rosrun learning_topic turtle_velocity_publisher- 预期结果
八、程序运行说明
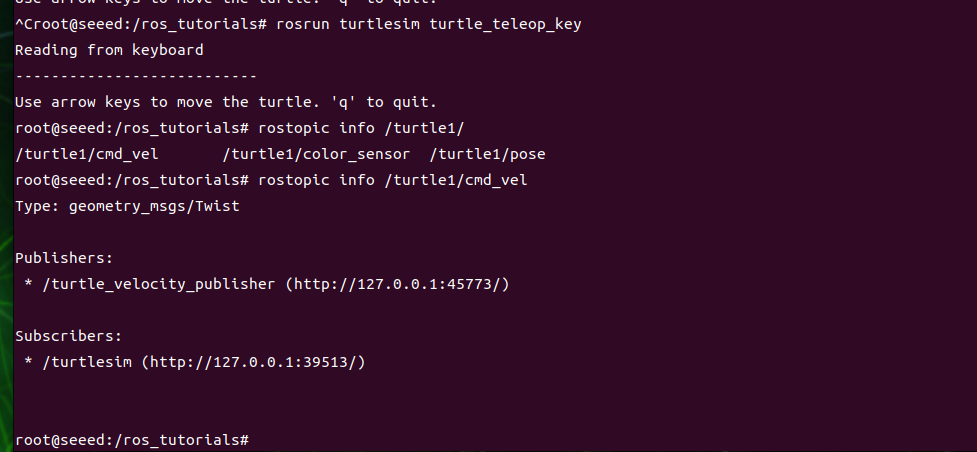
当您在终端输入主题列表时,您将找到/turtle1/cmd_vel 的主题。
我们将通过 Rostopicinfo /turtle1/cmd_vel 找到答案
这意味着海龟是 /turtle1/cmd_vel 速度主题的订阅者,因此发布者不断发送速度数据,当接收到海龟时,它们开始高速移动。
Python 实现
1)在package目录下新建文件夹scripts,然后在scripts文件夹下新建Python文件(文件后缀.py)命名为turtledevelopmentpublisher.py
2)将下面的程序代码复制到海龟开发publisher.py文件中
代码文件:7-2-1-4-publisher-suffix.py
#!/usr/bin/env python3

import rospy
from geometry_msgs.msg import Twist

def turtle_velocity_publisher():

    rospy.init_node('turtle_velocity_publisher', anonymous=True) # Initialize the ROS node.

    # Create a turtlesim velocity publisher on /turtle1/cmd_vel. The message type is geometry_msgs/Twist and the queue size is 8.
    turtle_vel_pub = rospy.Publisher('/turtle1/cmd_vel', Twist, queue_size=8)


    rate = rospy.Rate(10) # Set the loop rate.

    while not rospy.is_shutdown():
        # Initialize a geometry_msgs::Twist message.
        turtle_vel_msg = Twist()
        turtle_vel_msg.linear.x = 0.8
        turtle_vel_msg.angular.z = 0.6

        # Publish the message.
        turtle_vel_pub.publish(turtle_vel_msg)
        rospy.loginfo("linear is:%0.2f m/s, angular is:%0.2f rad/s",
                turtle_vel_msg.linear.x, turtle_vel_msg.angular.z)


        rate.sleep()# Sleep according to the loop rate.

if __name__ == '__main__':
    try:
        turtle_velocity_publisher()
    except rospy.ROSInterruptException:
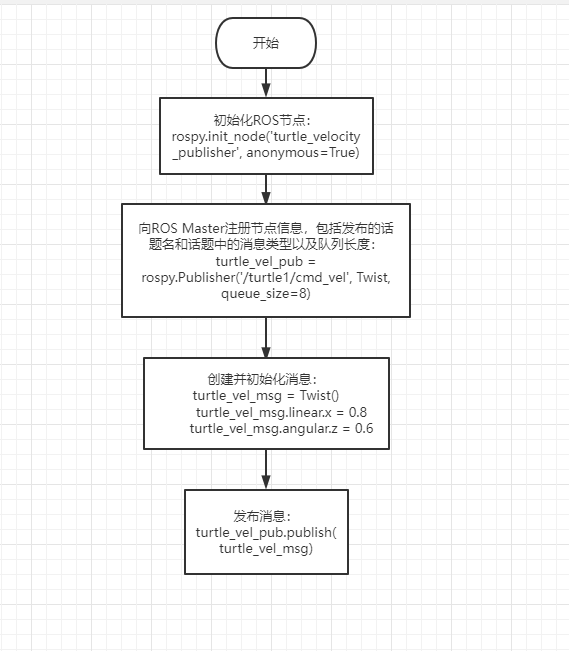
pass- 项目流程图
4、操作流程
打开第一个终端运行 roscore
roscore运行小乌龟节点
rosrun turtlesim turtlesim_node运行发射器,继续向乌龟发送速度。
rosrun learning_topic turtle_velocity_publisher.py注意:运行前需要给turtledevelopmentpublisher.py添加可执行权限,才能打开turtledevelopmentpublisher.py文件夹中的终端。
sudo chmod a+x turtle_velocity_publisher.py所有Python都需要添加执行权限,否则会出错!
数字
7.2.1.5 订阅者
订阅者
订阅,接收发布者发布的数据,然后进入其回调函数,在回调函数中处理接收到的数据。核心内容是回调函数,每个订阅者订阅该主题。
创建订阅者
创建步骤
ROS节点的初始化
-
创建句柄
-
订阅主题
4.循环主题消息并返回到回调函数
5)、在回调函数中完成消息处理。
本章的工作区遵循第四节中创建的工作区。
C++ 实现
1)在创建的包的src文件夹下的`publishing'教程目录中创建一个新的C++文件,名为turtleposesubscriber.cpp
2)将下面的程序代码复制到海龟姿势subscriber.cpp文件中
代码文件:7-2-1-5-subscriber-subscriber.cpp
/*Create a subscriber for the current turtlesim pose.*/
#include <ros/ros.h>
#include "turtlesim/Pose.h"
// The callback runs when a subscribed message is received.
void turtle_poseCallback(const turtlesim::Pose::ConstPtr& msg){
    // Print the received message.
    ROS_INFO("Turtle pose: x:%0.3f, y:%0.3f", msg->x, msg->y);
}

int main(int argc, char **argv){

    ros::init(argc, argv, "turtle_pose_subscriber");// Initialize the ROS node.

    ros::NodeHandle n;//Create a node handle.

    // Create a subscriber for /turtle1/pose and register poseCallback.
    ros::Subscriber pose_sub = n.subscribe("/turtle1/pose", 10, turtle_poseCallback);

    ros::spin(); // Wait for callbacks.

    return 0;
}catkin_ws/
├── CMakeLists.txt
└── src/
├── CMakeLists.txt
└── learning_topic/
├── CMakeLists.txt
├── package.xml
└── src/
└── turtle_velocity_publisher.cpp
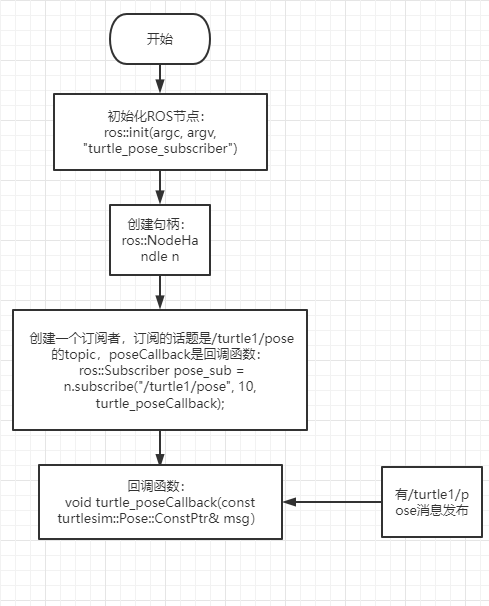
└── turtle_pose_subscriber.cpp3)程序流程图,对应5.2.1内容
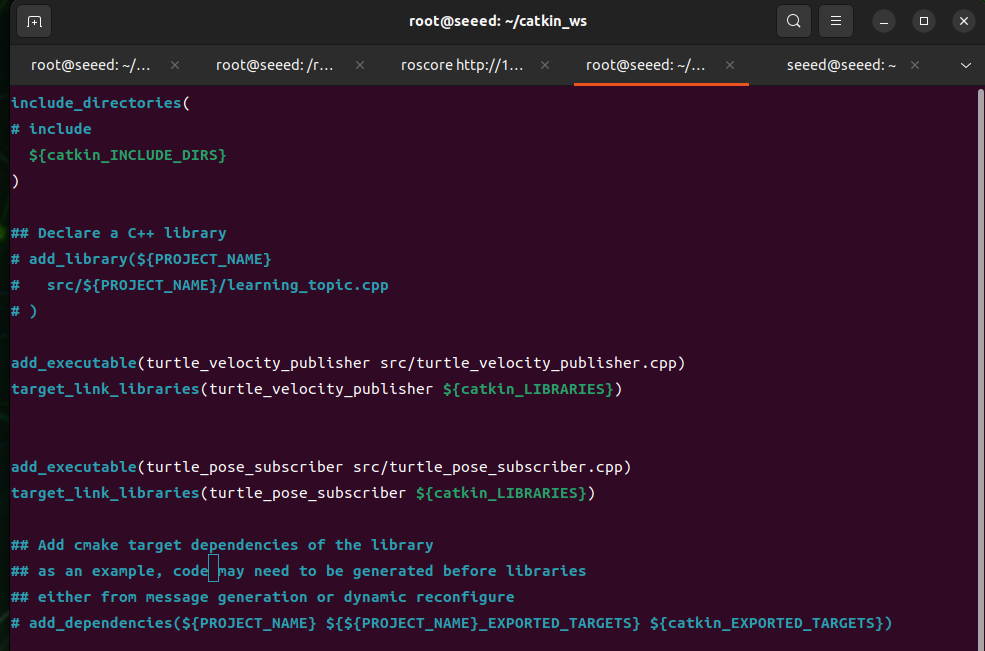
4)在catkin ws/src/learning_topic/CMakeLists.txt中,在构建区域下,添加以下内容:
(vim 基础使用回忆:14 次使用 Vim 编辑器)
Add executeable (turtle pose subscriber src/turtle_pose_subscriber.cpp)
{\cHFFFFFF}{\cH00FFFF}
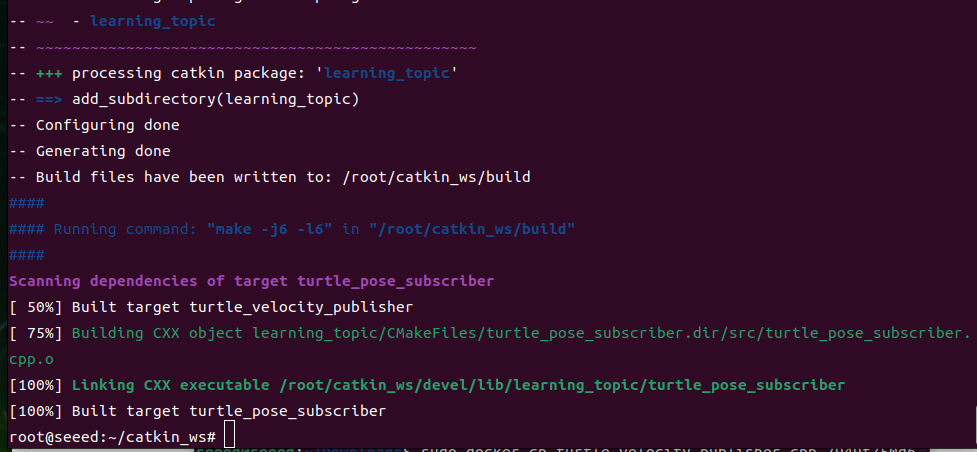
5、workspace目录下编译的代码
cd ~/catkin_ws
catkin_make
source devel/setup.bash     # source the workspace so ROS can find the program
操作流程
打开第一个终端运行 roscore
roscore第二个终端运行乌龟节点。
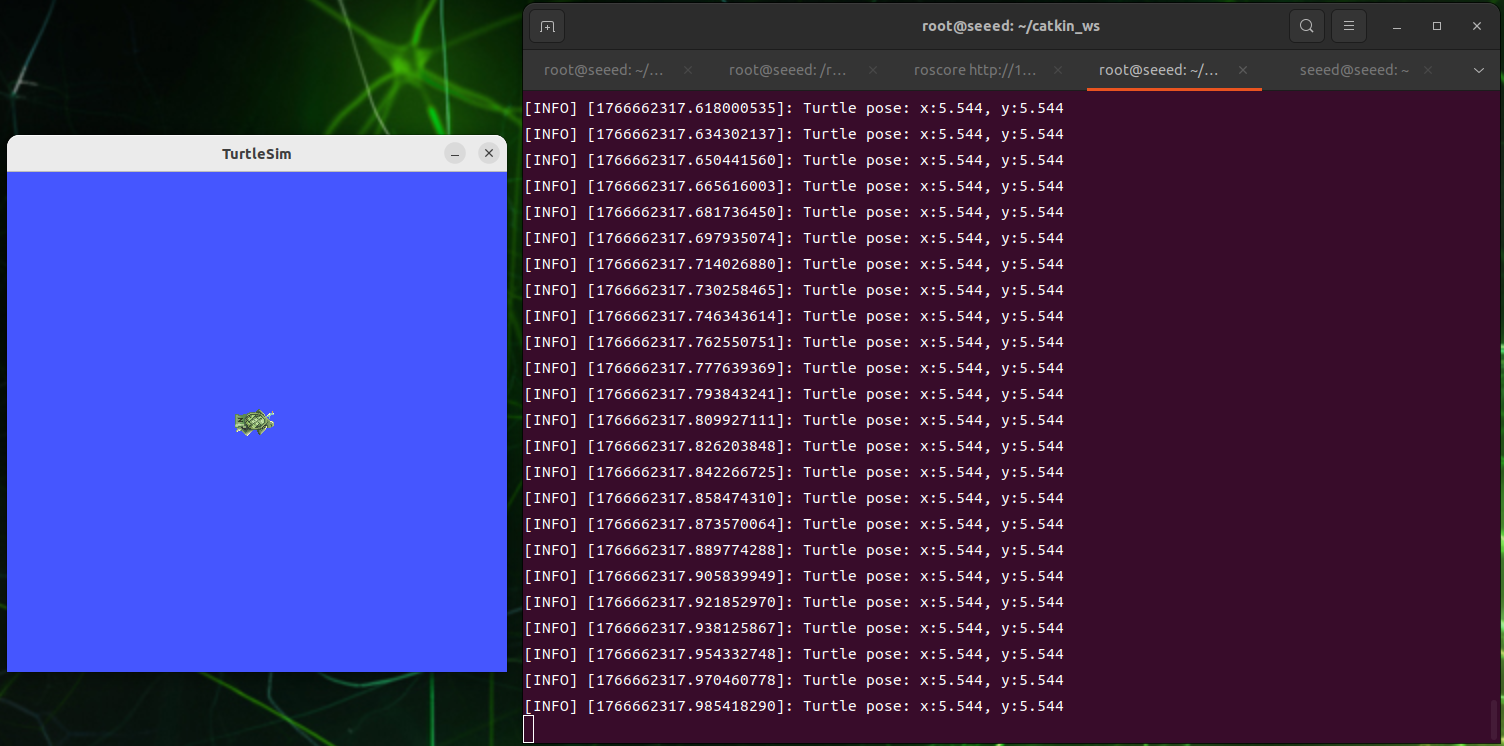
rosrun turtlesim turtlesim_node第三终端运行订阅节点,持续接收海龟投放位置数据
rosrun learning_topic turtle_pose_subscriber7)
八、程序运行说明
运行小乌龟的节点后,小乌龟不断发送它们的位置消息,主题是,
/海龟1/姿势
并且当它运行时,它接收海龟发送的数据消息,然后在echo函数中打印它们。
Python 实现
1)在package目录下新建文件夹scripts,然后在scripts文件夹下新建Python文件(文件后缀.py),命名为turtleposesubscriber.py
2)将下一个程序代码复制到海龟姿势subscriber.py
代码文件:7-2-1-5-subscriber-suffix.py
#!/usr/bin/env python3

import rospy
from turtlesim.msg import Pose

def poseCallback(msg):
    rospy.loginfo("Turtle pose: x:%0.3f, y:%0.3f", msg.x, msg.y)

def turtle_pose_subscriber():

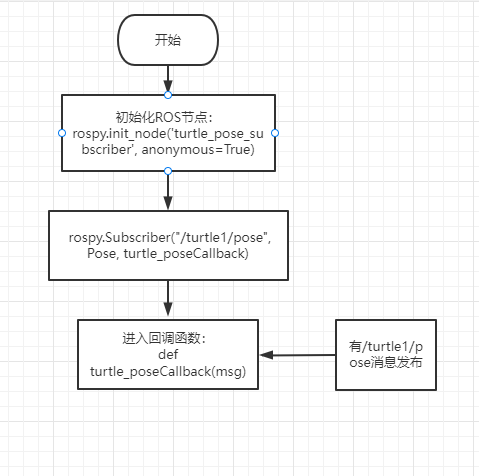
    rospy.init_node('turtle_pose_subscriber', anonymous=True)# Initialize the ROS node.

    # Create a subscriber for /turtle1/pose and register poseCallback.
    rospy.Subscriber("/turtle1/pose", Pose, poseCallback)


    rospy.spin()# Wait for callbacks.

if __name__ == '__main__':
turtle_pose_subscriber()- 项目流程图
4、操作流程
运行 roscore
roscore运行小乌龟节点
rosrun turtlesim turtlesim_node运行订阅者并继续接收海龟交付位置的数据
rosrun learning_topic turtle_pose_subscriber.py数字
7.2.1.6 自定义主题消息及使用
运行 7.2.1.1 ROS 1 简介 中描述的 ROS 1 Noetic Docker 容器中的命令。
本部分创建并使用名为 Information.msg 的自定义主题消息。该示例继续使用之前创建的 learning_topic 包。
创建消息文件
创建 msg 目录并定义自定义消息:
cd ~/catkin_ws/src/learning_topic
mkdir -p msg
vim msg/Information.msg代码文件:7-2-1-6-custom-topic-messages-and-usage-Information.msg
string company
string city
更新package.xml
将消息生成/运行时依赖项添加到 package.xml:
<build_depend>message_generation</build_depend>
<exec_depend>message_runtime</exec_depend>
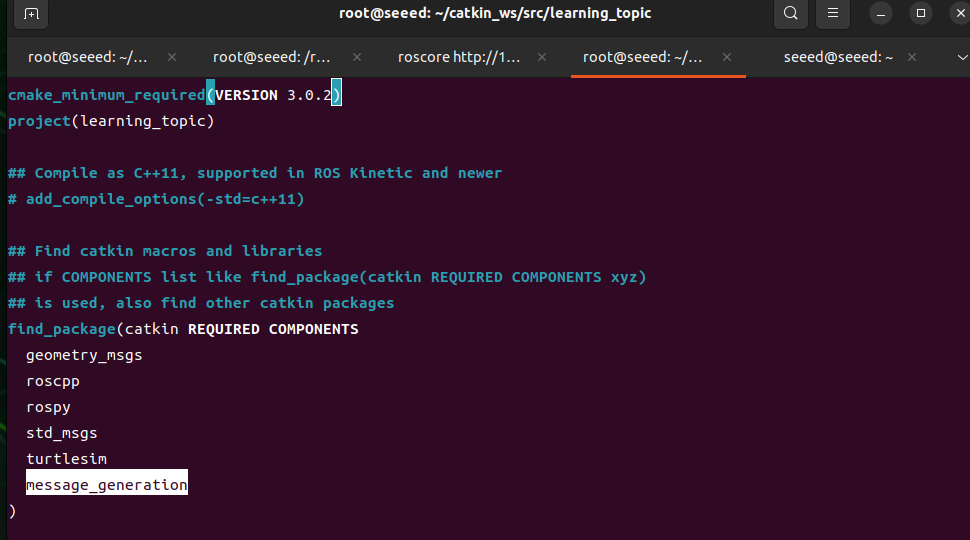
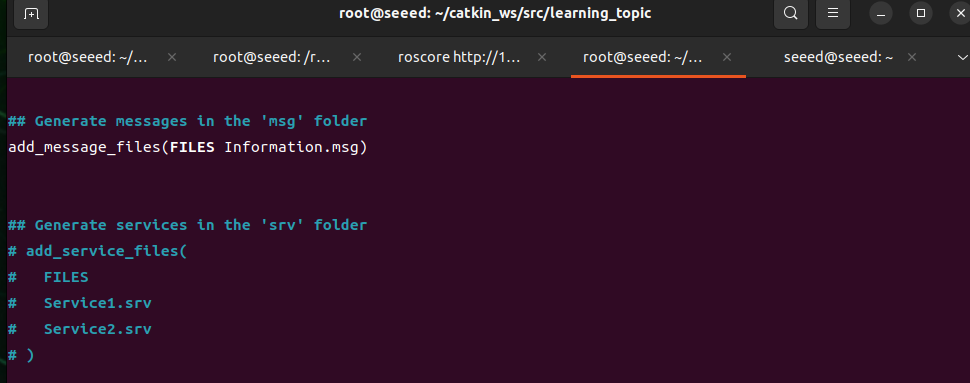
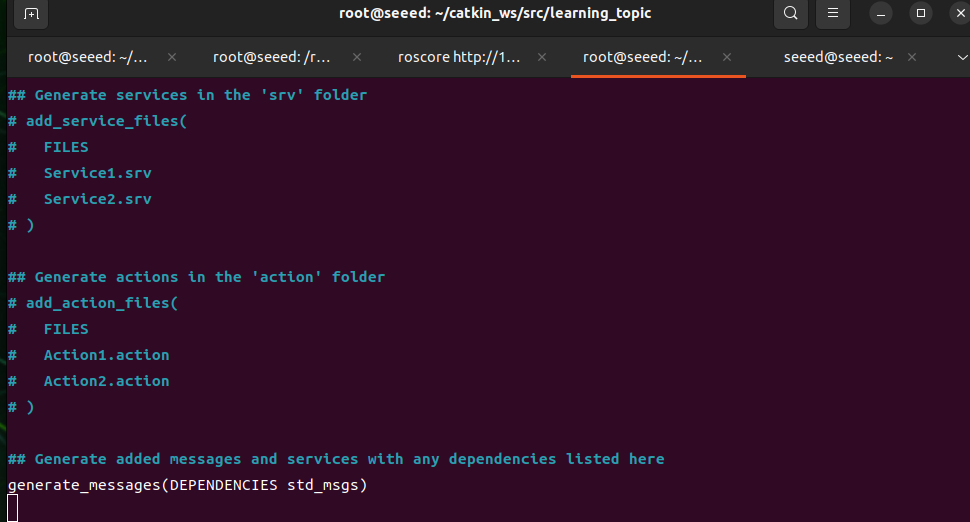
更新 CMakeLists.txt
将消息生成添加到 CMakeLists.txt:
find_package(catkin REQUIRED COMPONENTS
  roscpp
  rospy
  std_msgs
  message_generation
)

add_message_files(
  FILES
  Information.msg
)

generate_messages(
  DEPENDENCIES
  std_msgs
)

catkin_package(
  CATKIN_DEPENDS message_runtime
)
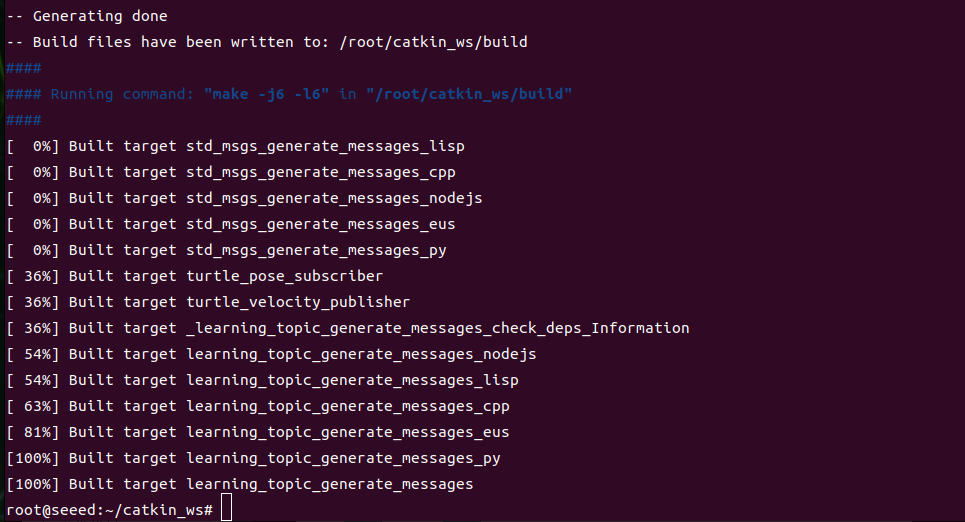
构建工作区:
cd ~/catkin_ws
catkin_make
source devel/setup.bash
C++ 发布者和订阅者
在 ~/catkin_ws/src/learning_topic/src 下创建以下文件。
代码文件:7-2-1-6-custom-topic-messages-and-usage-Information_publisher.cpp
/**
 * Publish /company_info with the custom learning_topic::Information message type.
 */
#include <ros/ros.h>
#include "learning_topic/Information.h"

int main(int argc, char **argv)
{
    ros::init(argc, argv, "company_information_publisher");
    ros::NodeHandle nh;

    ros::Publisher info_pub = nh.advertise<learning_topic::Information>("/company_info", 10);
    ros::Rate loop_rate(1);

    while (ros::ok())
    {
        learning_topic::Information info_msg;
        info_msg.company = "Seeed";
        info_msg.city = "Shenzhen";

        info_pub.publish(info_msg);
        ROS_INFO("Information: company:%s city:%s", info_msg.company.c_str(), info_msg.city.c_str());
        loop_rate.sleep();
    }
    return 0;
}代码文件:7-2-1-6-custom-topic-messages-and-usage-Information_subscriber.cpp
/**
 * Subscribe to /company_info with the custom learning_topic::Information message type.
 */
#include <ros/ros.h>
#include "learning_topic/Information.h"

void companyInfoCallback(const learning_topic::Information::ConstPtr& msg)
{
    ROS_INFO("Company: %s, city: %s", msg->company.c_str(), msg->city.c_str());
}

int main(int argc, char **argv)
{
    ros::init(argc, argv, "company_information_subscriber");
    ros::NodeHandle nh;
    ros::Subscriber sub = nh.subscribe("/company_info", 10, companyInfoCallback);
    ros::spin();
    return 0;
}
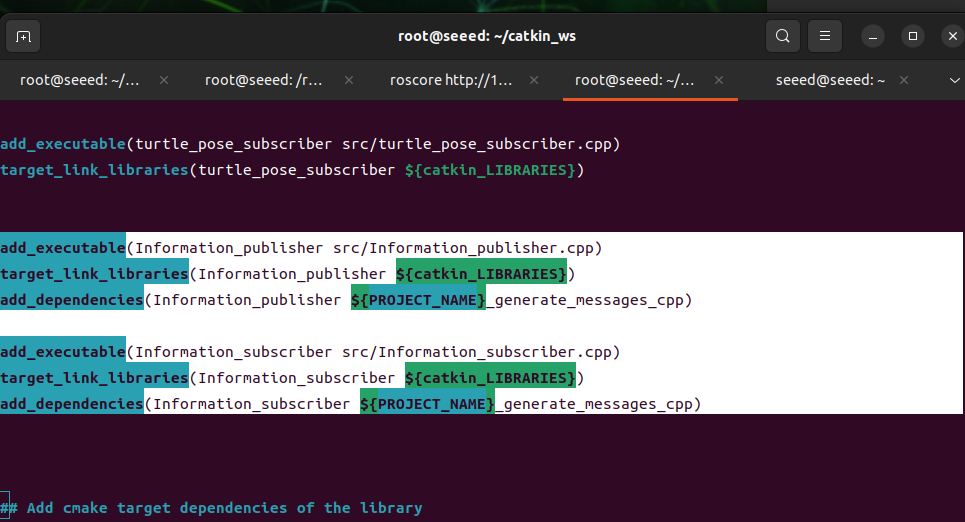
将可执行文件添加到 CMakeLists.txt:
add_executable(Information_publisher src/Information_publisher.cpp)
target_link_libraries(Information_publisher ${catkin_LIBRARIES})
add_dependencies(Information_publisher ${PROJECT_NAME}_generate_messages_cpp)

add_executable(Information_subscriber src/Information_subscriber.cpp)
target_link_libraries(Information_subscriber ${catkin_LIBRARIES})
add_dependencies(Information_subscriber ${PROJECT_NAME}_generate_messages_cpp)
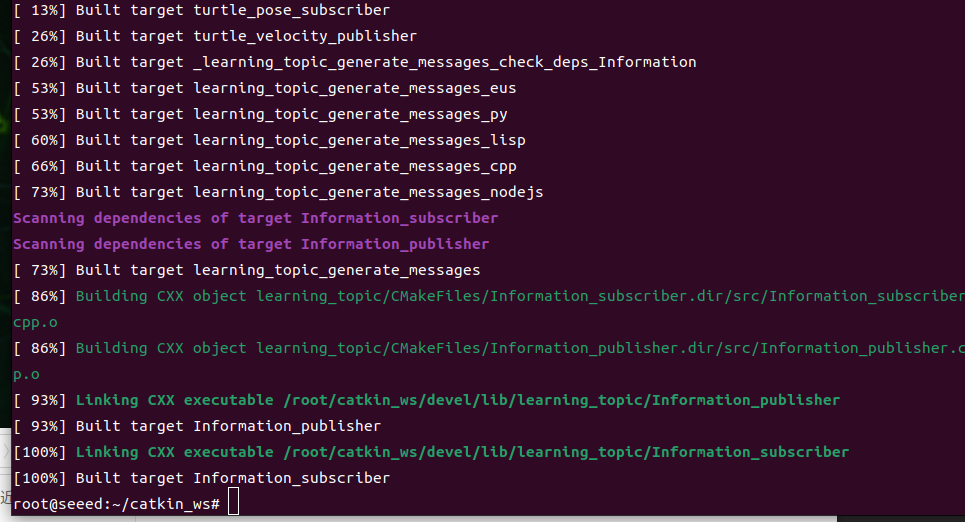
构建并运行:
cd ~/catkin_ws
catkin_make
source devel/setup.bash
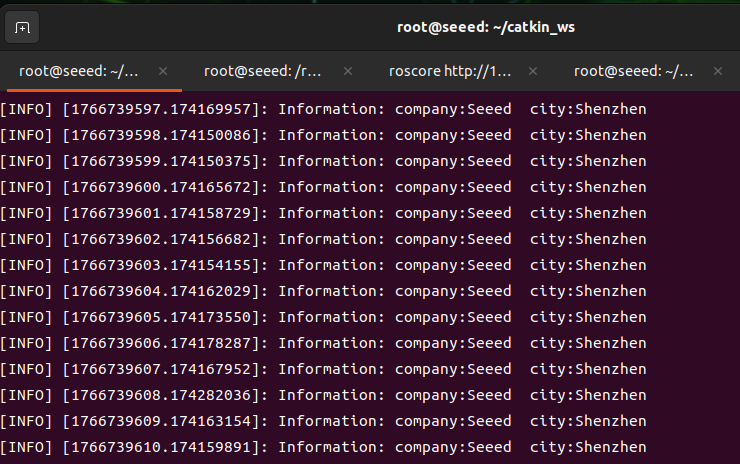
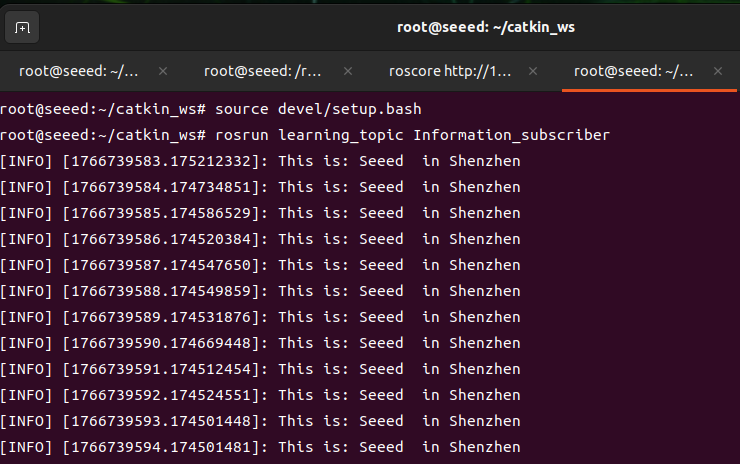
roscore
rosrun learning_topic Information_publisher
rosrun learning_topic Information_subscriber
Python 发布者和订阅者
在 ~/catkin_ws/src/learning_topic/scripts 下创建以下文件,然后使它们可执行。
代码文件:7-2-1-6-custom-topic-messages-and-usage-Information_publisher.py
#!/usr/bin/env python3
import rospy
from learning_topic.msg import Information

def information_publisher():
    rospy.init_node('information_publisher', anonymous=True)
    info_pub = rospy.Publisher('/company_info', Information, queue_size=10)
    rate = rospy.Rate(1)

    while not rospy.is_shutdown():
        info_msg = Information()
        info_msg.company = 'Seeed'
        info_msg.city = 'Shenzhen'
        info_pub.publish(info_msg)
        rospy.loginfo('Information: company:%s city:%s', info_msg.company, info_msg.city)
        rate.sleep()

if __name__ == '__main__':
information_publisher()代码文件:7-2-1-6-custom-topic-messages-and-usage-Information_subscriber.py
#!/usr/bin/env python3
import rospy
from learning_topic.msg import Information

def company_info_callback(msg):
    rospy.loginfo('Company: %s, city: %s', msg.company, msg.city)

def information_subscriber():
    rospy.init_node('information_subscriber', anonymous=True)
    rospy.Subscriber('/company_info', Information, company_info_callback)
    rospy.spin()

if __name__ == '__main__':
information_subscriber()chmod +x scripts/Information_publisher.py scripts/Information_subscriber.py
roscore
rosrun learning_topic Information_publisher.py
rosrun learning_topic Information_subscriber.py数字
7.2.1.7 客户端
运行 7.2.1.1 ROS 1 简介 中描述的 ROS 1 Noetic Docker 容器中的命令。
除了主题沟通之外,还有服务沟通。客户端发送请求,服务器返回响应。本节重点介绍客户端,展示如何用 C++ 和 Python 实现客户端。
准备工作
继续使用本节中创建的
learning_server包。
包的建立
1.切换到~/catkin_ws/src,终端执行:
catkin_create_pkg learning_server std_msgs rospy roscpp geometry_msgs turtlesim切换到~目录执行编译:
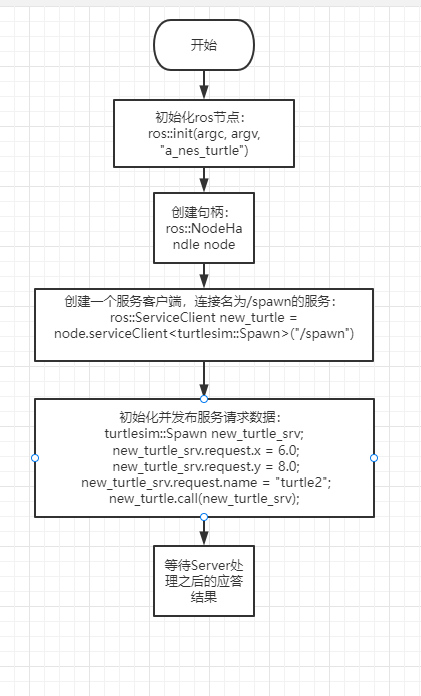
catkin_makeC++ 实现
实现的步骤
ROS节点的初始化
- 创建句柄
3)、创建客户端实例
-
初始化并发布服务请求数据
-
服务器收到响应
在 ~/catkin_ws/src/learning_server/src 下创建 a_new_turtle.cpp 并粘贴以下代码。
一个新的乌龟.cpp
/**
This example calls the turtlesim /spawn service to create a new turtle at the specified position.
*/

#include <ros/ros.h>
#include <turtlesim/Spawn.h>

int main(int argc, char** argv)
{

    ros::init(argc, argv, "a_new_turtle");// Initialize the ROS node.

    ros::NodeHandle node;

    ros::service::waitForService("/spawn"); // Wait for the /spawn service.

    ros::ServiceClient new_turtle = node.serviceClient<turtlesim::Spawn>("/spawn");//Create a service client for /spawn.

    // Initialize the turtlesim::Spawn request.
    turtlesim::Spawn new_turtle_srv;
    new_turtle_srv.request.x = 6.0;
    new_turtle_srv.request.y = 8.0;
    new_turtle_srv.request.name = "turtle2";

    // Call the service with x/y position and name parameters.
    ROS_INFO("Call service to create a new turtle name is %s,at the x:%.1f,y:%.1f", new_turtle_srv.request.name.c_str(),
        new_turtle_srv.request.x,
        new_turtle_srv.request.y);

    new_turtle.call(new_turtle_srv);


    ROS_INFO("Spawn turtle successfully [name:%s]", new_turtle_srv.response.name.c_str());// Display the service call result.

    return 0;
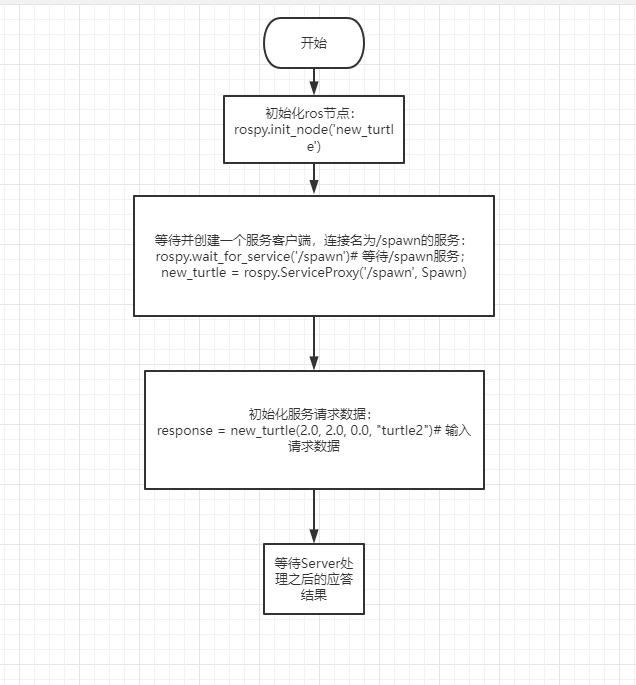
};- 程序流程图
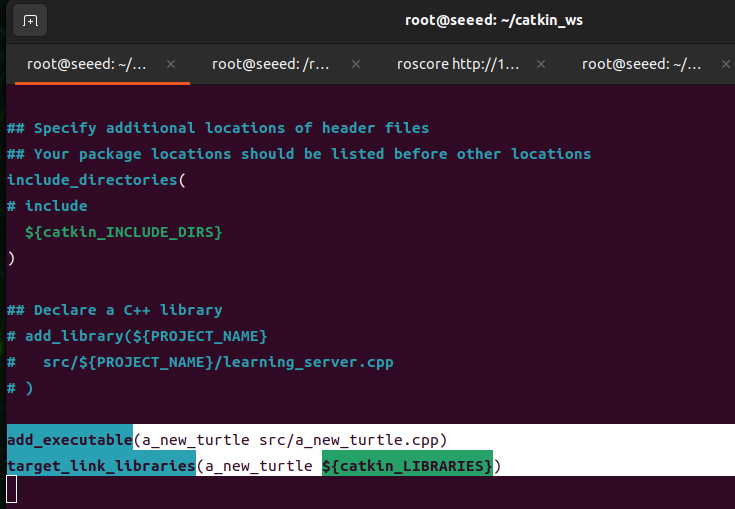
2)在CMakeLists.txt配置中,在构建区域下,添加以下内容:
(vim 基础使用回忆:14 次使用 Vim 编辑器)
代码文件:7-2-1-7-client-example-02.cmake
add_executable(a_new_turtle src/a_new_turtle.cpp)
target_link_libraries(a_new_turtle ${catkin_LIBRARIES})
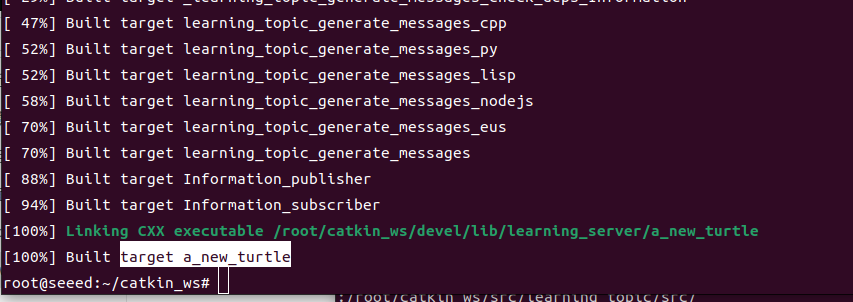
3.在workspace目录下重新编译代码
cd ~/catkin_ws
catkin_make
source devel/setup.bash     # source the workspace so ROS can find the program
4)打开三个终端运行程序
roscore
rosrun turtlesim turtlesim_node
rosrun learning_server a_new_turtle-
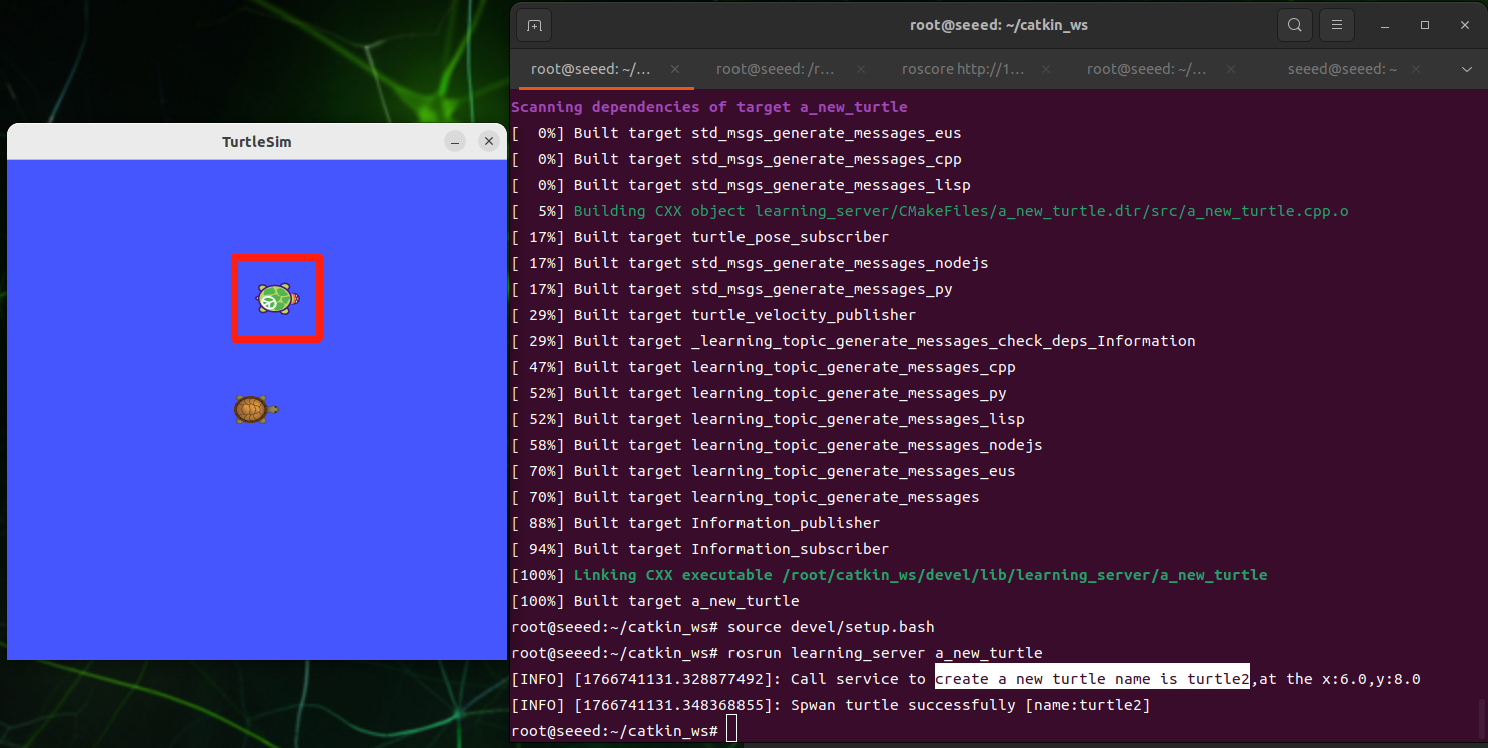
预期结果
-
流程
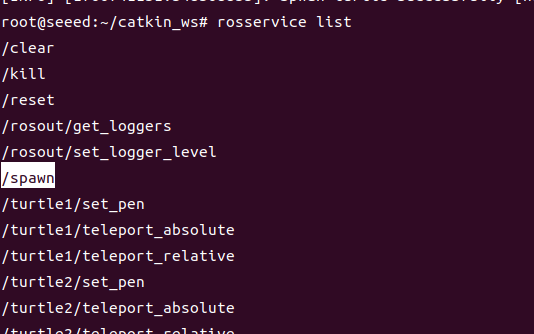
一旦小海龟节点被激活,重新运行一个新的海龟就会在图中显示出另一只小海龟,因为小海龟节点提供了/spawn的服务,从而产生了另一只小海龟海龟2,可以通过rosservice list命令查看,如下图。
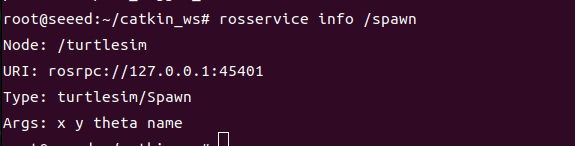
该服务所需的参数可以通过rosserviceinfo /spawn查看,如下图。
可以看到需要四个参数:x,y,theta,name,在新的turtle.cpp中初始化
代码文件:7-2-1-7-client-turtle.cpp
srv.request.x = 6.0;
srv.request.y = 8.0;
srv.request.name = "turtle2";
注意:Theta 未分配,默认为 0
Python 实现
在 ~/catkin_ws/src/learning_server 下创建 scripts/a_new_turtle.py 并粘贴以下代码。
a_new_turtle.py
代码文件:7-2-1-7-client-a_new_turtle.py
#!/usr/bin/env python3

import rospy
from turtlesim.srv import Spawn


def turtle_spawn():
    rospy.init_node('new_turtle')
    rospy.wait_for_service('/spawn')

    try:
        spawn_client = rospy.ServiceProxy('/spawn', Spawn)
        response = spawn_client(2.0, 2.0, 0.0, 'turtle2')
        return response.name
    except rospy.ServiceException as exc:
        rospy.logerr('Failed to call /spawn: %s', exc)
        return None


if __name__ == '__main__':
    name = turtle_spawn()
    if name:
rospy.loginfo('Created a new turtle named %s.', name)- 程序流程图
2.打开三个终端运行程序
roscore
rosrun turtlesim turtlesim_node
rosrun learning_server a_new_turtle.py
3)程序运行和描述的效果与C++实现的结果一致,这里的参数是Python如何提供服务的,
response = spawn_client(2.0, 2.0, 0.0, "turtle2")
对应的参数是x,y,theta,name。
数字
7.2.1.8 服务器
运行 7.2.1.1 ROS 1 简介 中描述的 ROS 1 Noetic Docker 容器中的命令。
当我们谈论客户请求和服务时,我们谈论的是服务交付。
继续使用本节中创建的
learning_server包。
C++ 实现
实现的步骤
ROS节点的初始化
- Server创建示例
3)循环等待服务请求,进入回调函数
4)在回调函数中完成服务的功能处理并提供响应数据的反馈
在 ~/catkin_ws/src/learning_server/src 下创建 turtle_vel_command_server.cpp 并粘贴以下代码。
/**
This example provides /turtle_vel_command with the std_srvs/Trigger service type.
*/
#include <ros/ros.h>
#include <geometry_msgs/Twist.h>
#include <std_srvs/Trigger.h>

ros::Publisher turtle_vel_pub;
bool pubvel = false;

// Service callback: req is the request and res is the response.
bool pubvelCallback(std_srvs::Trigger::Request  &req,
                    std_srvs::Trigger::Response &res)
{
    pubvel = !pubvel;

        ROS_INFO("Do you want to publish the vel?: [%s]", pubvel==true?"Yes":"No");// Print the client request.

    // Set response data.
    res.success = true;
    res.message = "The status is changed!";

    return true;
}

int main(int argc, char **argv)
{

    ros::init(argc, argv, "turtle_vel_command_server");


    ros::NodeHandle n;

    // Create the /turtle_vel_command server and register pubvelCallback.
    ros::ServiceServer command_service = n.advertiseService("/turtle_vel_command", pubvelCallback);

    // Create a publisher for /turtle1/cmd_vel. The message type is geometry_msgs::Twist and the queue size is 8.
    turtle_vel_pub = n.advertise<geometry_msgs::Twist>("/turtle1/cmd_vel", 8);

    ros::Rate loop_rate(10);// Set the loop rate.

    while(ros::ok())
    {

        ros::spinOnce();// Process callbacks once.

        // Publish turtle velocity commands when pubvel is true.
        if(pubvel)
        {
            geometry_msgs::Twist vel_msg;
            vel_msg.linear.x = 0.6;
            vel_msg.angular.z = 0.8;
            turtle_vel_pub.publish(vel_msg);
        }

        loop_rate.sleep();//Sleep according to the loop rate.
    }

    return 0;
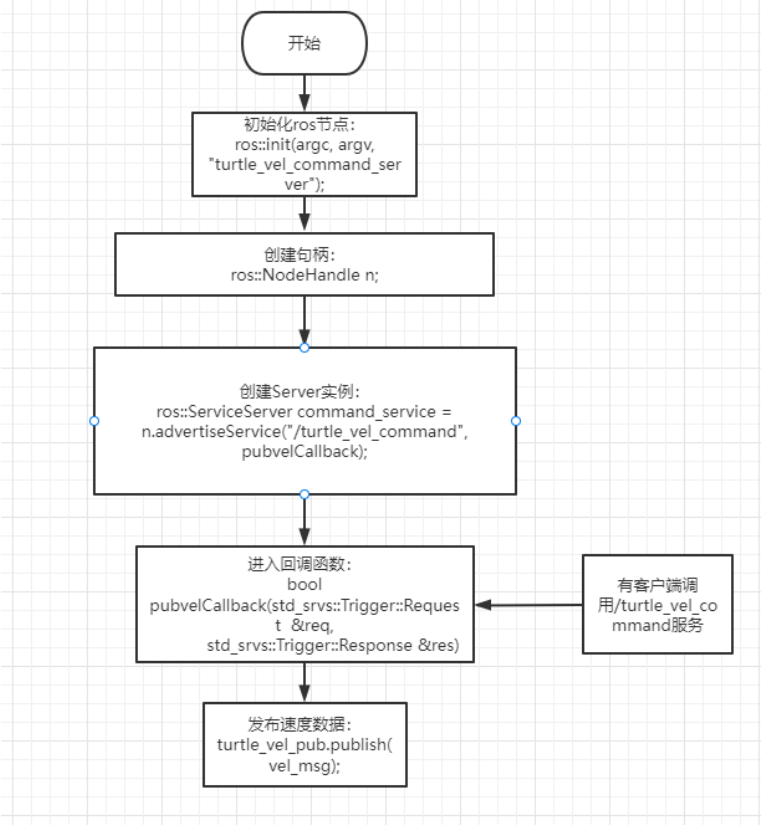
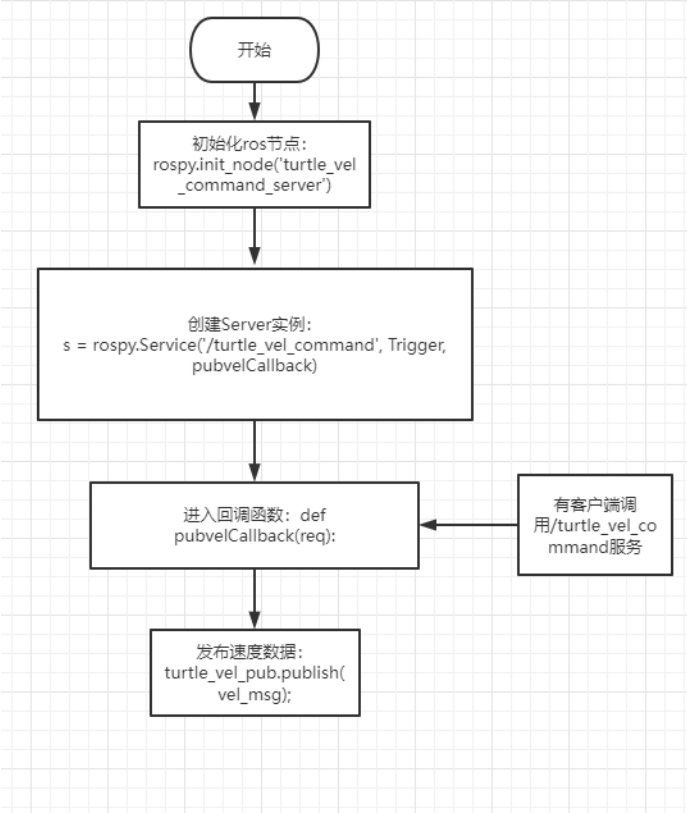
}- 程序流程图
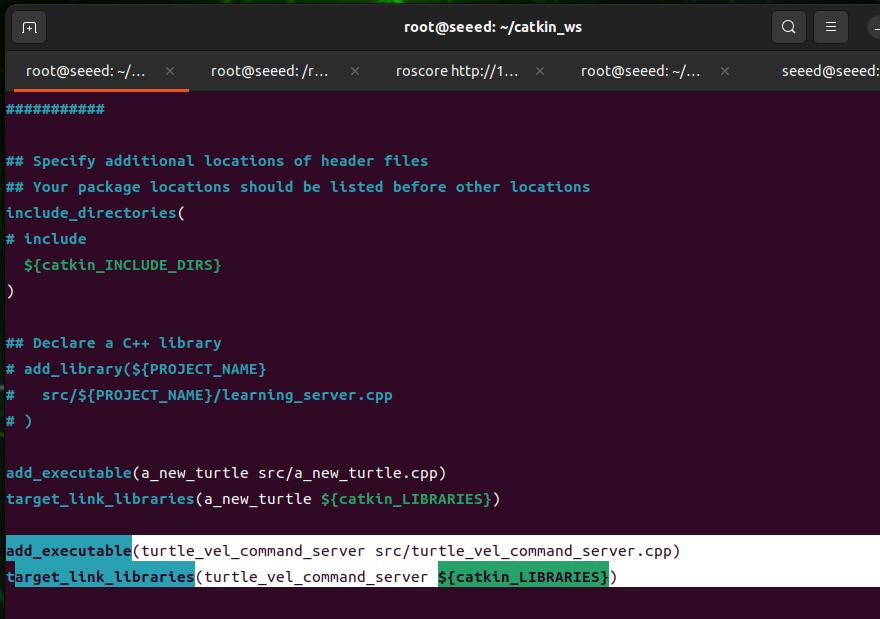
2)在CMakeLists.txt中配置,在build区域下,添加以下内容:
代码文件:7-2-1-8-server-example-02.cmake
add_executable(turtle_vel_command_server src/turtle_vel_command_server.cpp)
target_link_libraries(turtle_vel_command_server ${catkin_LIBRARIES})
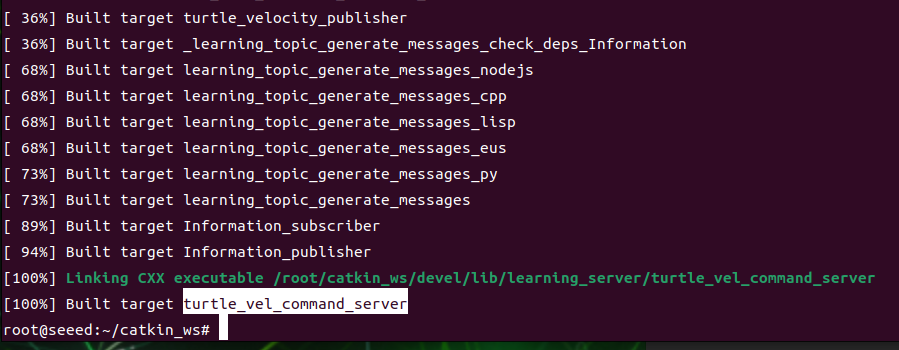
3、workspace目录下编译的代码
cd ~/catkin_ws
catkin_make
source devel/setup.bash # source the workspace so ROS can find the program- 启动四个终端运行程序
roscore
rosrun turtlesim turtlesim_node
rosrun learning_server turtle_vel_command_server
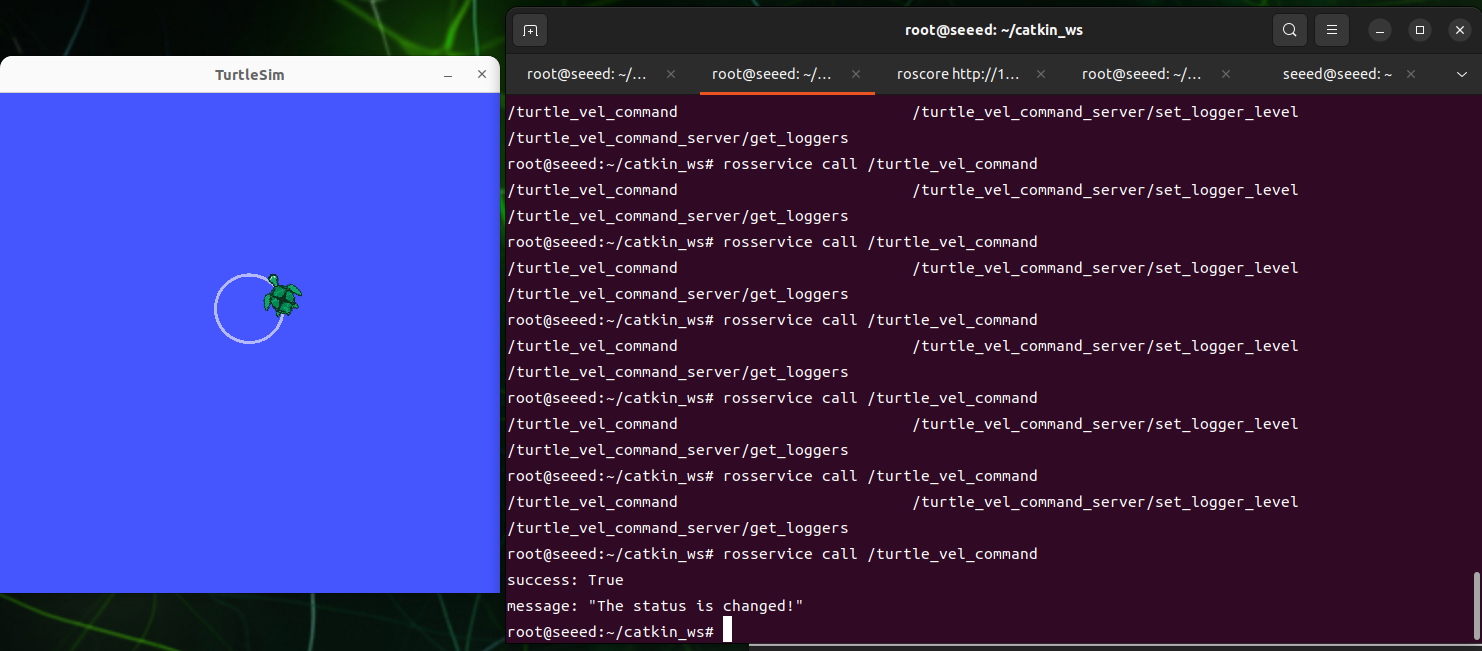
rosservice call /turtle_vel_command-
预期结果
-
流程
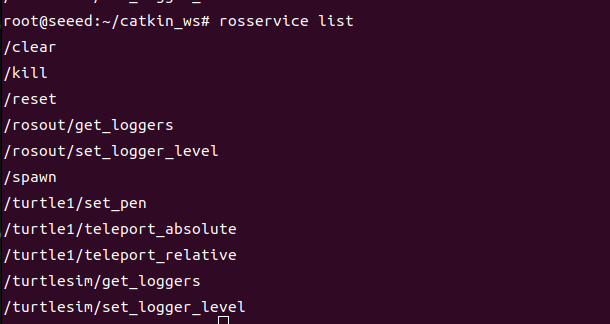
首先,运行小乌龟节点时,可以在终端进入rosservice list查看当前的服务是什么,如下:
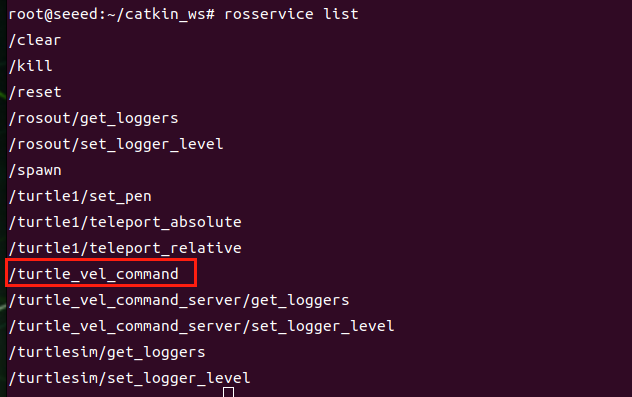
然后我们运行turtle vel命令服务器程序,进入rosservice列表,我们发现多了一个turtle vel命令服务器,如下图所示。
然后我们通过在终端输入来调用这个服务,我们发现小乌龟在昼夜不停地运动,如果它们再次调用,它们就会停止。这是因为,在背靠背服务中,我们将pubvel的值反转,然后反馈回来,main函数会判断pubvel的值,如果是True,则给出速度指令,如果是False,则不给出速度指令。
Python 实现
在 ~/catkin_ws/src/learning_server 下创建 scripts/turtle_vel_command_server.py 并粘贴以下代码。
turtle_vel_command_server.py
代码文件:7-2-1-8-server-turtle_vel_command_server.py
#!/usr/bin/env python3

import threading

import rospy
from geometry_msgs.msg import Twist
from std_srvs.srv import Trigger, TriggerResponse

pubvel = False
turtle_vel_pub = None


def publish_velocity_loop():
    rate = rospy.Rate(10)
    while not rospy.is_shutdown():
        if pubvel:
            vel_msg = Twist()
            vel_msg.linear.x = 0.6
            vel_msg.angular.z = 0.8
            turtle_vel_pub.publish(vel_msg)
        rate.sleep()


def pubvel_callback(req):
    global pubvel
    pubvel = not pubvel
    rospy.loginfo('Publish turtle velocity: %s', pubvel)
    return TriggerResponse(success=True, message='Velocity publishing toggled.')


def turtle_pubvel_command_server():
    global turtle_vel_pub
    rospy.init_node('turtle_vel_command_server')
    turtle_vel_pub = rospy.Publisher('/turtle1/cmd_vel', Twist, queue_size=8)
    rospy.Service('/turtle_vel_command', Trigger, pubvel_callback)
    threading.Thread(target=publish_velocity_loop, daemon=True).start()
    rospy.loginfo('Ready to receive /turtle_vel_command requests.')
    rospy.spin()


if __name__ == '__main__':
turtle_pubvel_command_server()- 程序流程图
2)打开三个终端运行程序:
roscore
rosrun turtlesim turtlesim_node
rosrun learning_server turtle_vel_command_server.py
3、程序运行的效果和程序的描述与C++实现的效果一致。
数字
7.2.1.9 自定义服务消息及使用
运行 7.2.1.1 ROS 1 简介 中所述的 ROS 1 Noetic Docker 容器中的命令。
本节定义了一个名为 IntPlus.srv 的自定义服务,并用 C++ 和 Python 实现了服务器/客户端对。
创建服务文件
cd ~/catkin_ws/src/learning_server
mkdir -p srv
vim srv/IntPlus.srv代码文件:7-2-1-9-custom-service-messages-and-usage-IntPlus.srv
int64 a
int64 b
---
int64 result
更新package.xml和CMakeLists.txt
将这些依赖项添加到 package.xml:
<build_depend>message_generation</build_depend>
<exec_depend>message_runtime</exec_depend>
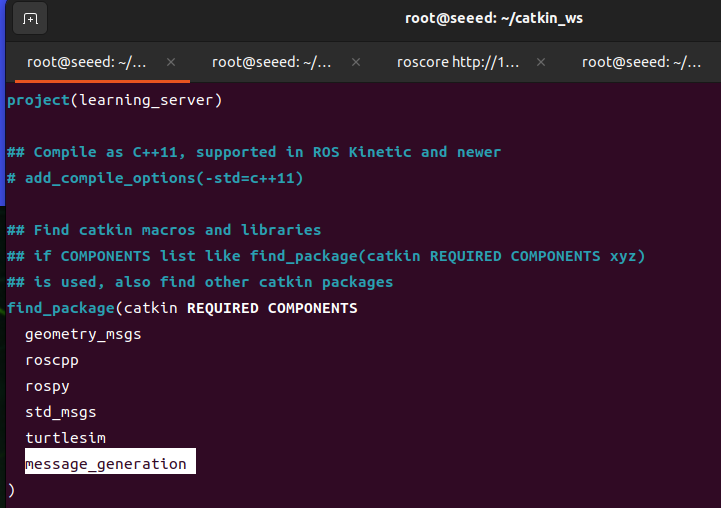
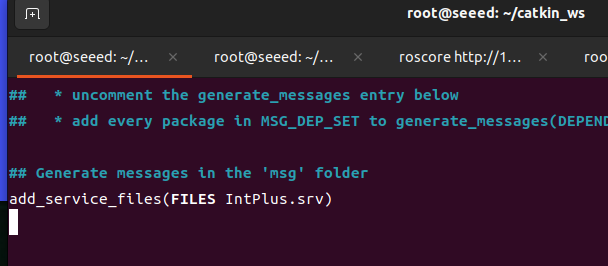
将服务生成添加到 CMakeLists.txt:
find_package(catkin REQUIRED COMPONENTS
  roscpp
  rospy
  std_msgs
  message_generation
)

add_service_files(
  FILES
  IntPlus.srv
)

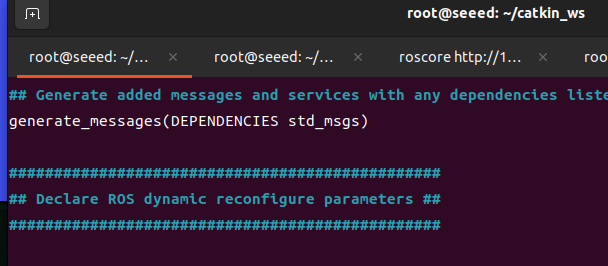
generate_messages(
  DEPENDENCIES
  std_msgs
)

catkin_package(
  CATKIN_DEPENDS message_runtime
)
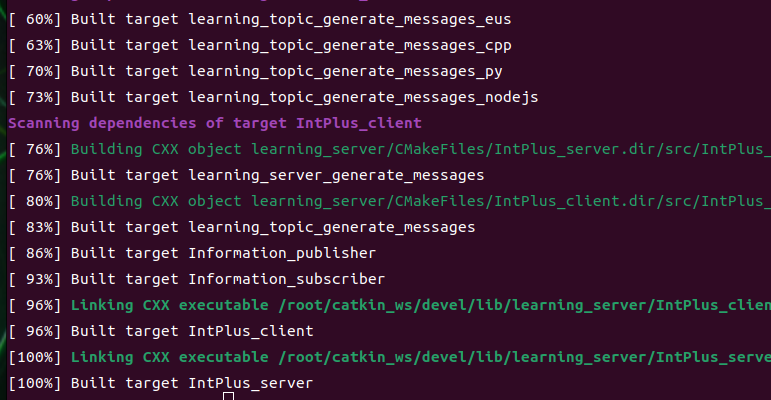
构建工作区:
cd ~/catkin_ws
catkin_make
source devel/setup.bash
C++ 服务器和客户端
代码文件:7-2-1-9-custom-service-messages-and-usage-IntPlus_server.cpp
#include <ros/ros.h>
#include "learning_server/IntPlus.h"

bool intPlusCallback(learning_server::IntPlus::Request &req,
                     learning_server::IntPlus::Response &res)
{
    ROS_INFO("number 1 is:%ld, number 2 is:%ld", req.a, req.b);
    res.result = req.a + req.b;
    return true;
}

int main(int argc, char **argv)
{
    ros::init(argc, argv, "IntPlus_server");
    ros::NodeHandle nh;
    ros::ServiceServer service = nh.advertiseService("/Two_Int_Plus", intPlusCallback);
    ROS_INFO("Ready to calculate two integers.");
    ros::spin();
    return 0;
}代码文件:7-2-1-9-custom-service-messages-and-usage-IntPlus_client.cpp
#include <ros/ros.h>
#include "learning_server/IntPlus.h"

int main(int argc, char **argv)
{
    ros::init(argc, argv, "IntPlus_client");
    ros::NodeHandle nh;
    ros::service::waitForService("/Two_Int_Plus");
    ros::ServiceClient client = nh.serviceClient<learning_server::IntPlus>("/Two_Int_Plus");

    learning_server::IntPlus srv;
    srv.request.a = 8;
    srv.request.b = 6;

    if (client.call(srv)) {
        ROS_INFO("Result: %ld", srv.response.result);
    } else {
        ROS_ERROR("Failed to call /Two_Int_Plus");
    }
    return 0;
}
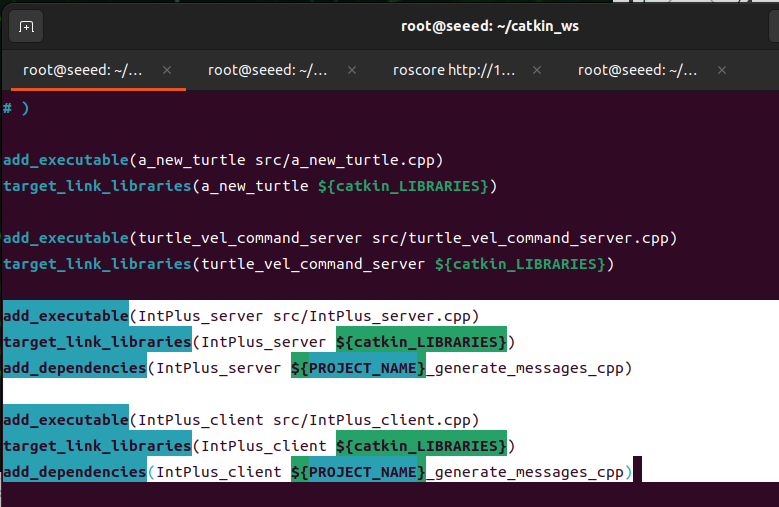
将可执行文件添加到 CMakeLists.txt:
add_executable(IntPlus_server src/IntPlus_server.cpp)
target_link_libraries(IntPlus_server ${catkin_LIBRARIES})
add_dependencies(IntPlus_server ${PROJECT_NAME}_generate_messages_cpp)

add_executable(IntPlus_client src/IntPlus_client.cpp)
target_link_libraries(IntPlus_client ${catkin_LIBRARIES})
add_dependencies(IntPlus_client ${PROJECT_NAME}_generate_messages_cpp)
运行示例:
roscore
rosrun learning_server IntPlus_server
rosrun learning_server IntPlus_client
您也可以直接调用服务:
rosservice call /Two_Int_Plus 5 6Python 服务器和客户端
代码文件:7-2-1-9-custom-service-messages-and-usage-IntPlus_server.py
#!/usr/bin/env python3
import rospy
from learning_server.srv import IntPlus, IntPlusResponse

def int_plus_callback(req):
    rospy.loginfo('Ints: a:%d b:%d', req.a, req.b)
    return IntPlusResponse(req.a + req.b)

if __name__ == '__main__':
    rospy.init_node('IntPlus_server')
    rospy.Service('/Two_Int_Plus', IntPlus, int_plus_callback)
    rospy.loginfo('Ready to calculate two integers.')
rospy.spin()代码文件:7-2-1-9-custom-service-messages-and-usage-IntPlus_client.py
#!/usr/bin/env python3
import rospy
from learning_server.srv import IntPlus

if __name__ == '__main__':
    rospy.init_node('IntPlus_client')
    rospy.wait_for_service('/Two_Int_Plus')
    plus_client = rospy.ServiceProxy('/Two_Int_Plus', IntPlus)
    response = plus_client(22, 20)
rospy.loginfo('Result: %d', response.result)chmod +x scripts/IntPlus_server.py scripts/IntPlus_client.py
roscore
rosrun learning_server IntPlus_server.py
rosrun learning_server IntPlus_client.py数字


7.2.1.10 使用 TF 发布和收听
运行 7.2.1.1 ROS 1 简介 中所述的 ROS 1 Noetic Docker 容器中的命令。
tf 包
tf 是一个允许用户随着时间的推移跟踪多个坐标系的包,使用树形数据结构帮助开发人员随时更改坐标、坐标之间的完成点、向量等,使用时间缓冲区并维护多个坐标之间的坐标交替。
使用步骤
1.拦截tf变换
接收缓存系统中发布的所有坐标,转换数据,然后从中搜索所需的坐标。
- 广播tf改造
(b) 广播系统中坐标之间的坐标交替。系统的多个部分可能存在经过 tf 修改的广播。每个广播都可以直接插入到 tf 树中,无需任何进一步的同步。
tf坐标广播和收听节目实现
创建并编译包
cd ~/catkin_ws/src
catkin_create_pkg learning_tf rospy roscpp turtlesim tf
cd..
catkin_make
如何实现tf广播器
- TF广播者(Transform Broadcaster)的定义;
2.tf数据的初始化和坐标的创建;
3)、释放坐标转换(sendTransform);
如何实现一个tf监听设备
1、TF监听设备(TransformListener)的定义;
2)查找坐标(waitForTransform、lookupTransform)
C++语言实现tf广播器
1)在包的src文件夹下创建C++文件(后缀为.cpp的文件)
2)将下面的程序代码复制到turtle tf Broadcaster.cpp文件中
代码文件:7-2-1-10-publishing-and-listening-with-tf-with.cpp
#include <ros/ros.h>
#include <tf/transform_broadcaster.h>
#include <turtlesim/Pose.h>

std::string turtle_name;

void poseCallback(const turtlesim::PoseConstPtr& msg)
{

    static tf::TransformBroadcaster br;// Create a TF broadcaster.

    // Initialize TF data.
    tf::Transform transform;
    transform.setOrigin( tf::Vector3(msg->x, msg->y, 0.0) );//Set xyz coordinates.
    tf::Quaternion q;
    q.setRPY(0, 0, msg->theta);//Set Euler angles for x, y, and z rotation.
    transform.setRotation(q);

    br.sendTransform(tf::StampedTransform(transform, ros::Time::now(), "world", turtle_name));// Broadcast TF data between world and the turtle frame.
}

int main(int argc, char** argv)
{
    ros::init(argc, argv, "turtle_world_tf_broadcaster");// Initialize the ROS node.

    if (argc != 2)
    {
        ROS_ERROR("Missing a parameter as the name of the turtle!");
        return -1;
    }

    turtle_name = argv[1];// Use the input argument as the turtle name.

    // Subscribe to the turtle pose topic.
    ros::NodeHandle node;
    ros::Subscriber sub = node.subscribe(turtle_name+"/pose", 10, &poseCallback);

        // Wait for callbacks.
    ros::spin();

    return 0;
};-
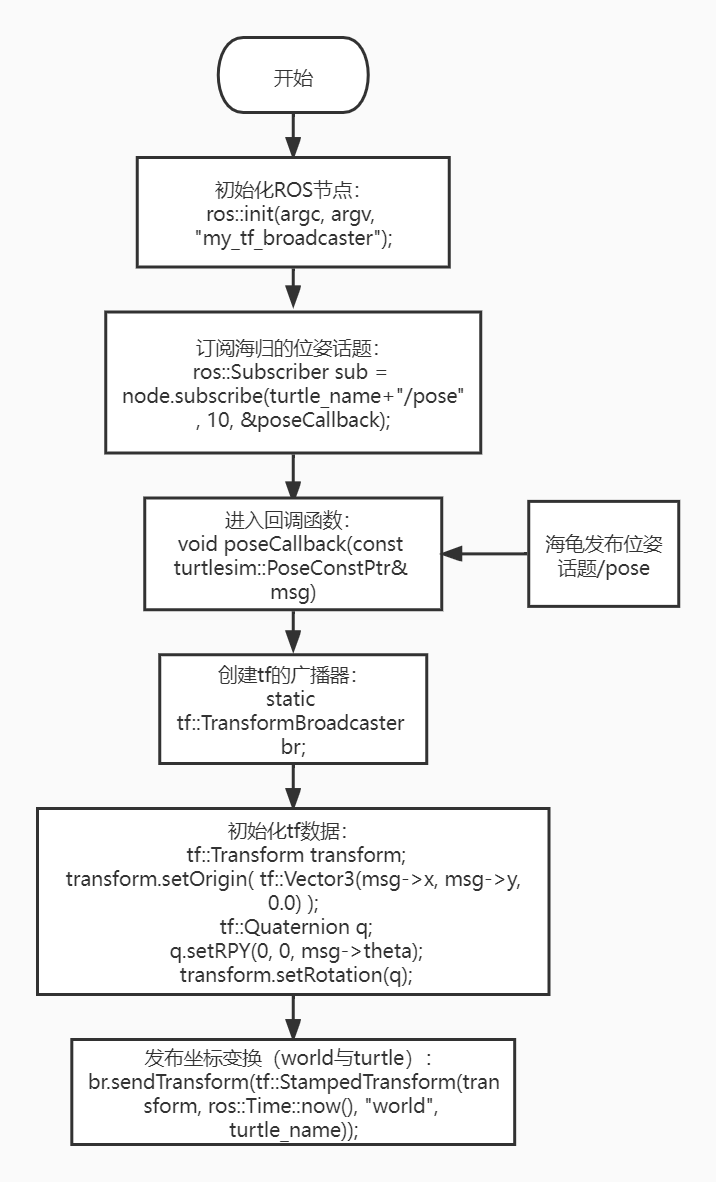
项目流程图
-
代码解析
首先订阅乌龟的/pose位置,如果发布了主题,则进入背靠背功能。然后回到tf的broadcaster,然后初始化tf数据,其值为/pose主题的订阅。最后,小乌龟对世界坐标的变换是通过sendTransform的函数br.sendTransform发布的。有四个参数,第一个表示Transform类型的tf:(即之前初始化的tf数据)坐标,第二个参数是时间戳,第三个和第四个是变量源和目标坐标。
C++语言实现tf监听设备
1)在包的src文件夹下创建C++文件(后缀为.cpp的文件)
2)将下面的程序代码复制到fileturtle tf lister.cpp
代码文件:7-2-1-10-publishing-and-listening-with-tf-with.cpp
/**
This example listens to TF data, computes velocity commands, and publishes them to turtle2.
turtle2->turtle1 = world->turtle*world->turtle2
*/

#include <ros/ros.h>
#include <tf/transform_listener.h>
#include <geometry_msgs/Twist.h>
#include <turtlesim/Spawn.h>

int main(int argc, char** argv)
{

    ros::init(argc, argv, "turtle1_turtle2_listener");// Initialize the ROS node.


    ros::NodeHandle node; // Create a node handle.

    // Call the service to spawn turtle2.
    ros::service::waitForService("/spawn");
    ros::ServiceClient add_turtle = node.serviceClient<turtlesim::Spawn>("/spawn");
    turtlesim::Spawn srv;
    add_turtle.call(srv);

    // Create a publisher for turtle2 velocity commands.
    ros::Publisher vel = node.advertise<geometry_msgs::Twist>("/turtle2/cmd_vel", 10);

    tf::TransformListener listener;// Create a TF listener.

    ros::Rate rate(10.0);

    while (node.ok())
    {
        // Get TF data between turtle1 and turtle2.
        tf::StampedTransform transform;
        try
        {
            listener.waitForTransform("/turtle2", "/turtle1", ros::Time(0), ros::Duration(3.0));
            listener.lookupTransform("/turtle2", "/turtle1", ros::Time(0), transform);
        }
        catch (tf::TransformException &ex)
        {
            ROS_ERROR("%s",ex.what());
            ros::Duration(1.0).sleep();
            continue;
        }

        // Compute angular and linear velocity from the relative pose between turtle1 and turtle2, then publish commands for turtle2.
        geometry_msgs::Twist turtle2_vel_msg;

        turtle2_vel_msg.angular.z = 6.0 * atan2(transform.getOrigin().y(),
                                        transform.getOrigin().x());
        turtle2_vel_msg.linear.x = 0.8 * sqrt(pow(transform.getOrigin().x(), 2) +
                                      pow(transform.getOrigin().y(), 2));
        vel.publish(turtle2_vel_msg);

        rate.sleep();
    }
    return 0;
};-
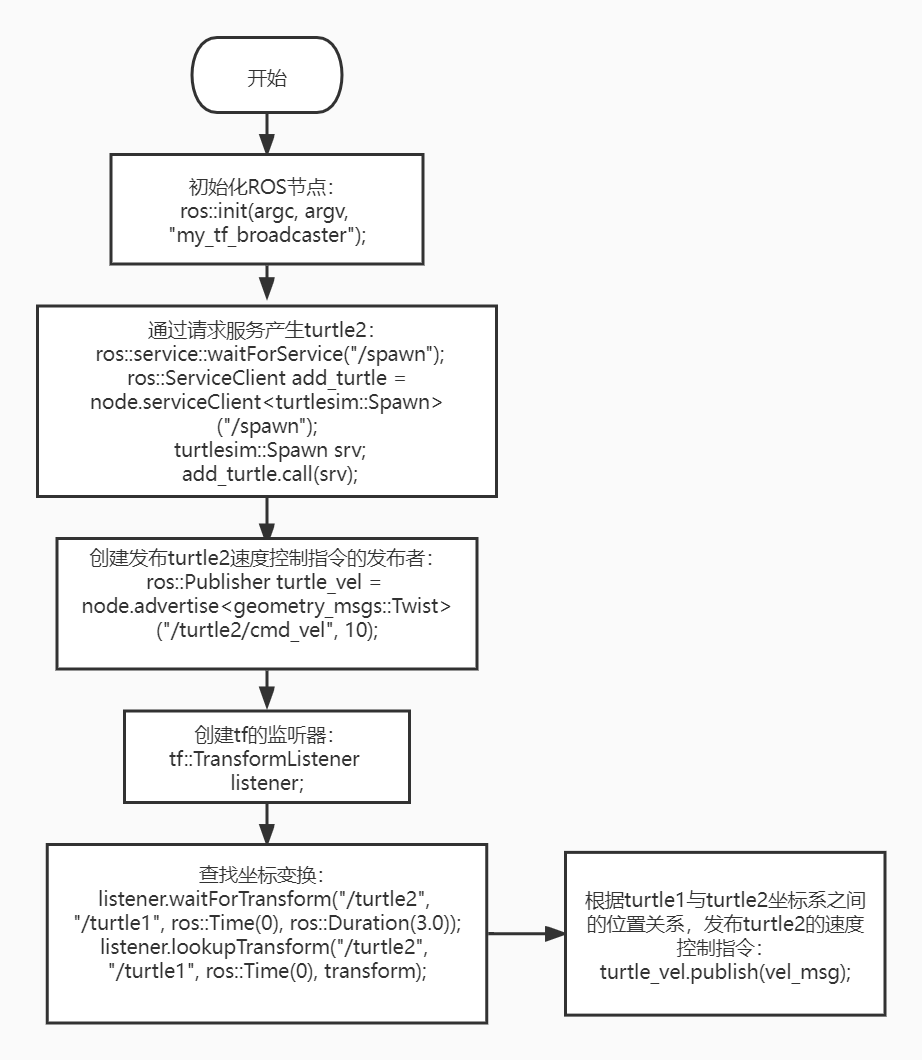
项目流程图
-
代码解析
首先,服务调用创建另一个小乌龟tortele2,然后创建一个乌龟2速度控制器;然后创建一个监听设备,监听并搜索左边的turtle1和tuetle2,其中涉及到两个函数:
代码文件:7-2-1-10-publishing-and-listening-with-tf-example-03.cpp
waitForTransform and lookupTransform
waitForTransform(target_frame,source_frame,time,timeout)
两个坐标分别代表目标坐标和源坐标,时间表示等待两个坐标变化的时间,由于坐标变化是一个阻塞过程,因此需要设置时间限制。
LookupTransform(目标帧,源帧,transferform):给定源帧和目标坐标(目标帧),给定两个坐标之间的时间(变换)。
我们通过LoopupTransform得到坐标变换的结果,然后x, x, x, x, x, x, x, x, x, x, x, x, x, x, x, x, x, x, x, x, x, x, x, x, x, x, x, x, x, x, x, x, x, x, x, x, x, x, x, x, x, x, x, x, x, x, x, x, x, x, x, x, x, x, x, x, x, x, x, x, x, x, x, x, x, x, x, x, x, x, x, x, x, x, x, x, x, x, x, x, x, x, x, x, x, x, x, x, x, x, x, x, x, x, x, x, x, x, x, x, x, x, x, x, x, x, x, x, x, x, x, x, x, x, x, x, x, x, x, x, x, x, x, x, x, x, x, x, x, x, x, x, x, x, x, x, x, x, x, x, x, x、x、x、x、x、x、x、x、x、x
对 CMakeLists.txt 和编译的修改
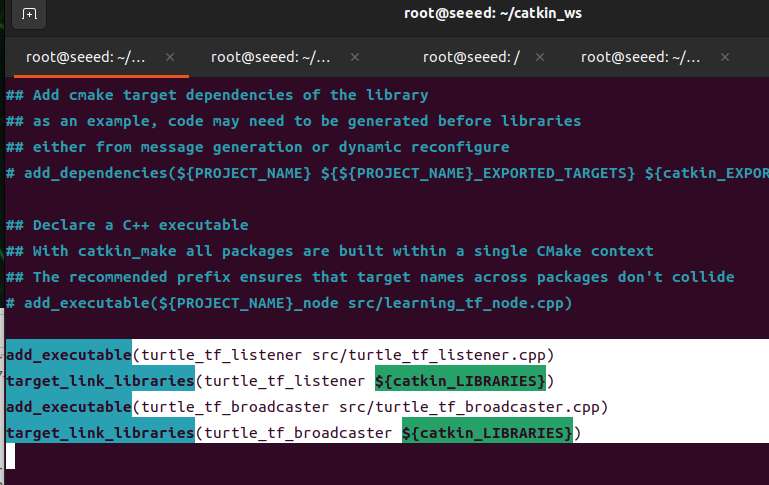
1.修改CMakeLists.txt
修改包下的src/learning_tf/CMakeLists.txt,添加以下内容:
(vim 基础使用回忆:14 次使用 Vim 编辑器)
代码文件:7-2-1-10-publishing-and-listening-with-tf-example-04.cpp
add_executable(turtle_tf_listener src/turtle_tf_listener.cpp)
target_link_libraries(turtle_tf_listener ${catkin_LIBRARIES})

add_executable(turtle_tf_broadcaster src/turtle_tf_broadcaster.cpp)
target_link_libraries(turtle_tf_broadcaster ${catkin_LIBRARIES})
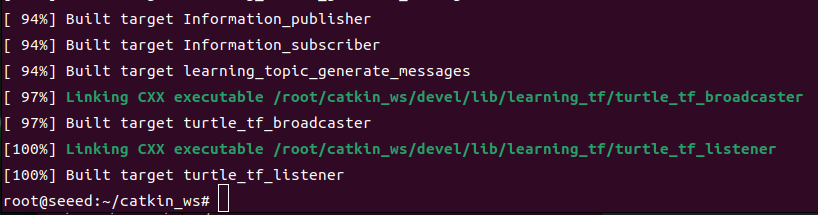
2、编写实施文件
cd ~/catkin_ws
catkin_make
source devel/setup.bash     # source the workspace so ROS can find the program
###启动及运行效果展示
1)打开六个终端并运行以下命令:
roscore
rosrun turtlesim turtlesim_node
rosrun learning_tf turtle_tf_broadcaster __name:=turtle1_tf_broadcaster /turtle1
rosrun learning_tf turtle_tf_broadcaster __name:=turtle2_tf_broadcaster /turtle2
rosrun learning_tf turtle_tf_listener
rosrun turtlesim turtle_teleop_key # start keyboard teleoperation for the turtle- 已显现的影响
三.程序声明
当roscore激活时,小乌龟节点被激活,最后会出现小乌龟;然后我们发布两个tf变换,turtle1->world,turtle2->world,因为如果我们想知道turtle2和turtle1之间的变化,就需要知道它们和trld之间的变化;然后打开tf监听程序,此时发现终端又产生了一只乌龟,乌龟2会向乌龟1移动;然后我们打开键盘控制,然后点击箭头来控制turtle1移动,turtle2就会跟随turtle1移动。
Python 语言的 tf 广播器
1)在包tf中创建文件夹脚本切换到该目录,新建一个.py文件,命名为turtle tf Broadcaster.py
2)将下面的程序代码复制到fileturtle tf Broadcaster.py
代码文件:7-2-1-10-publishing-and-listening-with-tf-new.py
#!/usr/bin/env python3

import roslib
roslib.load_manifest('learning_tf')
import rospy

import tf
import turtlesim.msg

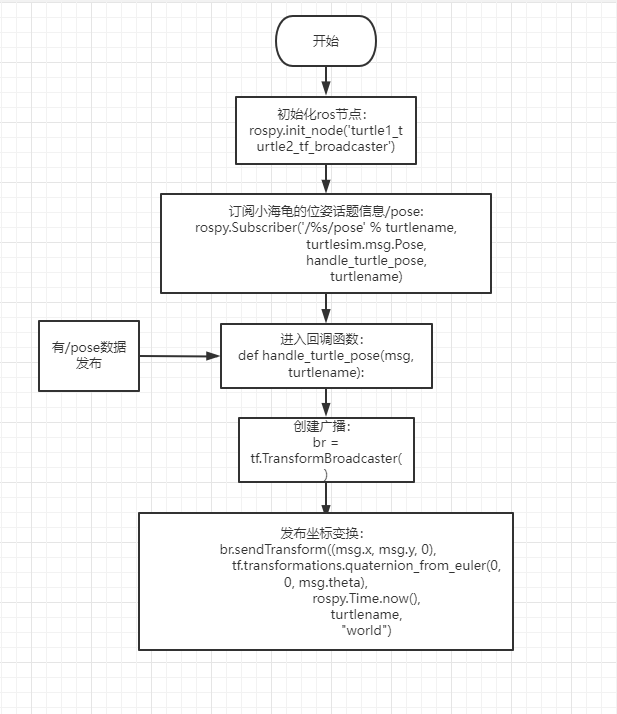
def handle_turtle_pose(msg, turtlename):
    br = tf.TransformBroadcaster()# Create a TF broadcaster.
    # Broadcast the TF transform between world and the named turtle.
    br.sendTransform((msg.x, msg.y, 0),
                     tf.transformations.quaternion_from_euler(0, 0, msg.theta),
                     rospy.Time.now(),
                     turtlename,
                     "world")

if __name__ == '__main__':

    rospy.init_node('turtle1_turtle2_tf_broadcaster')# Initialize the ROS node.

    turtlename = rospy.get_param('~turtle') # Get the turtle name from the parameter server.
    # Subscribe to the turtle pose topic.
    rospy.Subscriber('/%s/pose' % turtlename,
                     turtlesim.msg.Pose,
                     handle_turtle_pose,
                     turtlename)
rospy.spin()- 项目流程图
Python语言实现tf监听设备
1)在profile Linearning tf的脚本文件夹中创建一个Python文件(后缀为.py的文件),名为turtle tf lister.py
2)将下面的程序代码复制到turtle tf lister.py文件中
代码文件:7-2-1-10-publishing-and-listening-with-tf-with.py
#!/usr/bin/env python3
import rospy
import math
import tf
import geometry_msgs.msg
import turtlesim.srv

if __name__ == '__main__':
    rospy.init_node('turtle_tf_listener')# Initialize the ROS node.

    listener = tf.TransformListener()# Initialize a TF listener.

    rospy.wait_for_service('spawn')
    # Call the service to create another turtle named turtle2.
    spawner = rospy.ServiceProxy('spawn', turtlesim.srv.Spawn)
    spawner(8, 6, 0, 'turtle2')
    # Declare a publisher for turtle2 velocity.
    turtle_vel = rospy.Publisher('turtle2/cmd_vel', geometry_msgs.msg.Twist,queue_size=1)

    rate = rospy.Rate(10.0)
    while not rospy.is_shutdown():
        try:
            # Look up the TF transform between turtle2 and turtle1.
            (trans,rot) = listener.lookupTransform('/turtle2', '/turtle1', rospy.Time(0))
        except (tf.LookupException, tf.ConnectivityException, tf.ExtrapolationException):
            continue
        # Compute linear and angular velocity, then publish them.
        angular = 6.0 * math.atan2(trans[1], trans[0])
        linear = 0.8 * math.sqrt(trans[0] ** 2 + trans[1] ** 2)
        cmd = geometry_msgs.msg.Twist()
        cmd.linear.x = linear
        cmd.angular.z = angular
        turtle_vel.publish(cmd)
rate.sleep()- 项目流程图
启动和运营有效性展示
- 准备一份落地文件
在包目录下,新建文件夹launch,切换到launch,新建一个名为Start tf demo py.launch的launch文件,将以下内容复制到其中:
代码文件:7-2-1-10-publishing-and-listening-with-tf-py.xml
<launch>

    <!-- turtlesim node-->
    <node pkg="turtlesim" type="turtlesim_node" name="sim"/>
    <!-- broadcast turtle1 -> world -->
    <node name="turtle1_tf_broadcaster" pkg="learning_tf" type="turtle_tf_broadcaster.py" respawn="false" output="screen" >
      <param name="turtle" type="string" value="turtle1" />
    </node>
    <!-- broadcast turtle2 -> world -->
    <node name="turtle2_tf_broadcaster" pkg="learning_tf" type="turtle_tf_broadcaster.py" respawn="false" output="screen" >
      <param name="turtle" type="string" value="turtle2" />
    </node>
    <!--listener-->
    <node pkg="learning_tf" type="turtle_tf_listener.py" name="listener" />
    <!--turtle keyboard control node-->
    <node pkg="turtlesim" type="turtle_teleop_key" name="teleop" output="screen"/>
</launch>- 启动
roslaunch learning_tf start_tf_demo_py.launch应用程序运行时,鼠标点击运行lanch的窗口,按下方向键,turtle2会随着turtle1移动。
3)运行效果与C++大致一致
数字