Getting Started with Node-RED
Last updated:
Introduction
Node-RED is an open-source, flow-based development tool for connecting devices, APIs, and online services. Its browser-based editor allows you to build data-processing and automation workflows by wiring nodes together, making it useful for IoT and industrial edge applications.
In this tutorial, we will install Node-RED on a reComputer RK Series device, complete its initial configuration, open the web editor, and deploy a simple test flow.
Hardware and Software Requirements
| Item | Requirement |
|---|---|
| Edge device | reComputer RK Series device |
| Operating system | 64-bit Debian-based Linux, such as Debian or Armbian |
| Network | Internet access for installation; local network access to the device |
| Access | Terminal or SSH access with sudo privileges |
| Client | A computer with a modern web browser |
Step 1: Connect to the reComputer RK Device
Connect to the board through a terminal or SSH. For example:
ssh seeed@<DEVICE_IP>Replace <DEVICE_IP> with the IP address of your board and seeed with the actual login username if different.
Check the system architecture and Linux distribution:
uname -m
cat /etc/os-release
On a 64-bit RK system, the architecture should be aarch64.
Step 2: Install Node-RED
Install the packages required by the official installer:
sudo apt update
sudo apt install -y curl git build-essential ca-certificates
Run the official Node-RED Debian installer:
bash <(curl -fsSL https://github.com/node-red/linux-installers/releases/latest/download/install-update-nodered-deb) --node22 --skip-piThe --node22 option installs Node.js 22, and --skip-pi skips Raspberry Pi-specific nodes that are not needed for the RK Series. The installer installs Node-RED and configures its system service.
Run the installer as your regular Linux user with sudo privileges, rather than prefixing the command with sudo. Confirm installation when prompted and follow the on-screen instructions.
Step 3: Complete the Initial Configuration
On a fresh installation, complete the Node-RED settings initialization prompts when they appear. If initialization was skipped and no settings file exists yet, run the following command as the same user who installed Node-RED:
node-red admin init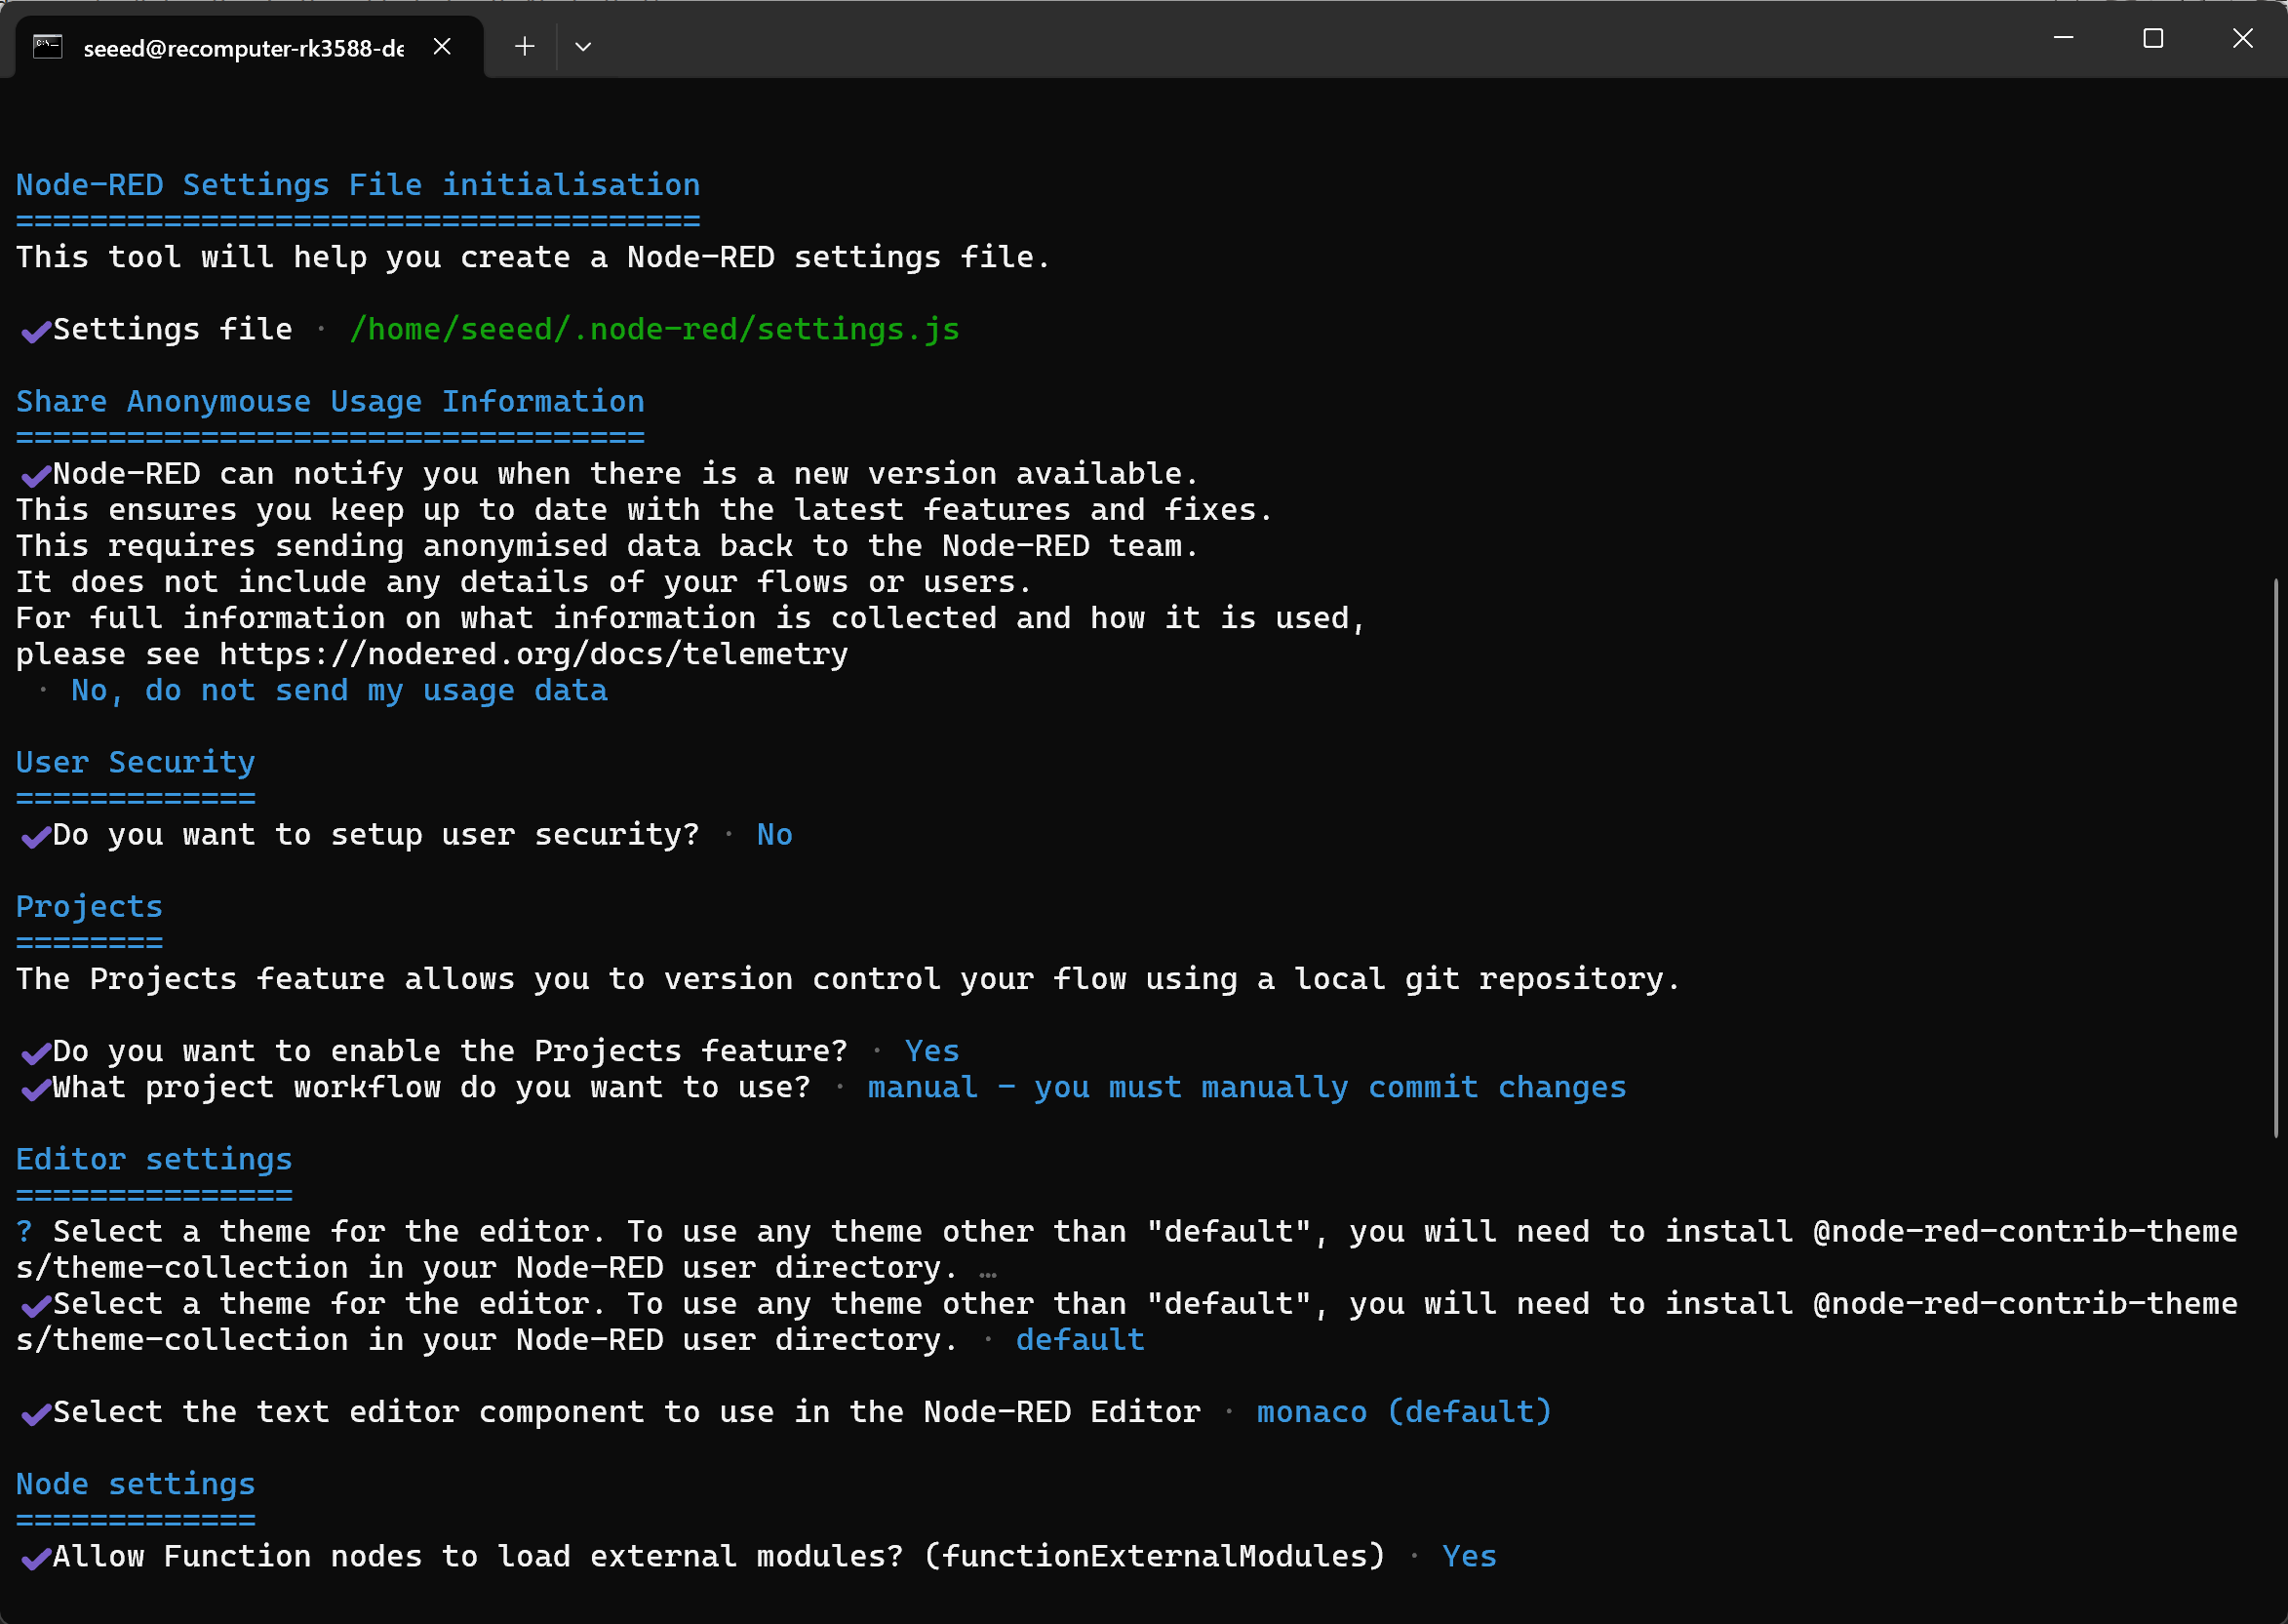
The configuration is stored in the Node-RED user directory. For a Linux user named seeed, the default path is:
/home/seeed/.node-red/settings.jsFor security, keep the editor on a trusted network and do not expose port
1880directly to the public internet. The administrator password is configured for the web editor.
Step 4: Verify the Installation and Start Node-RED
Check the installed versions:
node -v
npm -v
node-red --version
Start the Node-RED service:
node-red-startThis command starts the background service and follows its logs. Press Ctrl+C to leave the log view; the service keeps running.
In the same terminal after leaving the log view, or in another terminal, confirm that the service is running:
sudo systemctl status nodered.service --no-pagerThe service should report active (running).
Enable automatic startup after a reboot:
sudo systemctl enable nodered.serviceStep 5: Access the Node-RED Web Editor
Find the IP address of your reComputer RK device:
hostname -IFrom a computer on the same network, open:
http://<DEVICE_IP>:1880Node-RED uses port 1880 by default. If user security was enabled in the initialization step, log in with the account you created.
The Node-RED flow editor will appear, with a node palette on the left, a workspace in the center, and sidebar panels on the right.
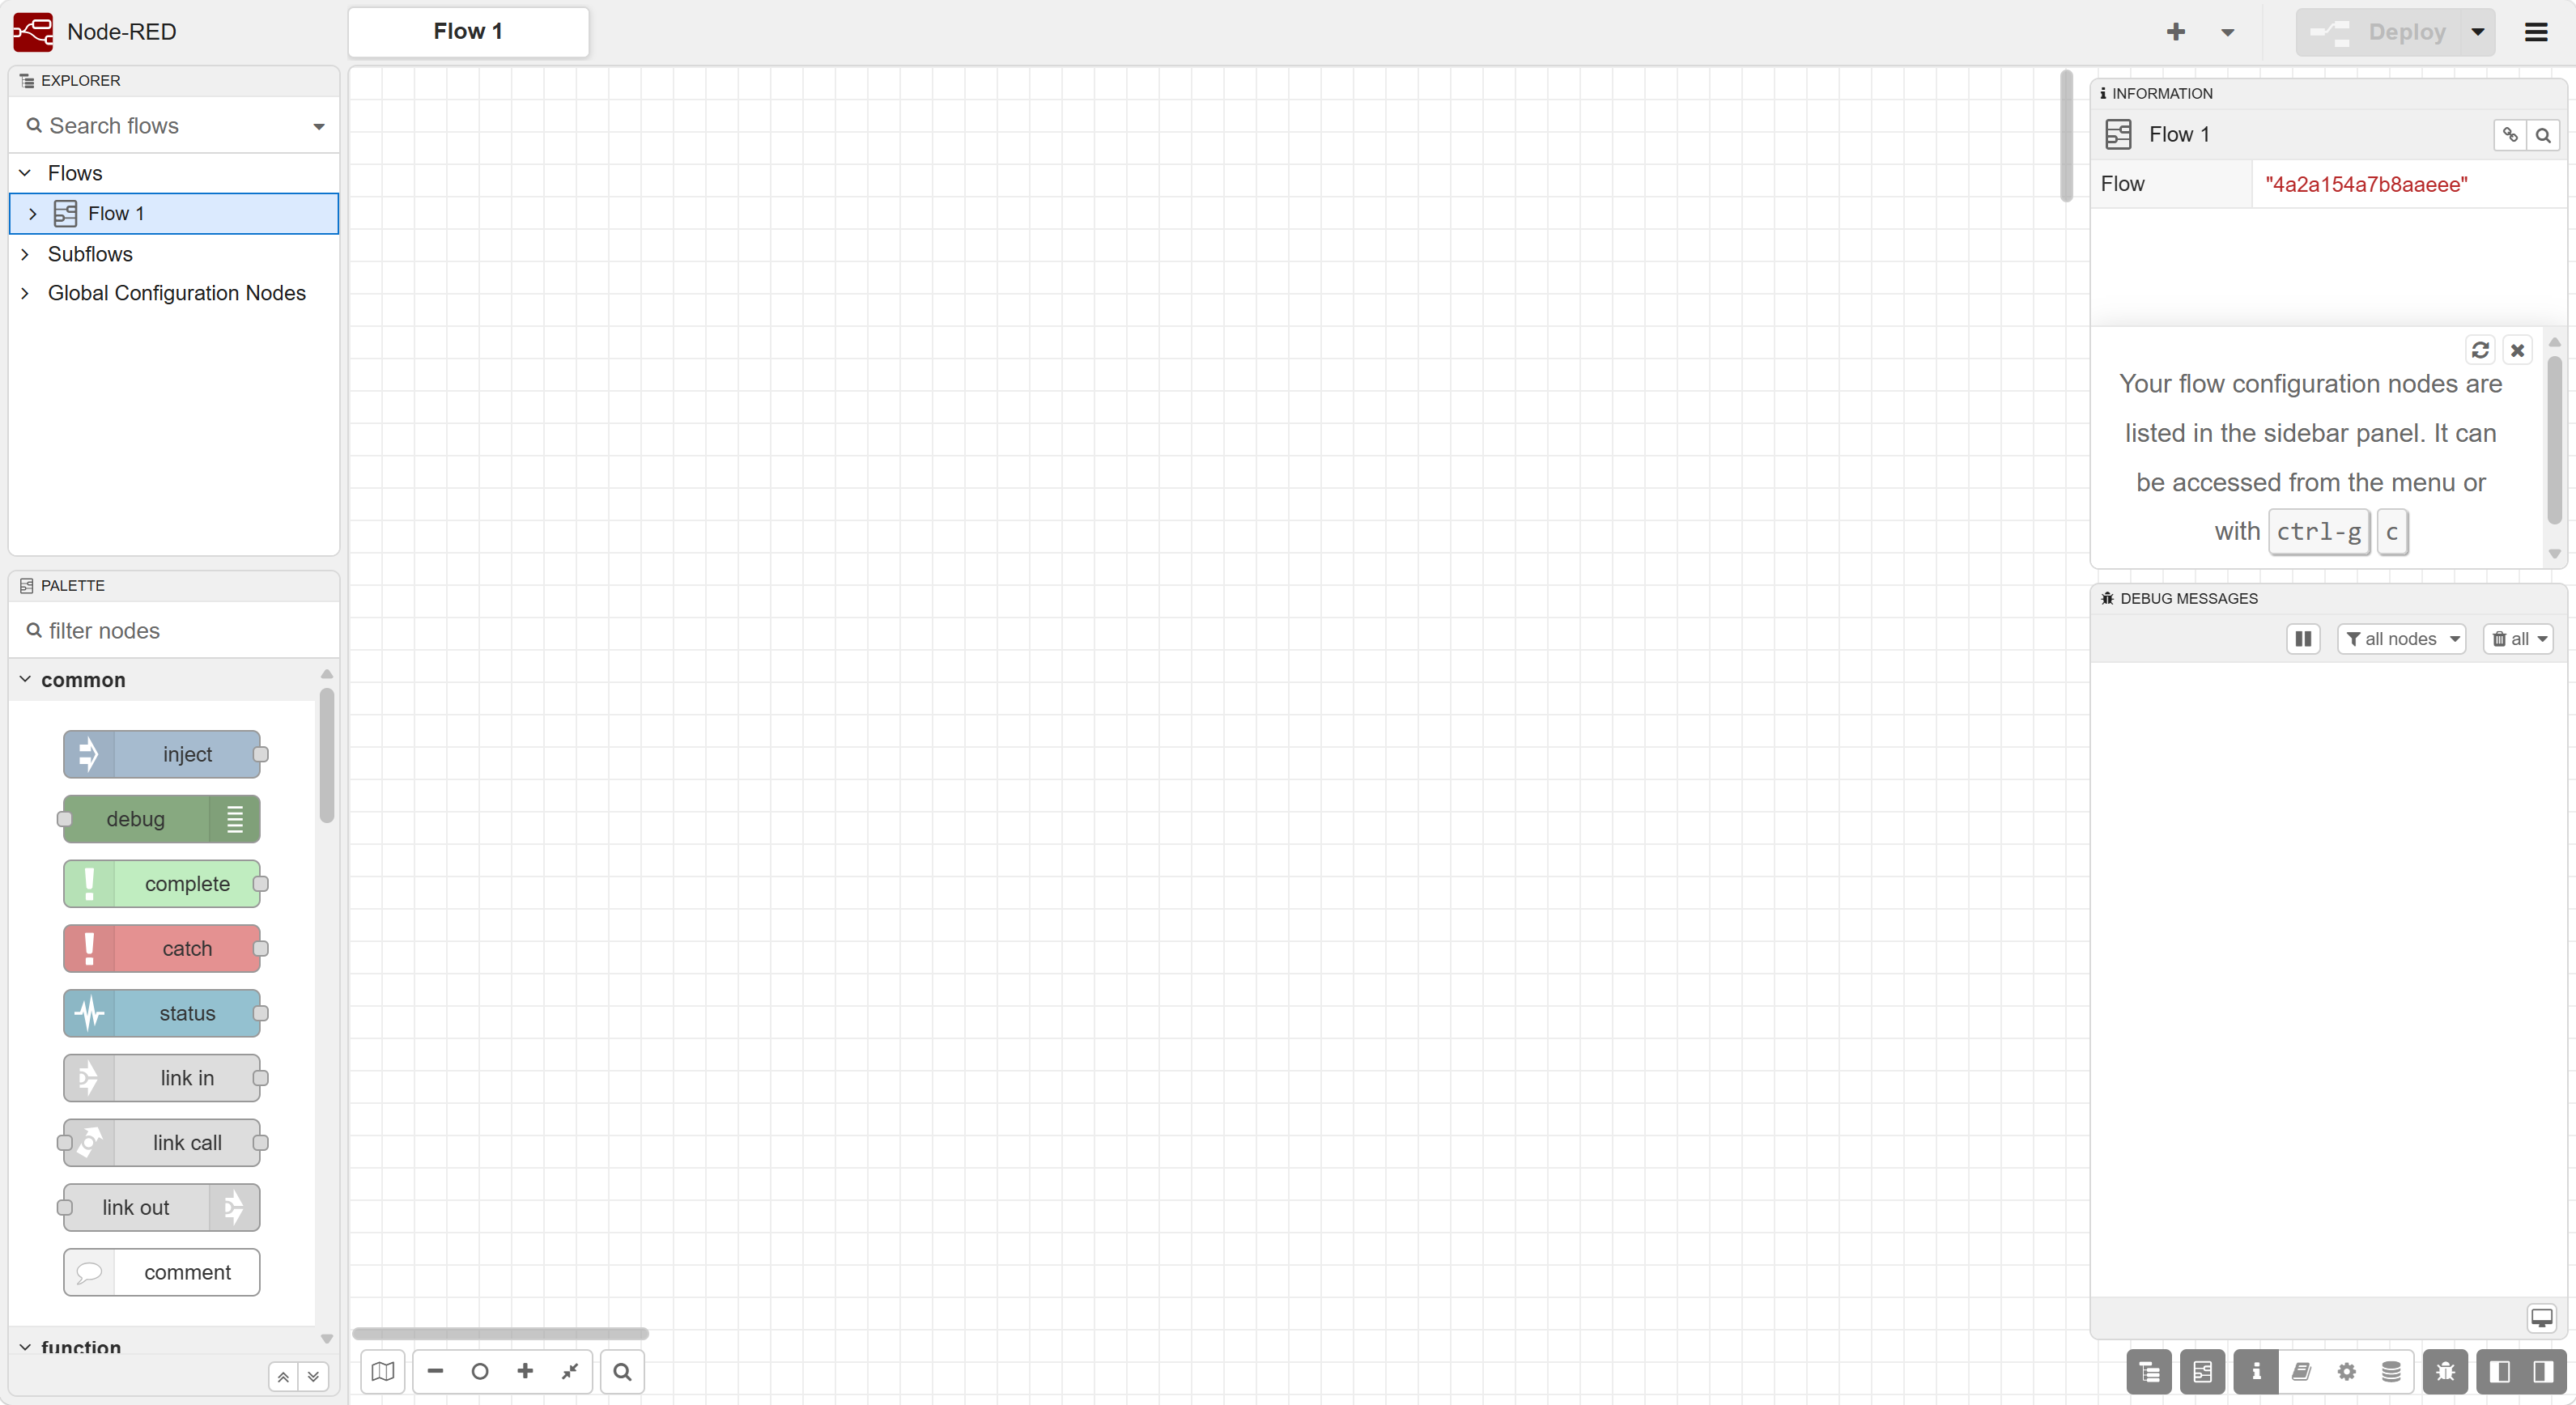
Step 6: Create and Run Your First Flow
We will create a simple flow using the built-in Inject and Debug nodes.
-
Find the inject node in the left palette and drag it onto the workspace.
-
Double-click the Inject node. Set
msg.payloadto a string with the valueHello from reComputer RK Series!, then click Done.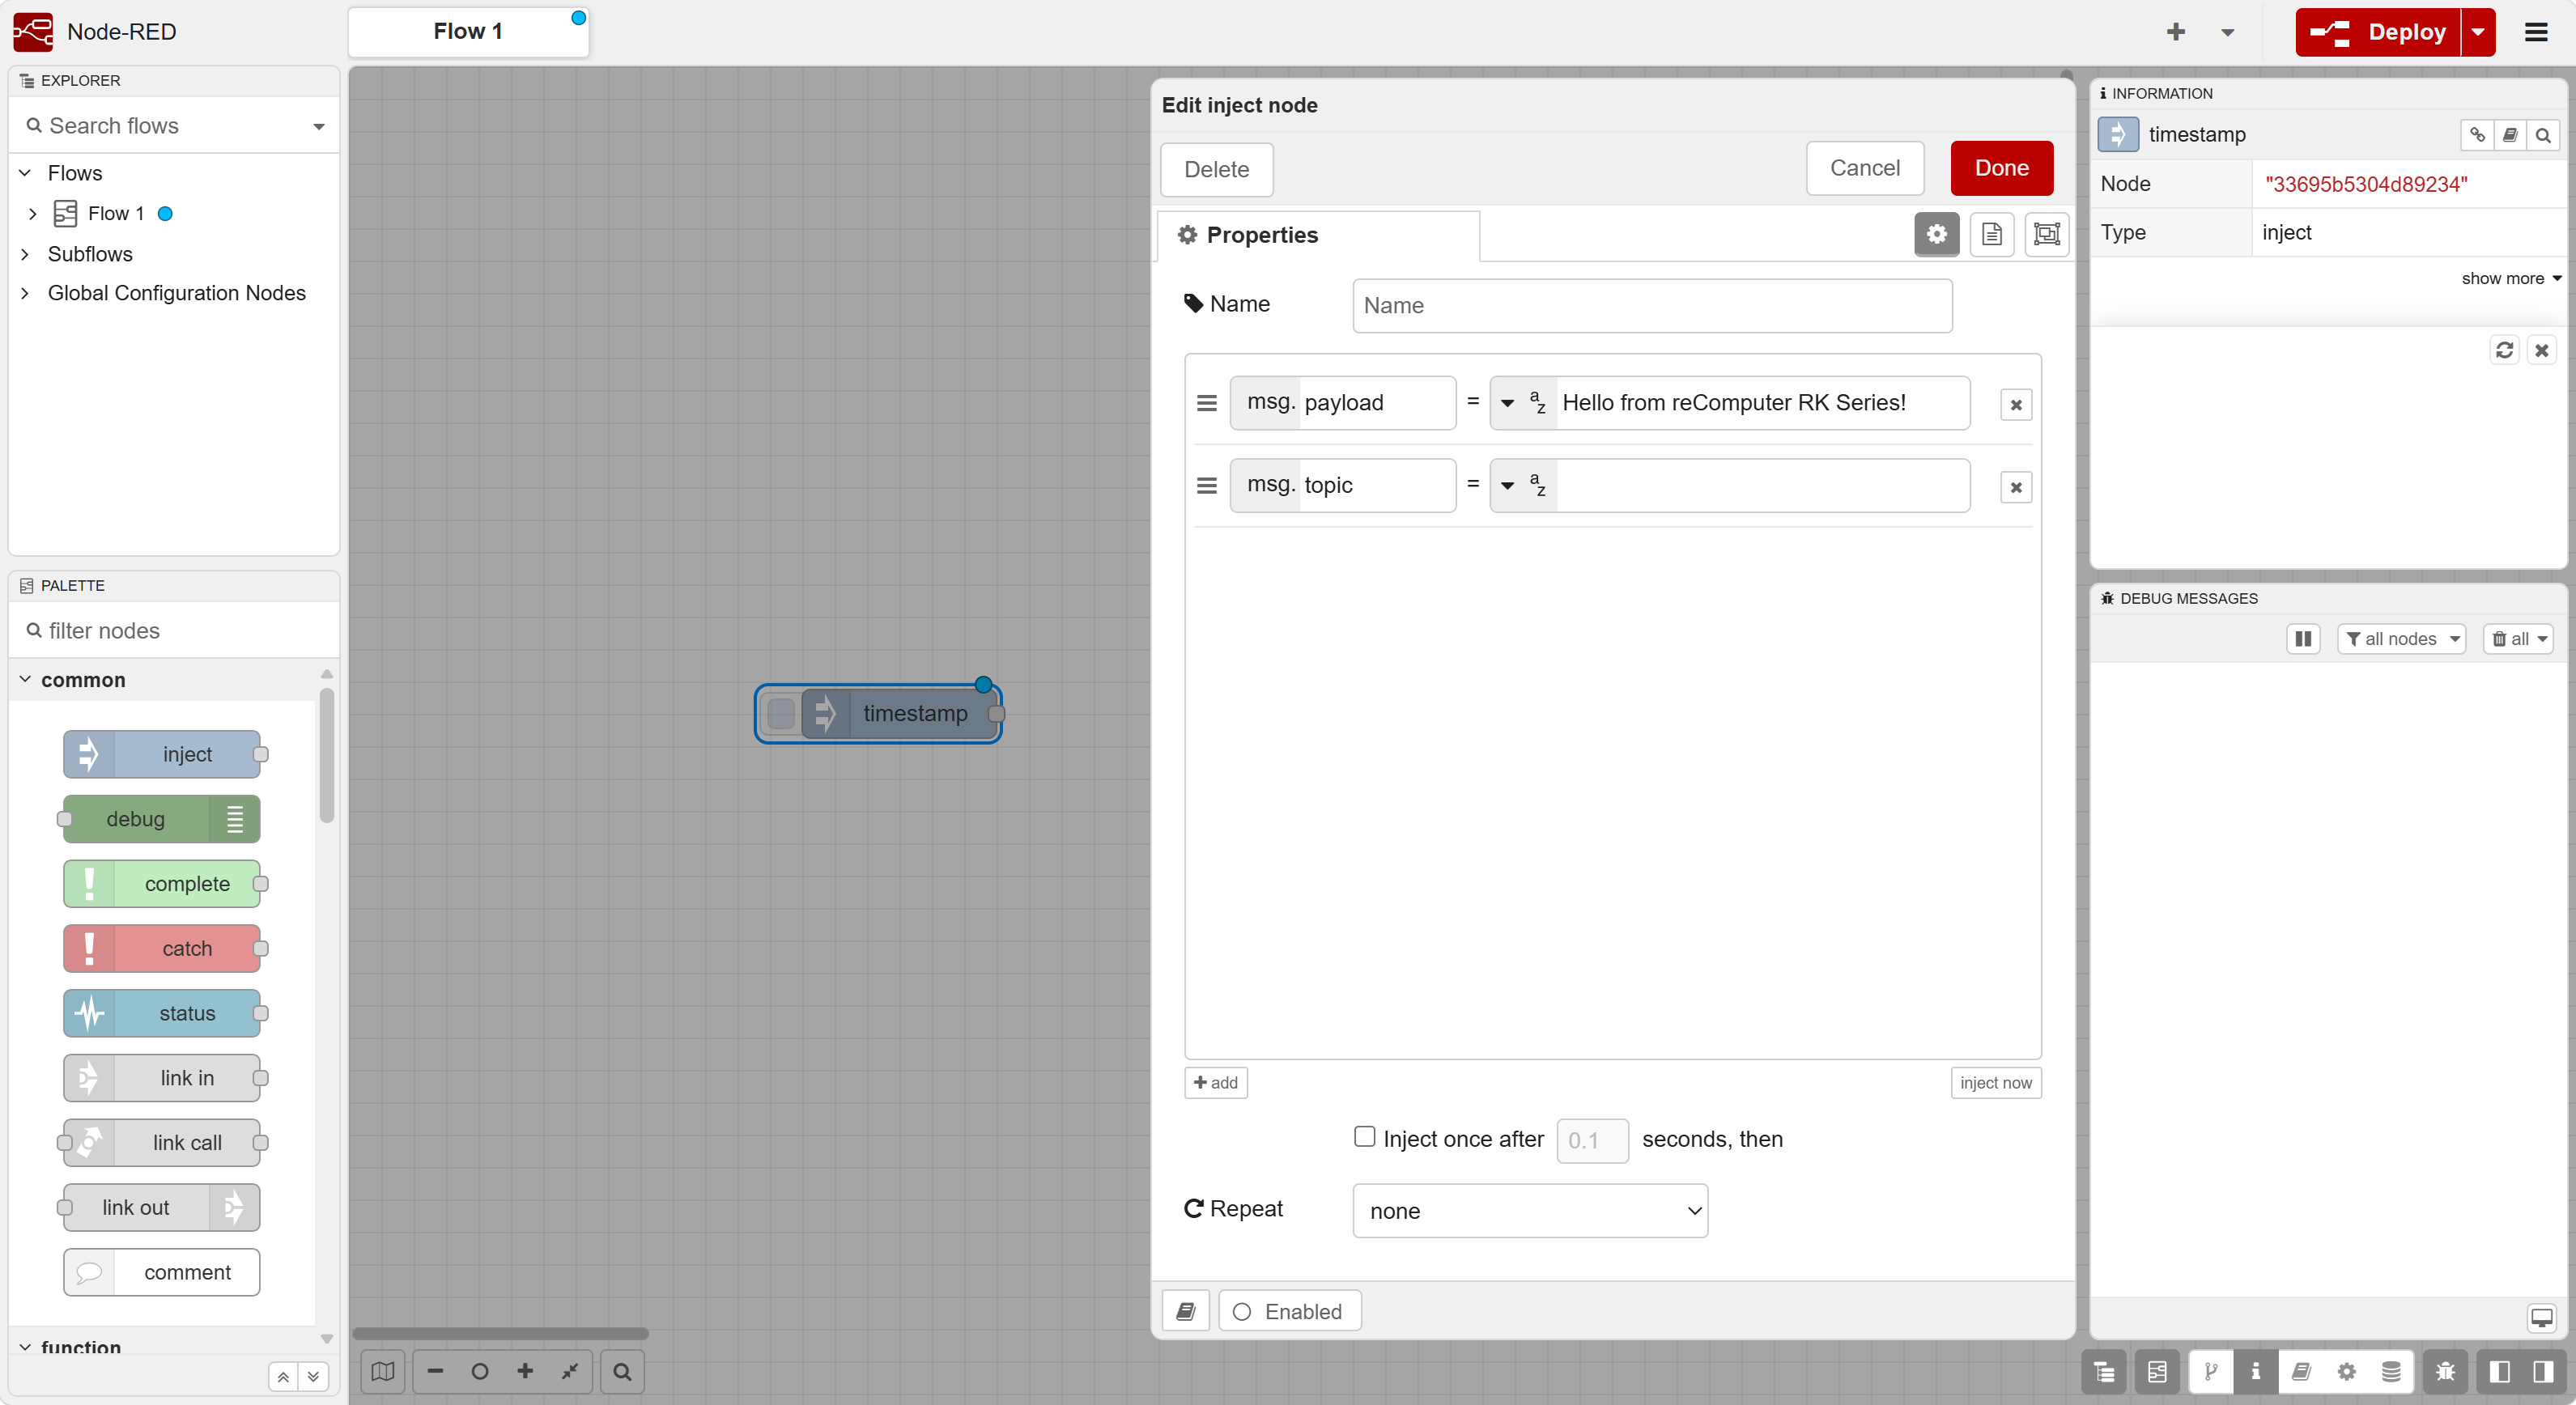
-
Drag a debug node onto the workspace.
-
Connect the Inject node's output to the Debug node's input.
-
Click Deploy in the upper-right corner to deploy the flow.
-
Open the Debug messages sidebar and click the small button on the left of the Inject node.
The Debug sidebar should display:
Hello from reComputer RK Series!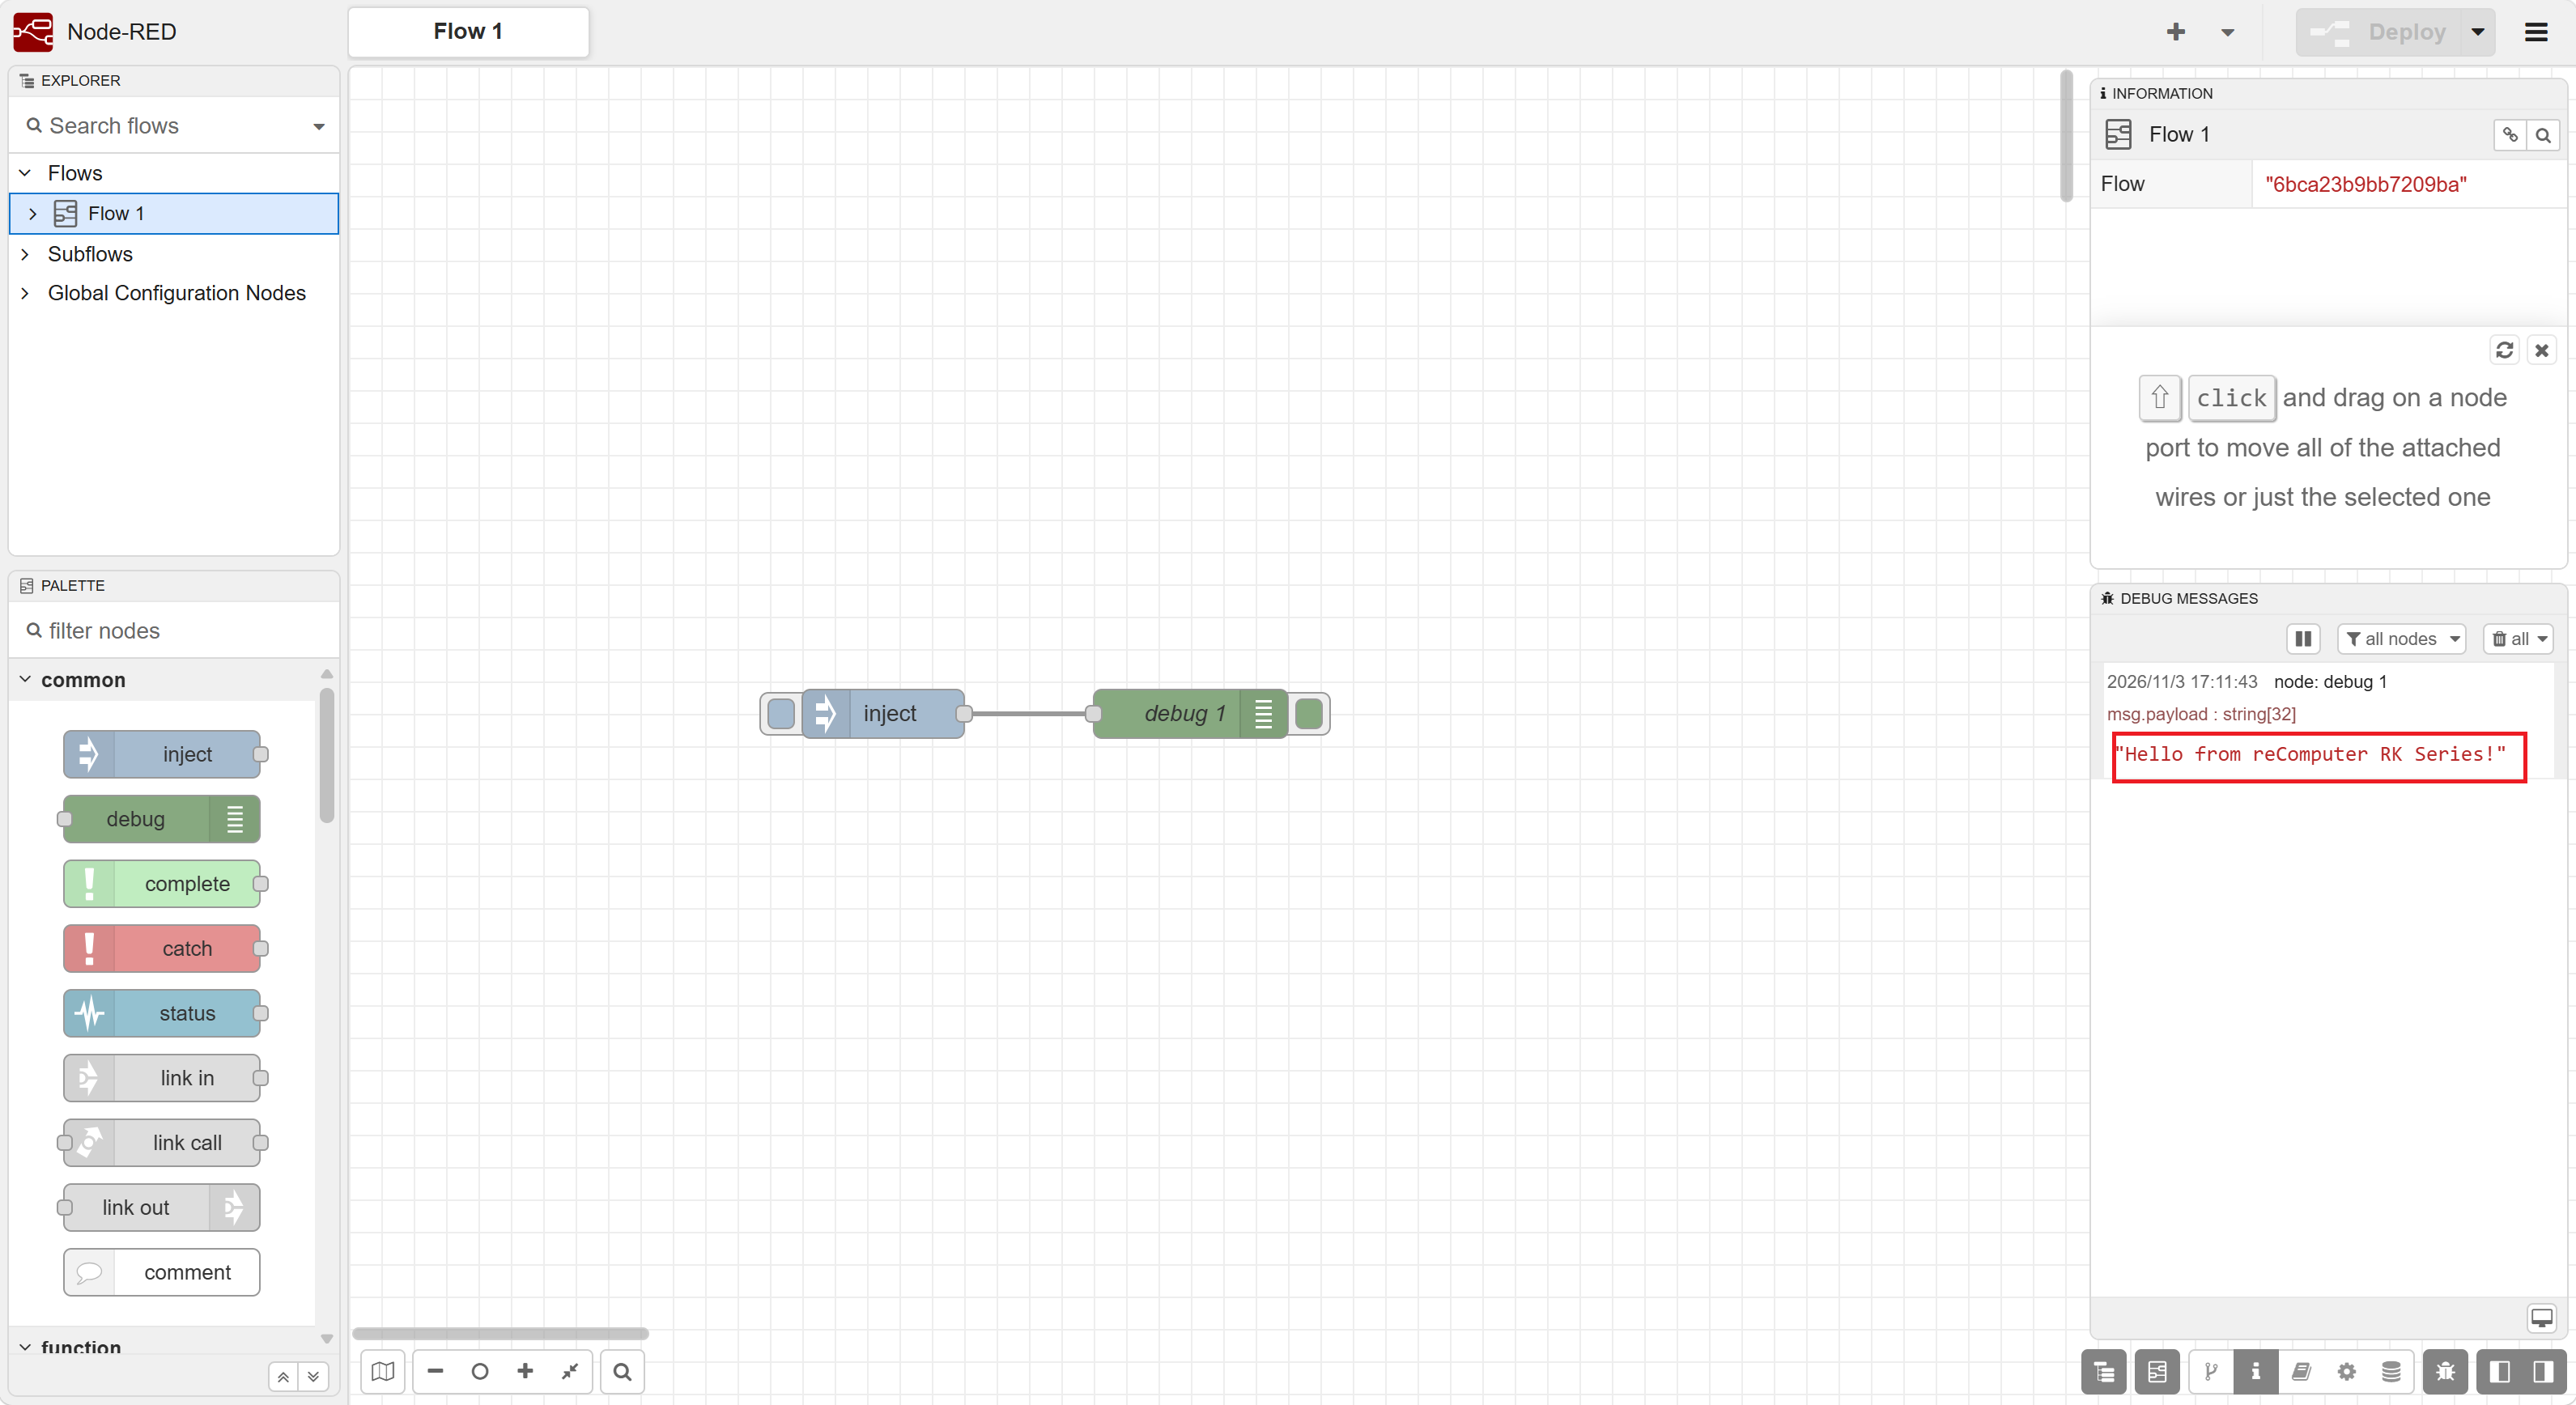
This confirms that the Node-RED editor can deploy and execute a flow on the RK device.
Step 7: Useful Node-RED Service Commands
| Action | Command |
|---|---|
| Start Node-RED | node-red-start |
| Stop Node-RED | node-red-stop |
| Restart Node-RED | node-red-restart |
| View logs | node-red-log |
| Check service status | sudo systemctl status nodered.service --no-pager |
| Enable startup on boot | sudo systemctl enable nodered.service |
Conclusion
You have installed Node-RED on a reComputer RK Series device, configured the editor, enabled its background service, and deployed a simple flow. Node-RED can now serve as a foundation for edge IoT applications using protocols such as MQTT and Modbus TCP, which can be covered in separate tutorials.