MQTT Communication with Node-RED
Last updated:
Introduction
MQTT is a lightweight publish/subscribe messaging protocol widely used in Internet of Things (IoT) applications. Instead of communicating directly with each other, devices send messages to an MQTT broker under a topic, and other clients can subscribe to that topic to receive the messages.
Node-RED provides built-in MQTT nodes, making it easy to receive and process IoT messages without writing a full MQTT application. In this tutorial, we will configure Node-RED on a reComputer RK Series device to subscribe to a topic on the HiveMQ public MQTT broker, then publish a JSON message from the RK terminal to verify the connection.
Security: This example uses the shared HiveMQ public broker on TCP port 1883 without TLS or authentication. Use test data only. Do not transmit passwords, personal information, or production/industrial data. For production deployments, use an authenticated broker with TLS.
Prerequisites
| Item | Requirement |
|---|---|
| Hardware | reComputer RK Series device |
| Operating system | Debian-based ARM64 Linux |
| Node-RED | Installed and running; complete Getting Started with Node-RED first |
| Network | Internet access to the HiveMQ public MQTT broker |
| Access | A web browser for Node-RED and a terminal or SSH connection to the RK device |
How It Works
reComputer RK Terminal
(mosquitto_pub)
       |
       | Publish JSON to topic: rk3588/seeed/demo
       v
HiveMQ Public MQTT Broker
(broker.hivemq.com:1883)
       |
       | Subscribe to the same topic
       v
Node-RED on reComputer RK
MQTT in  -->  Debug
       |
       v
Debug sidebar: received JSON object
Step 1: Open the Node-RED Editor
Ensure Node-RED is running on the RK device:
sudo systemctl status nodered.service --no-pagerIf needed, start the service:
node-red-startIf this command follows the service logs, press Ctrl+C to return to the terminal; Node-RED keeps running in the background.
Find the device's local IP address:
hostname -IFrom a computer on the same network, open the Node-RED editor:
http://<RK_DEVICE_IP>:1880Replace <RK_DEVICE_IP> with the actual IP address of the device. Log in if editor authentication was enabled during Node-RED setup.
Step 2: Add an MQTT Input Node
- Open Flow 1 (or create a new flow).
- Search the left palette for mqtt in, then drag the purple mqtt in node onto the workspace.
- Double-click the node to open Edit mqtt in node.
- Next to Server, click the add/edit button (+ or a pencil icon, depending on the version) to create an MQTT broker configuration.
Step 3: Configure the HiveMQ Broker
In the MQTT broker configuration dialog, enter:
| Setting | Value |
|---|---|
| Name | HiveMQ (optional display name) |
| Server | broker.hivemq.com |
| Port | 1883 |
| Protocol | MQTT V3.1.1 |
| Client ID | Leave blank to use an automatically generated ID |
| TLS | Disabled |
| Username / Password | Leave blank |
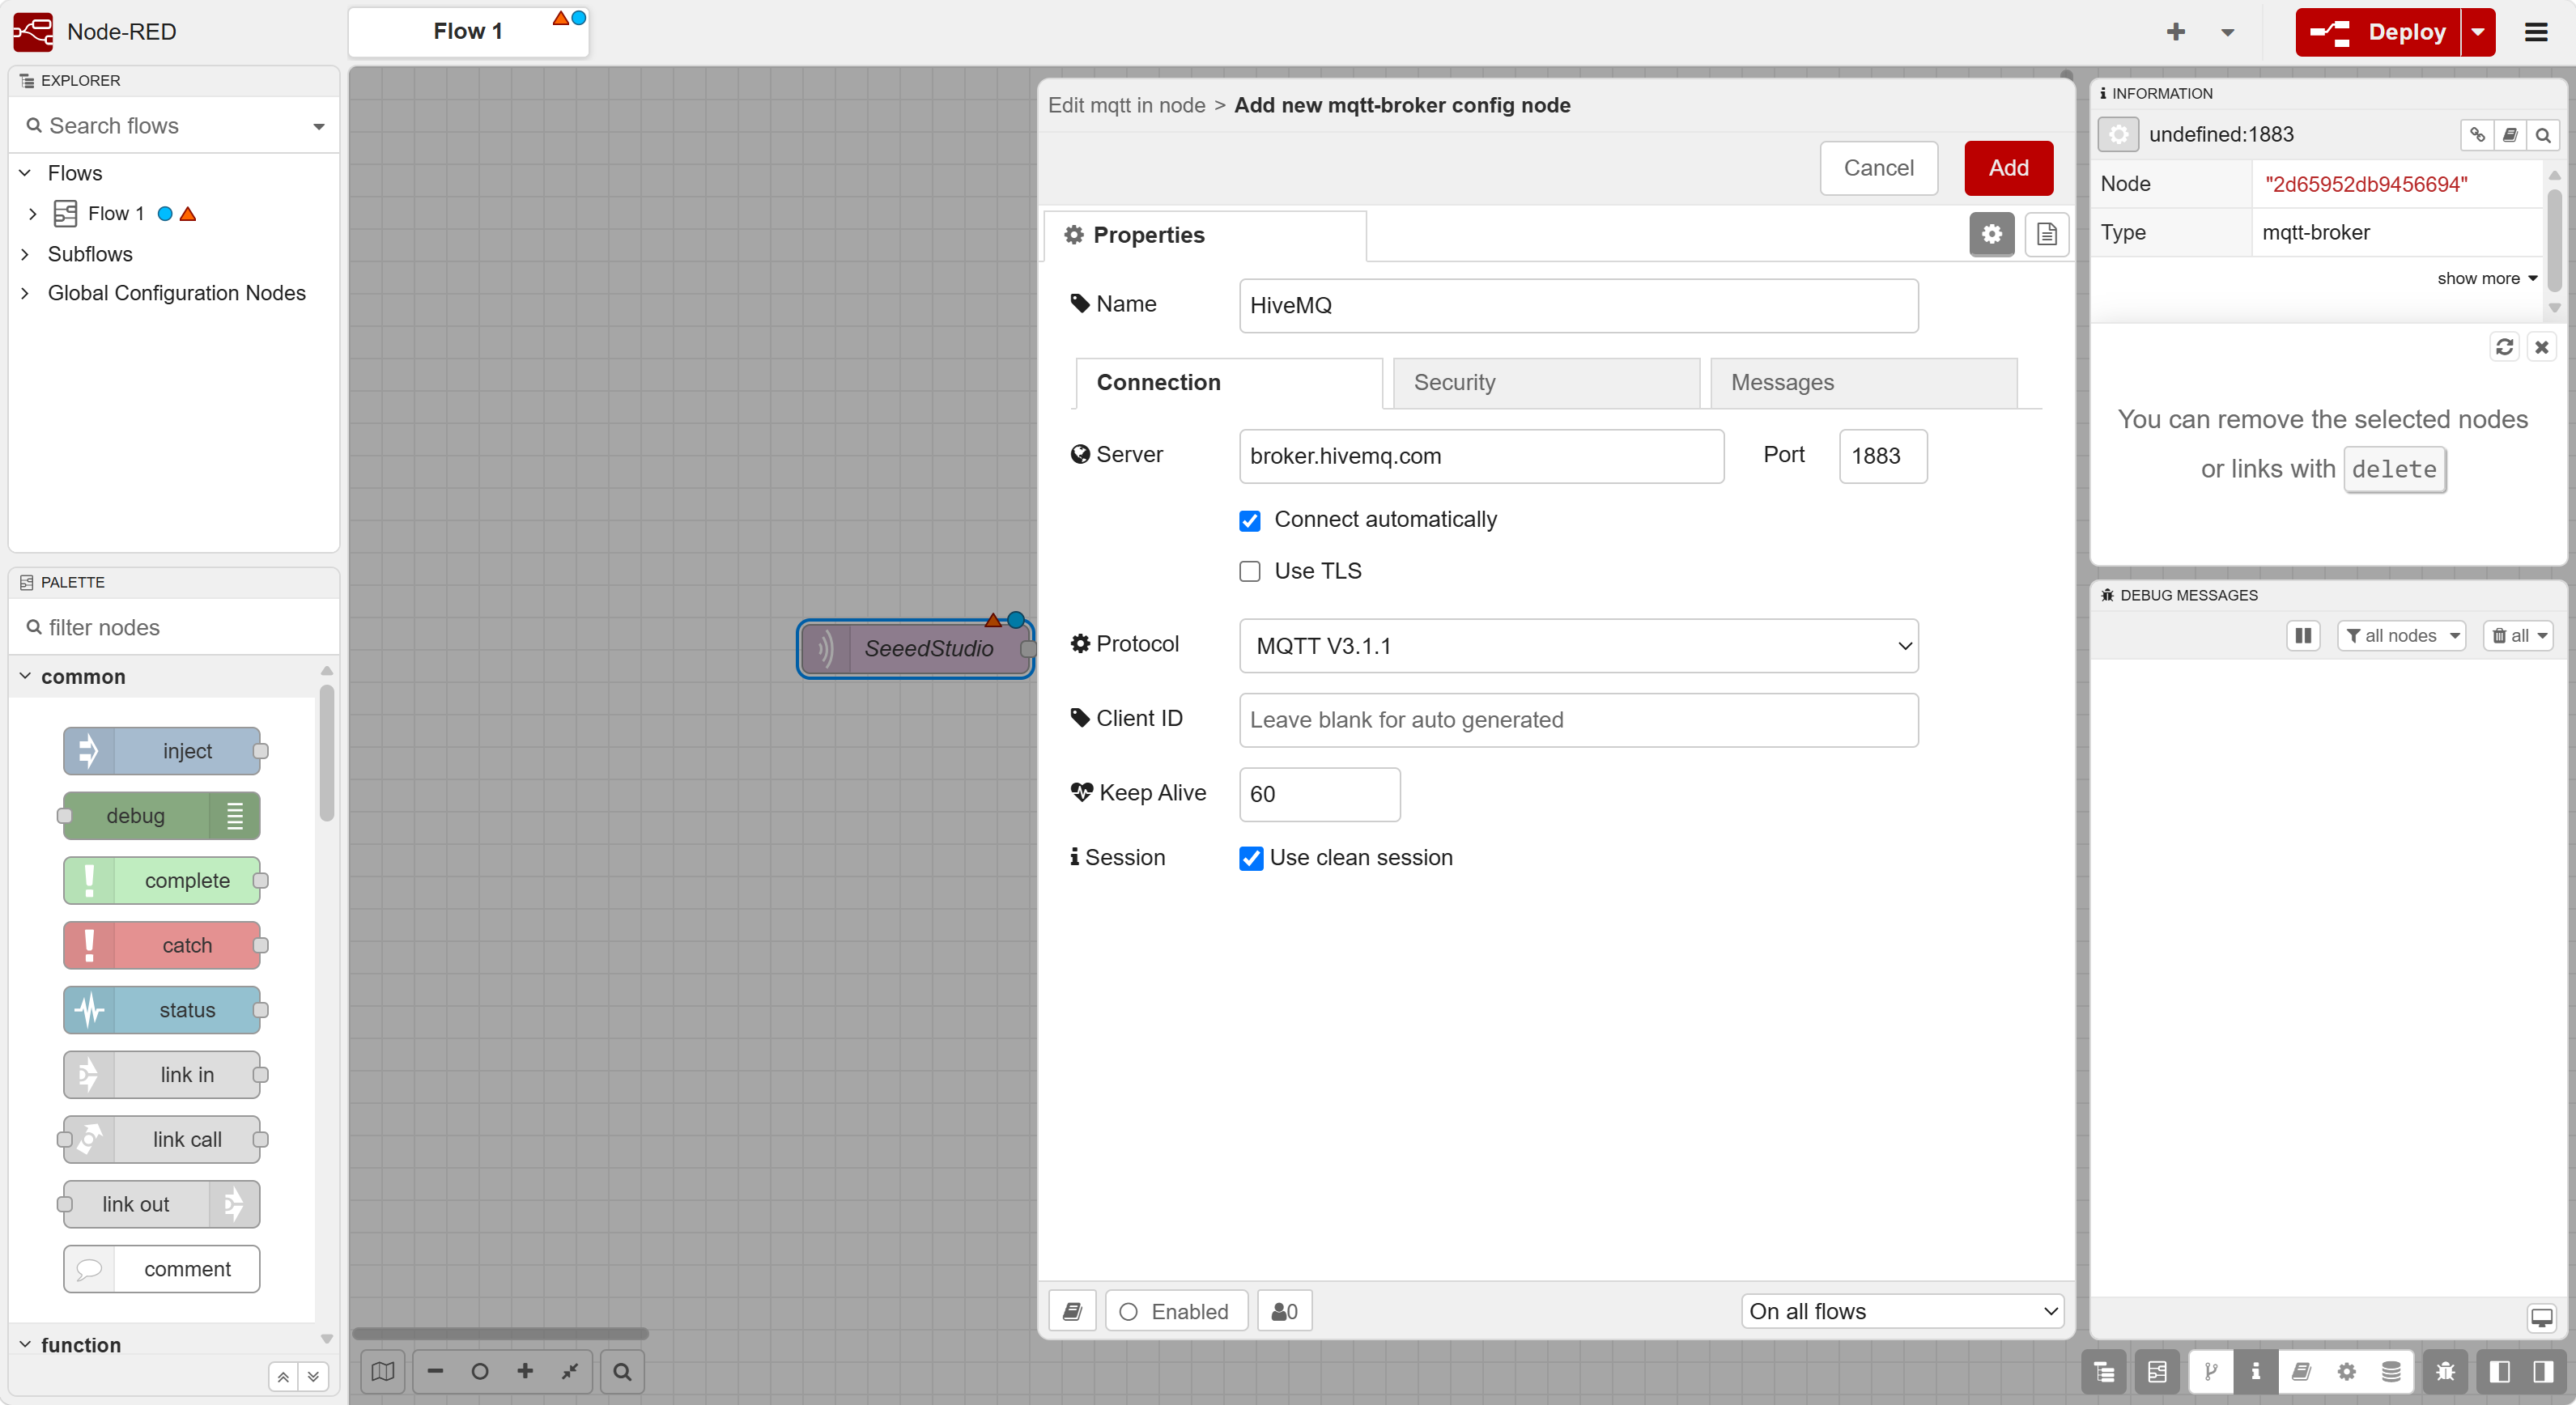
Keep the remaining options at their defaults, then click Add or Update (depending on the editor version) to save the broker configuration.
The public broker is shared by other users. Choose a topic that is unlikely to collide with other tests. This example uses
rk3588/seeed/demo. If you choose a different topic, use it consistently in both the subscription and publishing command.
Step 4: Configure the MQTT Subscription
Back in Edit mqtt in node, set:
| Setting | Value |
|---|---|
| Server | HiveMQ |
| Action | Subscribe to single topic |
| Topic | rk3588/seeed/demo |
| QoS | 0 |
| Output | auto-detect (parsed JSON object, string or buffer) |
| Name | SeeedStudio |
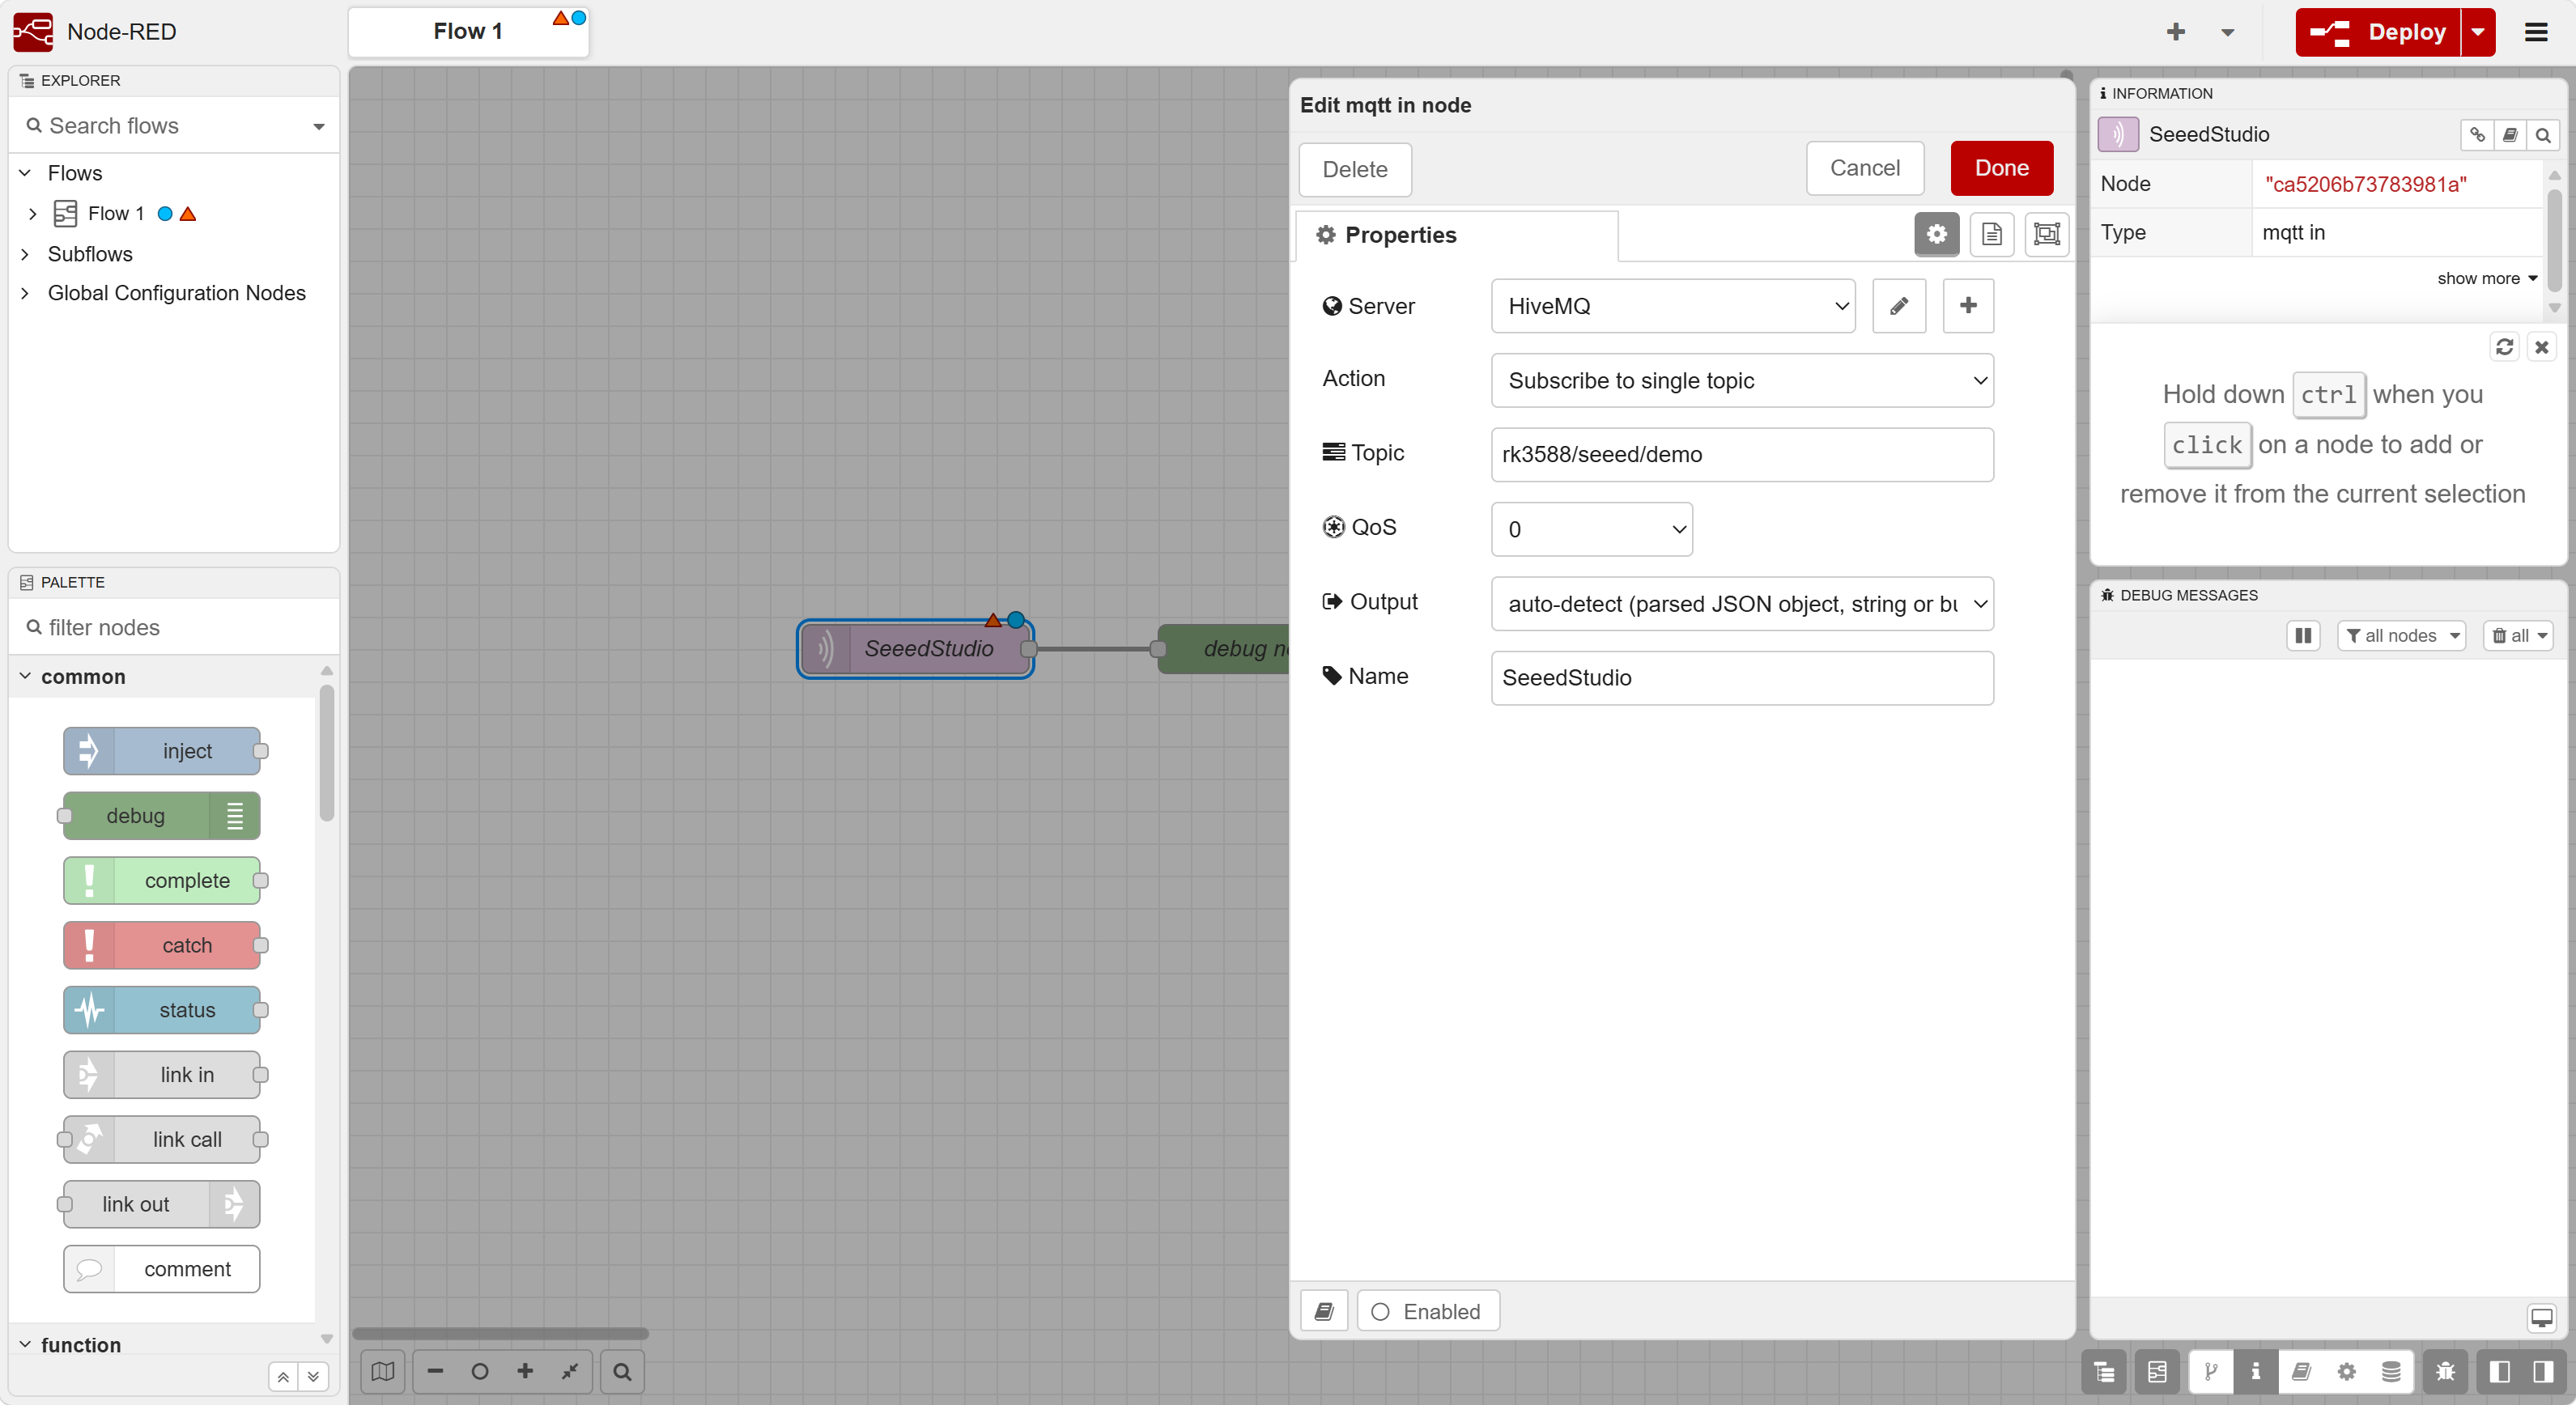
Click Done to save the node.
MQTT topics are case-sensitive. The topic in Node-RED must match the topic used by the command-line publisher exactly. If you change the topic to a unique value, update the publishing commands in Step 7 as well.
Step 5: Connect MQTT In to Debug and Deploy
- Search the palette for debug, then drag the green debug node into the workspace.
- Connect the output of SeeedStudio (mqtt in) to the input of the debug node.
- Open the Debug node settings and leave its output set to
msg.payload. - Click Done, then click Deploy in the upper-right corner.
- Open the Debug messages sidebar.
The resulting flow should look like this:
[SeeedStudio (mqtt in)] ----> [debug node]Once the MQTT connection is established, the MQTT in node should show a green connected status beneath it.
Step 6: Install the MQTT Command-Line Client
In the reComputer RK device's terminal, install the Mosquitto command-line tools:
sudo apt update
sudo apt install -y mosquitto-clients
The mosquitto_pub command sends an MQTT message to the broker. Node-RED, already subscribed to the same topic, can receive it.
Step 7: Publish a Test JSON Message
Run the following command in the RK terminal:
mosquitto_pub \
  -h broker.hivemq.com \
  -p 1883 \
  -t "rk3588/seeed/demo" \
  -m '{"device":"RK3588","temperature":25.6}'
This command publishes one JSON message to the topic rk3588/seeed/demo using the public HiveMQ broker.
For more detailed command-line output, you can use the -d flag:
mosquitto_pub -d \
  -h broker.hivemq.com \
  -p 1883 \
  -t "rk3588/seeed/demo" \
  -m '{"device":"RK3588","temperature":25.6}'
Step 8: Verify the Received Message in Node-RED
Return to the Node-RED editor and check the Debug messages sidebar. The MQTT input node should forward the message to the Debug node.
The message should contain the following data:
{
  "device": "RK3588",
  "temperature": 25.6
}
Because the MQTT input node's Output is configured to auto-detect JSON, Node-RED can display the payload as a parsed JavaScript object. The sidebar also identifies the topic as rk3588/seeed/demo.
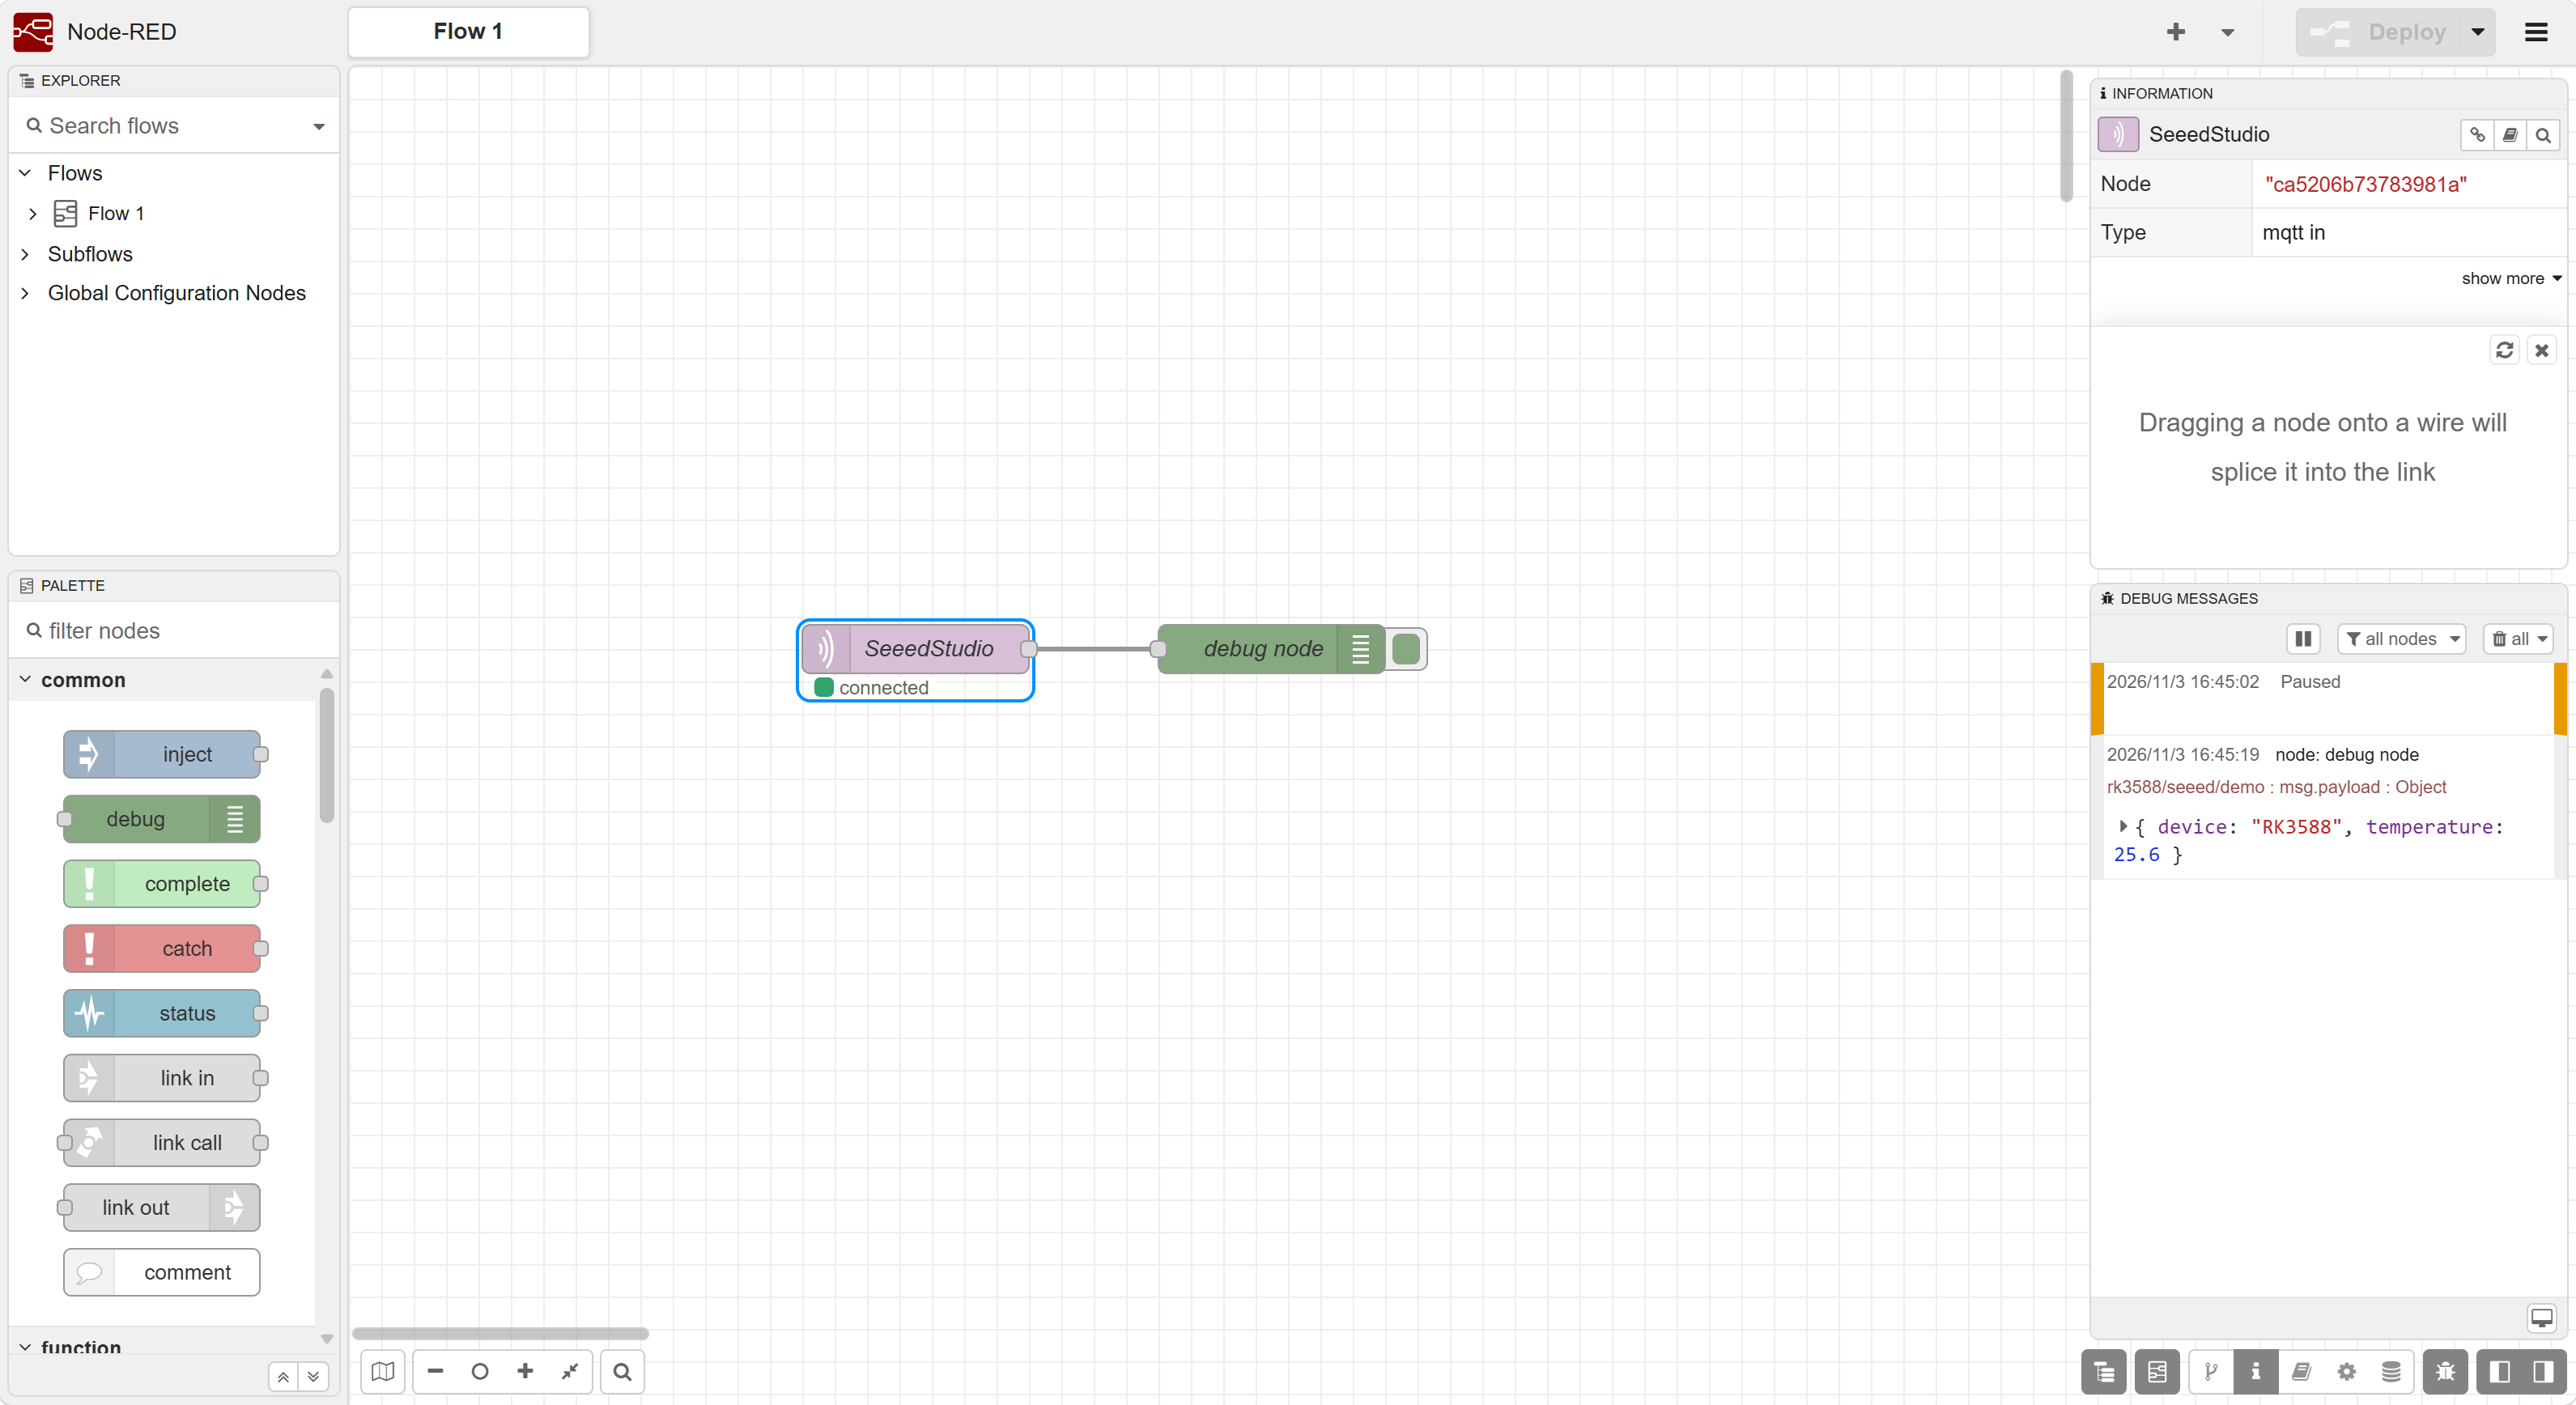
The successful message confirms this communication path:
reComputer RK terminal → HiveMQ public broker → Node-RED MQTT in → Debug
Conclusion
You have configured Node-RED on a reComputer RK Series device to connect to an MQTT broker, subscribe to a topic, and receive a JSON message published from the device's terminal. This provides a simple foundation for developing MQTT-based IoT applications on the RK platform.
In later tutorials, the MQTT flow can be extended to process sensor data, publish messages with an mqtt out node, or integrate with other industrial protocols and dashboards.