Overview of ROS and Environment Setup
Introduction
This tutorial provides a concise overview of ROS (Robot Operating System) and guides you through the quick installation and experience of ROS on the reComputer J3010 Nvidia Jetson Orin Nano. By the end of this tutorial, you will have a working ROS environment and will be able to run a simple ROS demo.
Prerequisites
To follow this tutorial, you will need the following hardware and software:
- Hardware: reComputer J3010 (Nvidia Jetson Orin Nano), display, keyboard, and mouse.
- Software: Jetpack 5.1.1, Ubuntu 20.04, ROS Noetic, Python and C++.
Introduction to the Development of ROS
What is ROS?
ROS (Robot Operating System) is an open-source framework for robot software development. It provides a structured communications layer above the host operating systems of a heterogeneous compute cluster. ROS is designed to be as thin as possible and consists of two parts:
- ROS system (ROS): The plumbing system that handles communication between processes. It is the middleware that allows different robot parts to communicate with each other.
- ROS packages: Libraries and tools needed to write robot applications.

Why ROS?
ROS simplifies the process of creating complex and robust robot behavior across a wide variety of robotic platforms. Some of the key objectives and advantages of using ROS include:
- Rapid Development: Provides a standard platform that accelerates development from research to production.
- Global Community: Supported by a large, active community contributing to and improving the software.
- Proven Track Record: Widely used in academic and commercial robotics.
- Time to Market: Helps reduce product development time with comprehensive tools and libraries.
- Versatility: Supports multiple domains and platforms, including embedded systems.
- Open Source: Free to use, modify, and extend, promoting innovation and collaboration.
- Commercial Friendly: Distributed under permissive licenses like Apache 2.0.
History and Development of ROS
The history of ROS (Robot Operating System) is intertwined with the broader evolution of robotics:
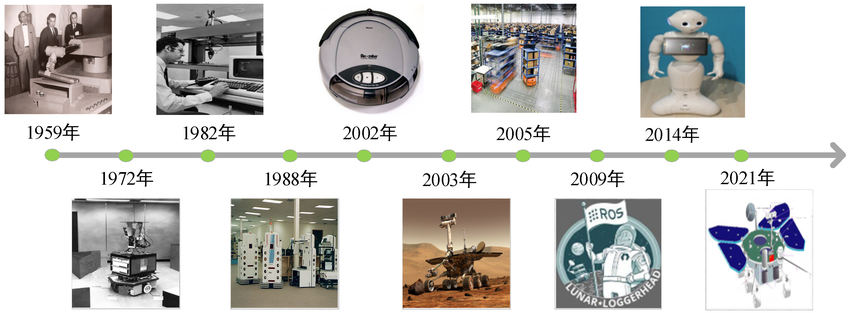
Early Robotics Developments
- 1959: The journey of robotics began with the development of the first automated robot.
- 1972: Emergence of robots capable of interacting with their environment.
- 1982: Integration of robots into computer systems for complex tasks.
- 1988: Advances in robotic automation and control systems.
- 2002: Introduction of consumer robots like the Roomba for household chores.
- 2003: Expansion of robotic exploration to Mars with rovers.
- 2005: Crucial roles in industrial automation, exemplified by warehouse robots.
History and Development of ROS
Early Robotics Developments
- 1959: The journey of robotics began with the development of the first automated robot.
- 1972: Emergence of robots capable of interacting with their environment.
- 1982: Integration of robots into computer systems for complex tasks.
- 1988: Advances in robotic automation and control systems.
- 2002: Introduction of consumer robots like the Roomba for household chores.
- 2003: Expansion of robotic exploration to Mars with rovers.
- 2005: Crucial roles in industrial automation, exemplified by warehouse robots.
The Birth of ROS
- 2007: Development of ROS began under the name "Switchyard" at the Stanford Artificial Intelligence Laboratory by Morgan Quigley, Eric Berger, and Andrew Ng. It aimed to address the lack of shared software infrastructure in robotics research.
- 2008: Development continued at Willow Garage, a robotics research lab.
- 2009: Official establishment of ROS, marked by its first version release.
Growth and Evolution
- 2010: Release of ROS 1.0, with Willow Garage playing a crucial role in its development and community growth.
- 2014: Introduction of social and service robots like Pepper, highlighting advancements in human-robot interaction.
- 2021: ROS evolves to support sophisticated and versatile robotic systems for various applications.
ROS Releases Timeline
| Release Name | Distribution | Release Date | EOL Date |
|---|---|---|---|
| Boxturtle | ROS 1 | March 2010 | March 2011 |
| C Turtle | ROS 1 | August 2010 | August 2011 |
| Diamondback | ROS 1 | March 2011 | November 2012 |
| Electric Emys | ROS 1 | August 2011 | January 2013 |
| Fuerte | ROS 1 | April 2012 | July 2013 |
| Groovy Galapagos | ROS 1 | December 2012 | May 2014 |
| Hydro Medusa | ROS 1 | September 2013 | May 2015 |
| Indigo Igloo | ROS 1 | July 2014 | April 2019 |
| Jade Turtle | ROS 1 | May 2015 | May 2017 |
| Kinetic Kame | ROS 1 | May 2016 | April 2021 |
| Lunar Loggerhead | ROS 1 | May 2017 | May 2019 |
| Melodic Morenia | ROS 1 | May 2018 | May 2023 |
| Noetic Ninjemys | ROS 1 | May 2020 | May 2025 |
| Foxy Fitzroy | ROS 2 | June 2020 | June 2023 |
| Galactic Geochelone | ROS 2 | May 2021 | November 2022 |
| Humble Hawksbill | ROS 2 | May 2022 | May 2027 |
| Rolling Ridley | ROS 2 | Ongoing | Ongoing |
Today, ROS is maintained by Open Robotics, a non-profit organization dedicated to developing the core ROS system, including ROS 2.0, which incorporates improvements for real-time and embedded systems, along with other tools and libraries.
ROS Environment Installation and Quick Experience
Install ROS1
- Step 1: Open Terminal and Update System Packages.
bash
sudo apt update sudo apt upgrade - Step 2: Install Basic Tools.
bash
sudo apt install curl gnupg2 lsb-release - Step 3: Add ROS repository key.
bash
sudo curl -sSL https://raw.githubusercontent.com/ros/rosdistro/master/ros.asc | sudo apt-key add - - Step 4: Add ROS repository.
bash
sudo sh -c 'echo "deb http://packages.ros.org/ros/ubuntu $(lsb_release -sc) main" > /etc/apt/sources.list.d/ros-latest.list' - Step 5: Update package list.
bash
sudo apt update - Step 6: Install ros-noetic-desktop-full.
bash
sudo apt install ros-noetic-desktop-full sudo apt-get install python3-rosdep - Step 7: Initialize rosdep.
bash
sudo rosdep init rosdep update - Step 8: Set Up ROS Environment Variables.
bash
echo "source /opt/ros/noetic/setup.bash">> ~/.bashrc && source ~/.bashrc - Step 9: Install Dependency Tools.
bash
sudo apt install python3-rosinstall python3-rosinstall-generator python3-wstool build-essential - Step 10: Test the Installation.
bash
roscore
Quick Start with ROS
To quickly experience ROS, let's create a ROS workspace and run a simple demo.
-
Create a ROS workspace
bashmkdir -p ~/catkin_ws/src cd ~/catkin_ws/ catkin_make -
Source the setup file
bashsource devel/setup.bash -
Run a demo
bashroscoreOpen another terminal and run:
bashrosrun turtlesim turtlesim_nodeOpen yet another terminal and run:
bashrosrun turtlesim turtle_teleop_key
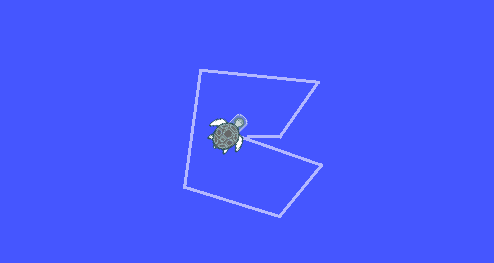
This quick demo shows a graphical turtle robot that you can control using the keyboard.
Installation of Common Development Software for ROS
Installation of VScode and ROS Development Extensions
-
For the installation of VSCode, please refer to the previous tutorial: 3.1-Python and Programming Fundamentals
-
Install tools such as
Python,ROS,C++, andCMake Toolsfrom the VSCode Extensions Marketplace.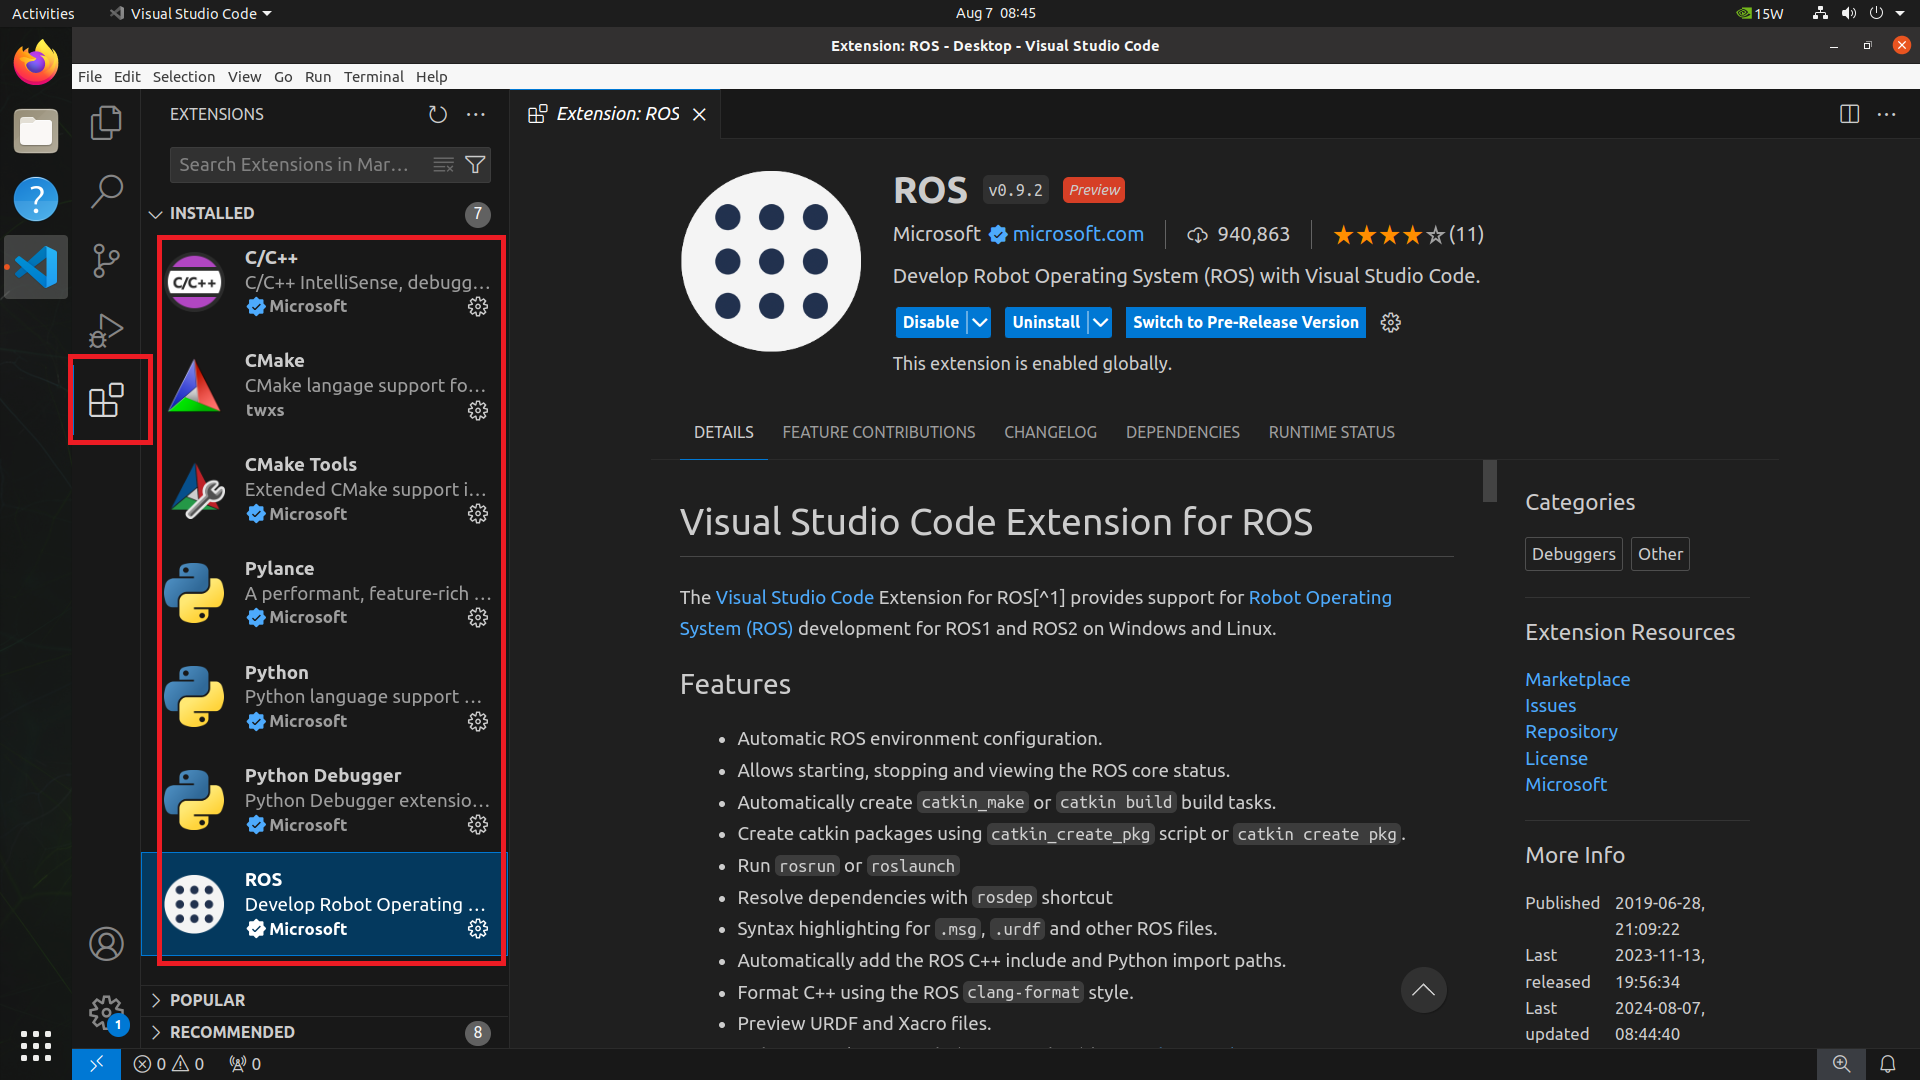
Install the Terminator multi-functional terminal.
-
Install
bashsudo apt-get update sudo apt install terminator
-
Show Applications ---> Search for "Terminator" ---> Right-click and select "Add to Favorites"
-
Common Terminator Shortcuts
- Alt + Up: Move to the terminal above
- Alt + Down: Move to the terminal below
- Alt + Left: Move to the terminal on the left
- Alt + Right: Move to the terminal on the right
- Ctrl + Shift + O: Split terminal horizontally
- Ctrl + Shift + E: Split terminal vertically
- Ctrl + Shift + Right: Move the splitter to the right in a vertically split terminal
- Ctrl + Shift + Left: Move the splitter to the left in a vertically split terminal
- Ctrl + Shift + Up: Move the splitter up in a horizontally split terminal
- Ctrl + Shift + Down: Move the splitter down in a horizontally split terminal
- Ctrl + Shift + S: Hide/Show the scroll bar
- Ctrl + Shift + F: Search
- Ctrl + Shift + C: Copy selected content to clipboard
- Ctrl + Shift + V: Paste clipboard content
- Ctrl + Shift + W: Close the current terminal
- Ctrl + Shift + Q: Quit the current window, closing all terminals within it
- Ctrl + Shift + X: Maximize the current terminal
- Ctrl + Shift + Z: Maximize the current terminal and enlarge the font
- Ctrl + Shift + N or Ctrl + Tab: Move to the next terminal
- Ctrl + Shift + P or Ctrl + Shift + Tab: Move to the previous terminal
- F11: Toggle full screen
- Ctrl + Shift + T: Open a new tab
- Ctrl + PageDown: Move to the next tab
- Ctrl + PageUp: Move to the previous tab
- Ctrl + Shift + PageDown: Swap the current tab with the next tab
- Ctrl + Shift + PageUp: Swap the current tab with the previous tab
- Ctrl + Plus (+): Increase font size
- Ctrl + Minus (-): Decrease font size
- Ctrl + Zero (0): Reset font size to the original
- Ctrl + Shift + R: Reset terminal state
- Ctrl + Shift + G: Reset terminal state and clear the screen
- Super + g: Bind all terminals, allowing input to be mirrored across all terminals
- Super + Shift + G: Unbind all terminals
- Super + t: Bind all terminals in the current tab, mirroring input across them
- Super + Shift + T: Unbind terminals in the current tab
- Ctrl + Shift + I: Open a new window, sharing the process with the original window
- Super + i: Open a new window with a separate process from the original window