Authentication
SenseCraft CLI authenticates with an Access Key. One key covers SenseCraft Data, SenseCraft AI, and CodeCraft Hub.
Choose either authorization method, then check the active profile:
| Method | How it works | Choose it for |
|---|---|---|
1. Browser authorization — auth init | Sign in and approve access in your browser, then select or create a key in the wizard | First-time setup, including setup with an AI agent |
2. Import an Access Key — auth add | Create or find a key in the account center, then import it into the CLI | Reusing a specific key, scripts, or CI |
Both methods save an active Access Key profile on the machine running the CLI. Later commands reuse that profile.
Before you start: accounts and sites
Section titled “Before you start: accounts and sites”The CLI does not create accounts. To authenticate you need an existing Seeed account on the site you’re targeting:
- Global (international) — register at sensecap.seeed.cc or sensecraft.seeed.cc.
- China — the domestic account system.
The site is chosen per profile and stored in the config file. A key created on one site does not work on another — a Global key against a China profile is the classic cause of an invalid-key error.
Method 1: Browser authorization
Section titled “Method 1: Browser authorization”Use auth init to sign in through your browser and select or create an
Access Key without copying its secret.
During AI setup, the agent runs the wizard in an interactive terminal session, shares the authorization link, and waits for you to sign in and approve access. The agent handles the terminal steps; site, key, and permission choices can be discussed in chat.
Start authorization
Section titled “Start authorization”sensecraft-cli auth initApprove access and finish setup
Section titled “Approve access and finish setup”| Step | What happens |
|---|---|
| 1 | Pick the site — Global (International) or China |
| 2 | Request a device code — the CLI fetches it from the user center |
| 3 | Approve in the browser — it prints a link with the one-time code already embedded, plus the code on its own line |
| 4 | Wait — it polls and continues by itself once you approve |
| 5 | Pick a key — it lists the Access Keys on your account; choose one, or create a new one with a Label and Read/Write level; the profile is saved as active |
The terminal looks like this:
[3/5] Complete authorization in the browser
Copy the link below into your browser and authorize with the primary account:
  https://account.seeed.cc/device?user_code=ABCD-2345
  Verification code: ABCD-2345
The CLI will continue automatically after you complete browser authorization.
Connection requirements
Section titled “Connection requirements”- The link is portable. Run
auth initon a headless box, in SSH, or in a container, and open the printed link on your laptop or phone — the CLI only has to stay running on the machine that started it. - It needs an interactive terminal. An AI agent needs an interactive terminal session to run the wizard. Non-interactive scripts and CI can use Method 2.
- It can create the key for you. All key selection and creation happens in this wizard.
- The code expires (a few minutes; the lifetime comes from the account
service). If you’re too slow the CLI exits with
context deadline exceededand saves nothing — re-run it for a fresh code. --sandboxsimulates the whole flow without network requests, and may still write a simulated config — pointSENSECRAFT_CONFIG_FILEat a throwaway file if that matters.
Method 2: Import an Access Key
Section titled “Method 2: Import an Access Key”Use auth add to import a specific Access Key. This method starts in the
account center and verifies the key through OpenAPI before saving it.
1. Create or locate an Access Key
Section titled “1. Create or locate an Access Key”Access Keys are created and managed in the Seeed account center, under Access Keys. Open the page for your site:
| Site | Page |
|---|---|
| Global (International) | account.seeed.cc/account/access-keys |
| China | account.seeed.cn/account/access-keys |
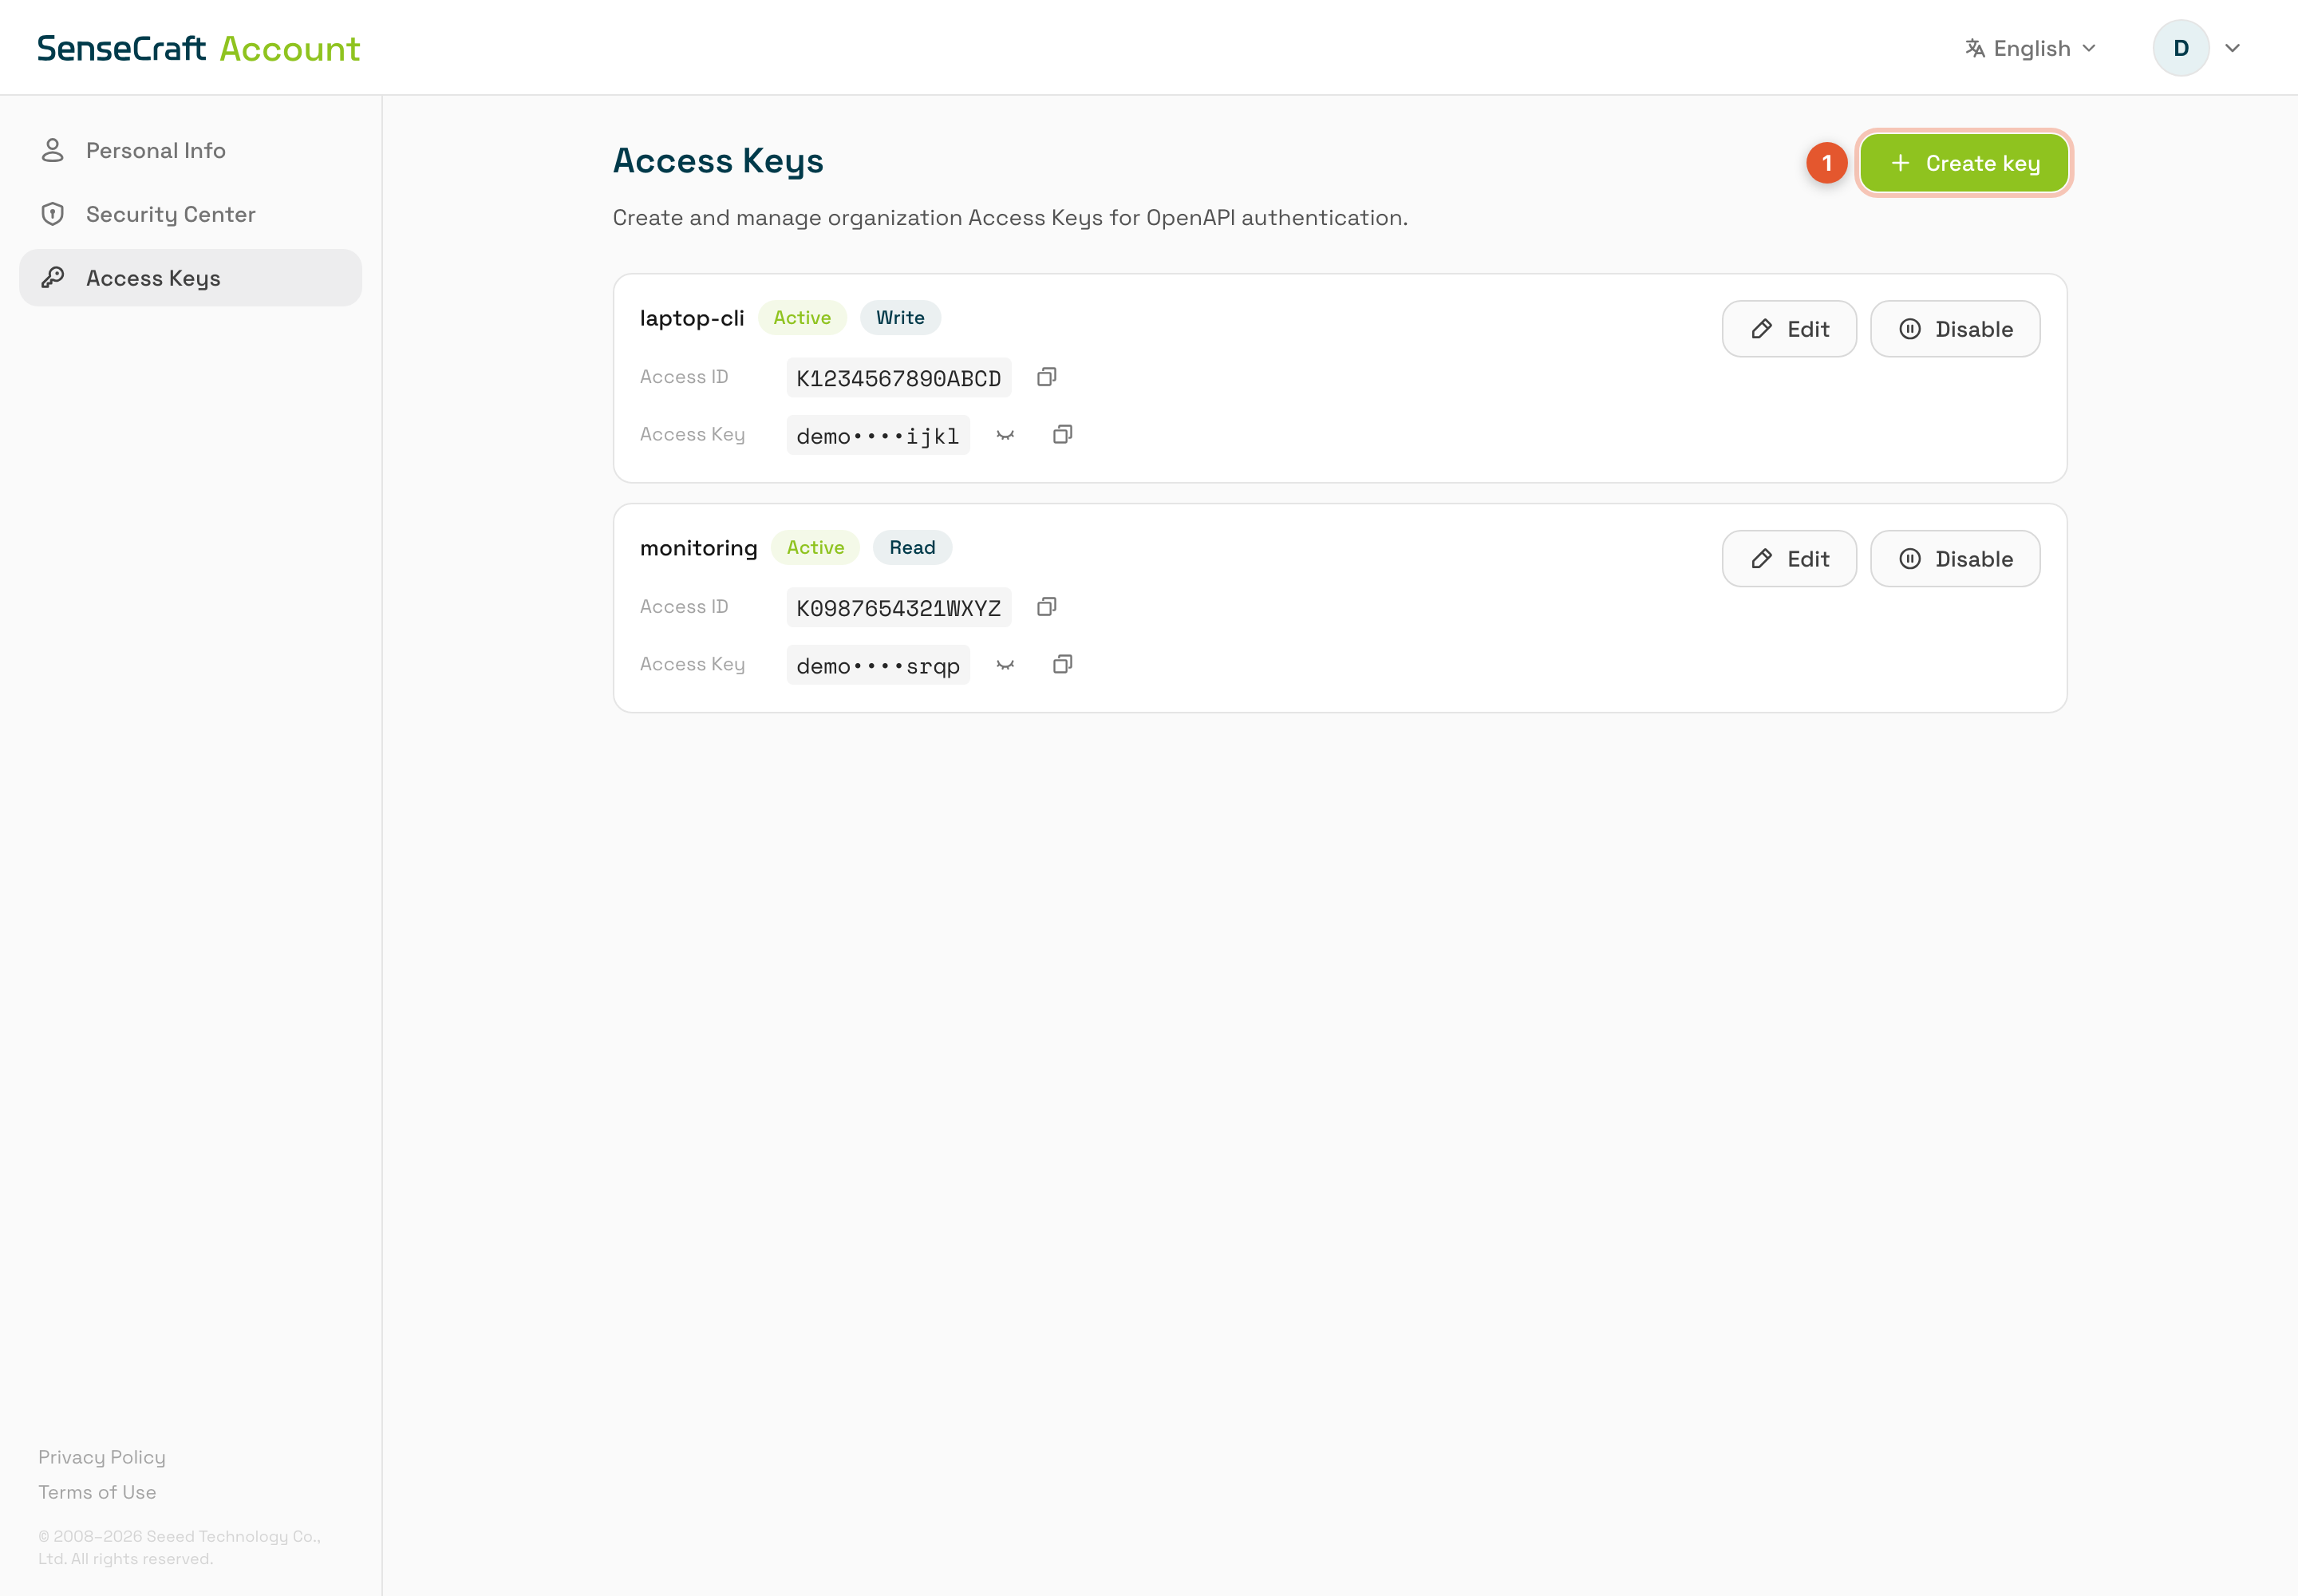
The Access Keys page for the selected site (demo data). Choose Create key.
Sign in with the primary account — sub-accounts cannot view or manage Access Keys; the page shows a permission warning instead of the list. Use an existing key, or create one:
- Choose Create key.
- Give it a Label you’ll recognize later (optional, up to 64
characters; e.g.
laptop-cli). - Choose a Permission:
- Read — list devices, read telemetry, search apps and models. Enough for monitoring and read-only agent workflows.
- Write — everything Read allows, plus creates, updates, publishes, deletes, uploads, deploys and binds.
- Copy both values from the new key’s row:
- Access ID — the public identifier; the CLI calls it the Key ID
(
--key-id). - Access Key — the secret (
--access-key). Reveal it with the eye icon, then copy it.
- Access ID — the public identifier; the CLI calls it the Key ID
(
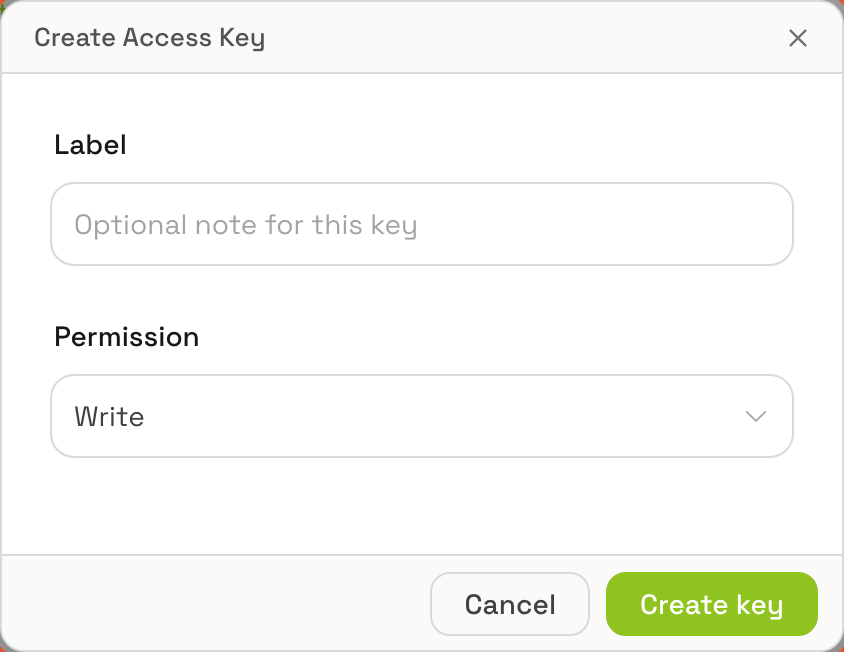
Give the key a Label and choose Read or Write.

Copy the Access ID; reveal the Access Key, then copy it.
The create dialog’s Permission defaults to Write; choose Read when the workflow only reads. A key with Read permission authenticates fine but every write command fails with a permission error — that is the key’s level, not a CLI bug.
The secret stays available on this page (reveal and copy), so treat it as a password rather than a one-time display. You can change the Label or Permission with Edit, and Disable the key when it should stop working. There is no Delete button on this page; Disable is the revocation switch, and Enable reverses it.
2. Import the key
Section titled “2. Import the key”Import the key into the CLI:
sensecraft-cli auth add \ --key-id <Access ID> \ --access-key <Access Key> \ --site Global--site accepts Global (default) and China. Pick the site that issued
the key: account.seeed.cc → --site Global, account.seeed.cn →
--site China. Verification calls that site’s OpenAPI, so a key from the
other site fails.
In an interactive terminal, any missing value is prompted for instead of
failing. The site prompt appears only when a key value was also prompted — if
you pass both --key-id and --access-key but omit --site, the CLI
silently uses Global. Pass --site explicitly when it matters.
Key ID: K1234567890Access Key: <paste the Access Key>Select the SenseCAP site to connect to 1) Global (International) 2) China (China site)Enter number [1]:The prompt echoes what you type; run it in a private terminal. The
--access-key flag form is also visible in shell history and process
listings, so don’t paste a key into shared logs, screenshots, or agent
transcripts.
3. Confirm the import
Section titled “3. Confirm the import”The CLI verifies the key with a view_organization call, resolves your
organization ID, saves the profile, and makes it active:
Verifying Access Key against OpenAPI ...✓ Access Key verified  Site: Global  Organization ID: 12345  Key ID: K1234567890
✓ Access config saved and set as active  Config file: ~/.config/sensecraft-cli/sensecraft.json
auth add only imports an existing key — it never creates, rotates, or
deletes one. On a verification
failure nothing is written to the config file.
auth info — inspect credentials
Section titled “auth info — inspect credentials”After either method, check the active profile with:
sensecraft-cli auth infoPrints (human-readable, not JSON) the config file path in use, plus the
site, organization ID, active Access ID (printed as Key ID), and creation
time. The secret is never printed. When
nothing is configured yet it prints No profiles configured yet. and
suggests auth init. This command reads local configuration; it does not
make an API request to validate the saved key.
Run this whenever you’re unsure which environment a command will hit — see also Configuration.
Multiple profiles and switching
Section titled “Multiple profiles and switching”The config file can hold several Access Key profiles (see Configuration for the file schema). One pointer decides which one is active:
use_api— the active Access ID
Every successful auth add / auth init writes its profile and sets it
active. To switch back to an earlier profile, run auth add for that
key/site again (it re-verifies and re-activates the existing profile), or
edit use_api in the config file directly. There is intentionally
no “first entry wins” fallback — an unset pointer is an error, not a guess.
Removing credentials
Section titled “Removing credentials”There is no auth remove command — credential removal is a local file
operation, done deliberately.
Stop the key from working
Section titled “Stop the key from working”Open the Access Keys page and Disable the key. API calls using it fail until you Enable it again. Disabling is reversible, and the key stays in the list. To invalidate the credential everywhere it is used, this is the step — deleting a local profile only forgets it on that machine.
Remove everything (log out completely)
Section titled “Remove everything (log out completely)”Delete the config directory (its location depends on how you installed; see Configuration):
rm -rf ~/.config/sensecraft-cli # Windows: Remove-Item -Recurse "$env:APPDATA\sensecraft-cli"This erases all Access Keys, tokens and profile pointers stored on that machine.
Remove one profile
Section titled “Remove one profile”Open sensecraft.json and delete the entry from app_config_list. If you
removed the currently active profile, also point use_api at a remaining
entry, or clear it and run auth add / auth init again. Keep the file’s
permissions at 0600 — the CLI writes it atomically with those permissions.
Security notes
Section titled “Security notes”- The config file is written with 0600 permissions using an atomic temp-file-and-rename, so a partial write never corrupts it. The secret is stored in plaintext in that file — protect the file, not just the key.
- Never commit
sensecraft.json; if you keep a copy in a repo for CI, scope the key to what the pipeline actually needs (read-only where possible). - A key with Read permission makes all write commands fail with a permission error — that’s the key’s level, not a CLI bug.
- During AI setup, the agent can run
auth initand wait for your browser approval. Keep passwords, tokens, and raw Access Keys out of chat and agent logs; see Confirmations and safety.
Version note
Section titled “Version note”The public @seeed-studio/sensecraft-cli build supports both auth init
(recommended) and auth add for a single Access Key, with Global and China
sites. Access Keys
do not expire and are never refreshed, so there is no auth refresh command
and no --kind flag. Remember that the China site is SenseCraft Data only.