Creating a New Application
Ce contenu n’est pas encore disponible dans votre langue.
Creating the Application
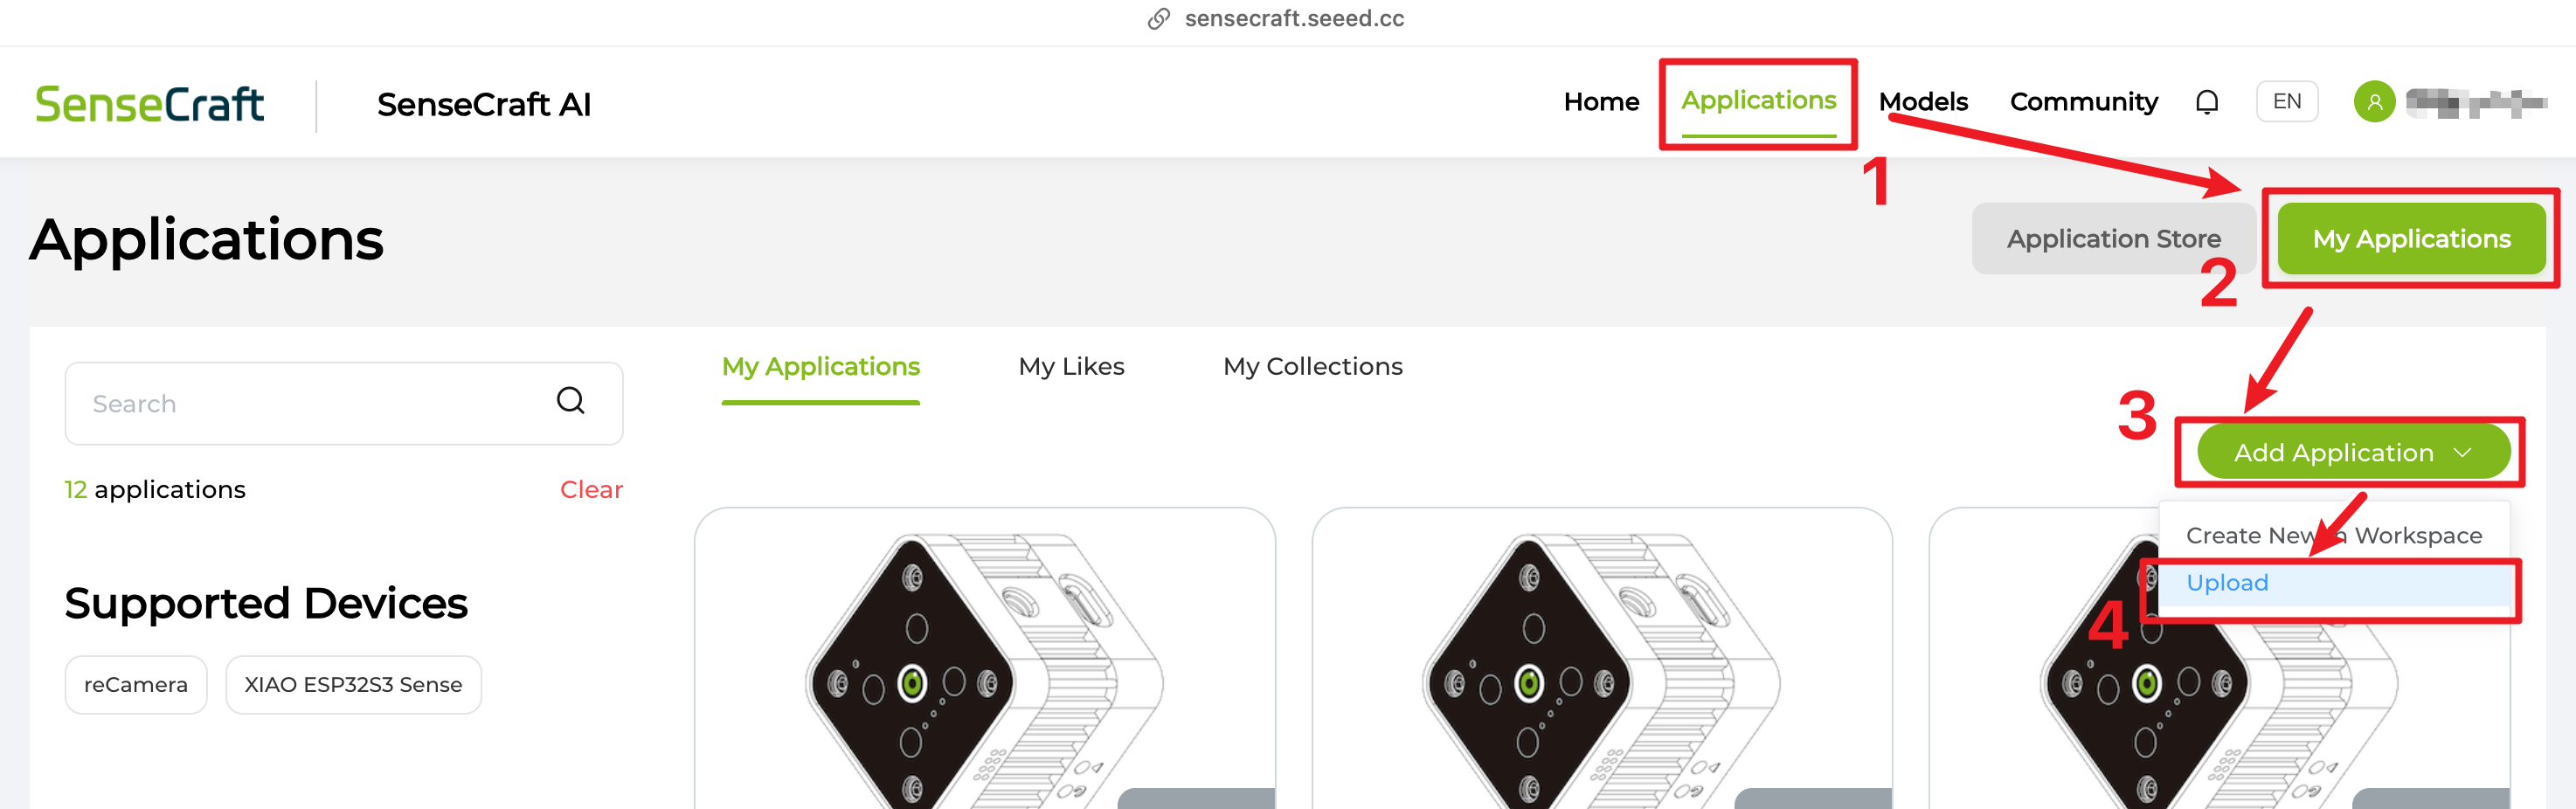
Section titled “Creating the Application”Go to the My Applications page, and click Create App > Upload.
To protect your work, once you enter the editing page, your changes will be saved automatically, and the navigation bar will show the save status in real time.
Building the Application
Section titled “Building the Application”The application creation process is divided into four clear steps, which you can switch between at any time using the top navigation bar.
Step 1: App Information
Section titled “Step 1: App Information”This is the first way others will learn about your application. Please consider it carefully to make your app more engaging.
Application Name and Description
Section titled “Application Name and Description”Give your application a clear name so others can understand what it does at a glance, and summarize the core scenario, technologies, devices, and so on in concise language.
The application name is limited to 60 characters, and the description is limited to 300 characters.
Choose the most appropriate category tag for your application. This matters for discovery and promotion.
Available scenes: Maker/DIY, Smart Home, Industrial, Agriculture, Security, Education, Healthcare, Retail, Other.
License
Section titled “License”Set your license here, including whether others may copy and modify your work, and whether commercial use is allowed.
- Allow others to duplicate and modify your app: Others can duplicate your application into a new editable project of their own, including all images, documentation, models, code, and configurations. If disabled, others can still view and deploy your app but cannot create their own copy. Only enable this if you have the rights to redistribute every asset in the project.
- Allow your work to be used for commercial purposes: Others may use your application — and any derivative works they create from it — in commercial products, paid services, or other revenue-generating contexts, without owing you royalties or additional permission.
Images
Section titled “Images”Display images strongly influence how attractive your application looks. The first image is used as the cover by default. You can upload up to 16 images; each file must be 2MB or smaller. A 4:3 aspect ratio is recommended.
Step 2: Documentation
Section titled “Step 2: Documentation”This is the core area of your application. Write a detailed application introduction and deployment workflow. Use the button in the upper-right corner to show or hide the live preview at any time so you can review the deployment flow and test deployment from another user’s perspective.
Edit with Markdown
Section titled “Edit with Markdown”The text editor uses Markdown. Type / while editing to open a shortcut menu for inserting headings or tool blocks (coming in a future update).
Application introduction
Section titled “Application introduction”Here you can describe the background, principles, and design of your project in free text. In this section you cannot add Tool Blocks that call SenseCraft capabilities.
Application deployment
Section titled “Application deployment”Describe your deployment process step by step so others can reproduce your application, including prerequisites for each step. Click the + control to add deployment steps. Keep the order logical and the instructions detailed. Toggle the live preview to check whether someone else could follow your steps successfully.
Using Tool Blocks
Section titled “Using Tool Blocks”In the deployment flow you can insert SenseCraft AI integrated features in one click. They streamline both your authoring experience and end-user deployment.
Available tool blocks:
- AI Vision — Deploy vision models for object recognition, detection, and classification on supported hardware.
- AI Audio — Deploy speech recognition models on supported hardware.
- AI Vibration — Detect vibration anomalies by learning normal vibration patterns and flagging deviations.
- Node-RED — Build and deploy visual logic flows for reCamera.
- Aily Blockly — Flash programs built in the Aily Blockly visual environment to edge devices.
- Deploy container app — Deploy containerized applications to supported hardware.
- Flash firmware — Flash firmware images to devices in one click.
- Debug tools (coming soon) — Inspect and troubleshoot device behavior during deployment.
See Tool Blocks for full configuration details on each block.
Step 3: Bill of Materials (BOM)
Section titled “Step 3: Bill of Materials (BOM)”List everything needed to reproduce your application.
From Seeed Studio
Section titled “From Seeed Studio”Search and add official Seeed hardware directly.
Other materials
Section titled “Other materials”For parts that are not from Seeed (fasteners, special cables, 3D-printed parts, and so on), provide name, short description, and quantity. Purchase links are helpful.
Software and platforms (coming soon)
Section titled “Software and platforms (coming soon)”List required software or platforms—for example Arduino IDE, Home Assistant, or Edge Impulse.
Step 4: Preview and publish
Section titled “Step 4: Preview and publish”Review the full application as an end user would. Before Publish, confirm required fields are complete, and agree to Declaration for Publishing, where you need to confirm that you have the right to distribute the code and assets, and nothing confidential or illegal is included.
After you publish, the application draft will be sent for review. You cannot edit that draft until the review is complete. If you are not ready to publish, exit the editor—progress is still saved automatically. Learn more about the publishing process in the following section.
Publishing the application
Section titled “Publishing the application”Application review
Section titled “Application review”Administrators check the following areas:
-
Content and security
-
Copyright and open-source licenses: You must own or have rights to all code, models, images, and assets, or comply strictly with upstream licenses (MIT, Apache, and so on).
-
Privacy and data security: Especially for camera or microphone use, there must be no hidden exfiltration, unauthorized uploads, or backdoors.
-
Law and community standards: No trade secrets, illegal material, malware, or violent, sexual, or hateful content.
-
-
Model quality and hardware fit
-
Model usability: Custom models must load and parse correctly on the platform.
-
Accuracy: Real-world performance should match what you describe—no overstated claims.
-
Hardware match: Model size and logic must fit the boards you claim to support.
-
-
Documentation and reproducibility
-
Clear basics: Name, excerpt, tags, and cover image are accurate and not misleading.
-
Accurate BOM: Listed hardware matches what the deployment steps actually use.
-
Reproducible deployment: Steps follow a logical order, and concrete details such as pin wiring, threshold values, and MQTT settings are spelled out clearly.
-
-
Community guidelines
- No spam: Meaningless duplicates or ads without technical value are not allowed.
App management
Section titled “App management”Every application has two states that can drift apart over time:
- Draft — the working copy you edit. Always private, only visible to you.
- Published version — the snapshot currently visible in the Application Store. Updated only when a new draft passes review.
You can manage an application from two places, and the available actions depend on which copy you are acting on.
From the Application Store
Section titled “From the Application Store”When you open your own published application from the store, the actions act on the published version.
-
Duplicate: Create a new standalone project from the published version. Useful for branching off a known-good release.
-
Edit: Jump into the editor for this app’s draft (same as opening it from My Applications).
-
Unpublish: Remove the app from the store and switch its status back to private. The draft is unaffected.
From My Applications
Section titled “From My Applications”The actions here operate on your draft.
-
Edit: Open the draft in the editor. Changes do not affect the published version until you publish again.
-
Duplicate: Create a new standalone project from the current draft.
-
Publish / Publish update: Submit the draft for review. The button is labeled Publish the first time and Publish update afterward. After approval, the new version replaces the existing public listing in the Application Store.
-
Unpublish: Take a public app off the store and return it to private status.
- Delete: Permanently remove the application.