Application for HomeAssistant
Dieser Inhalt ist noch nicht in deiner Sprache verfügbar.
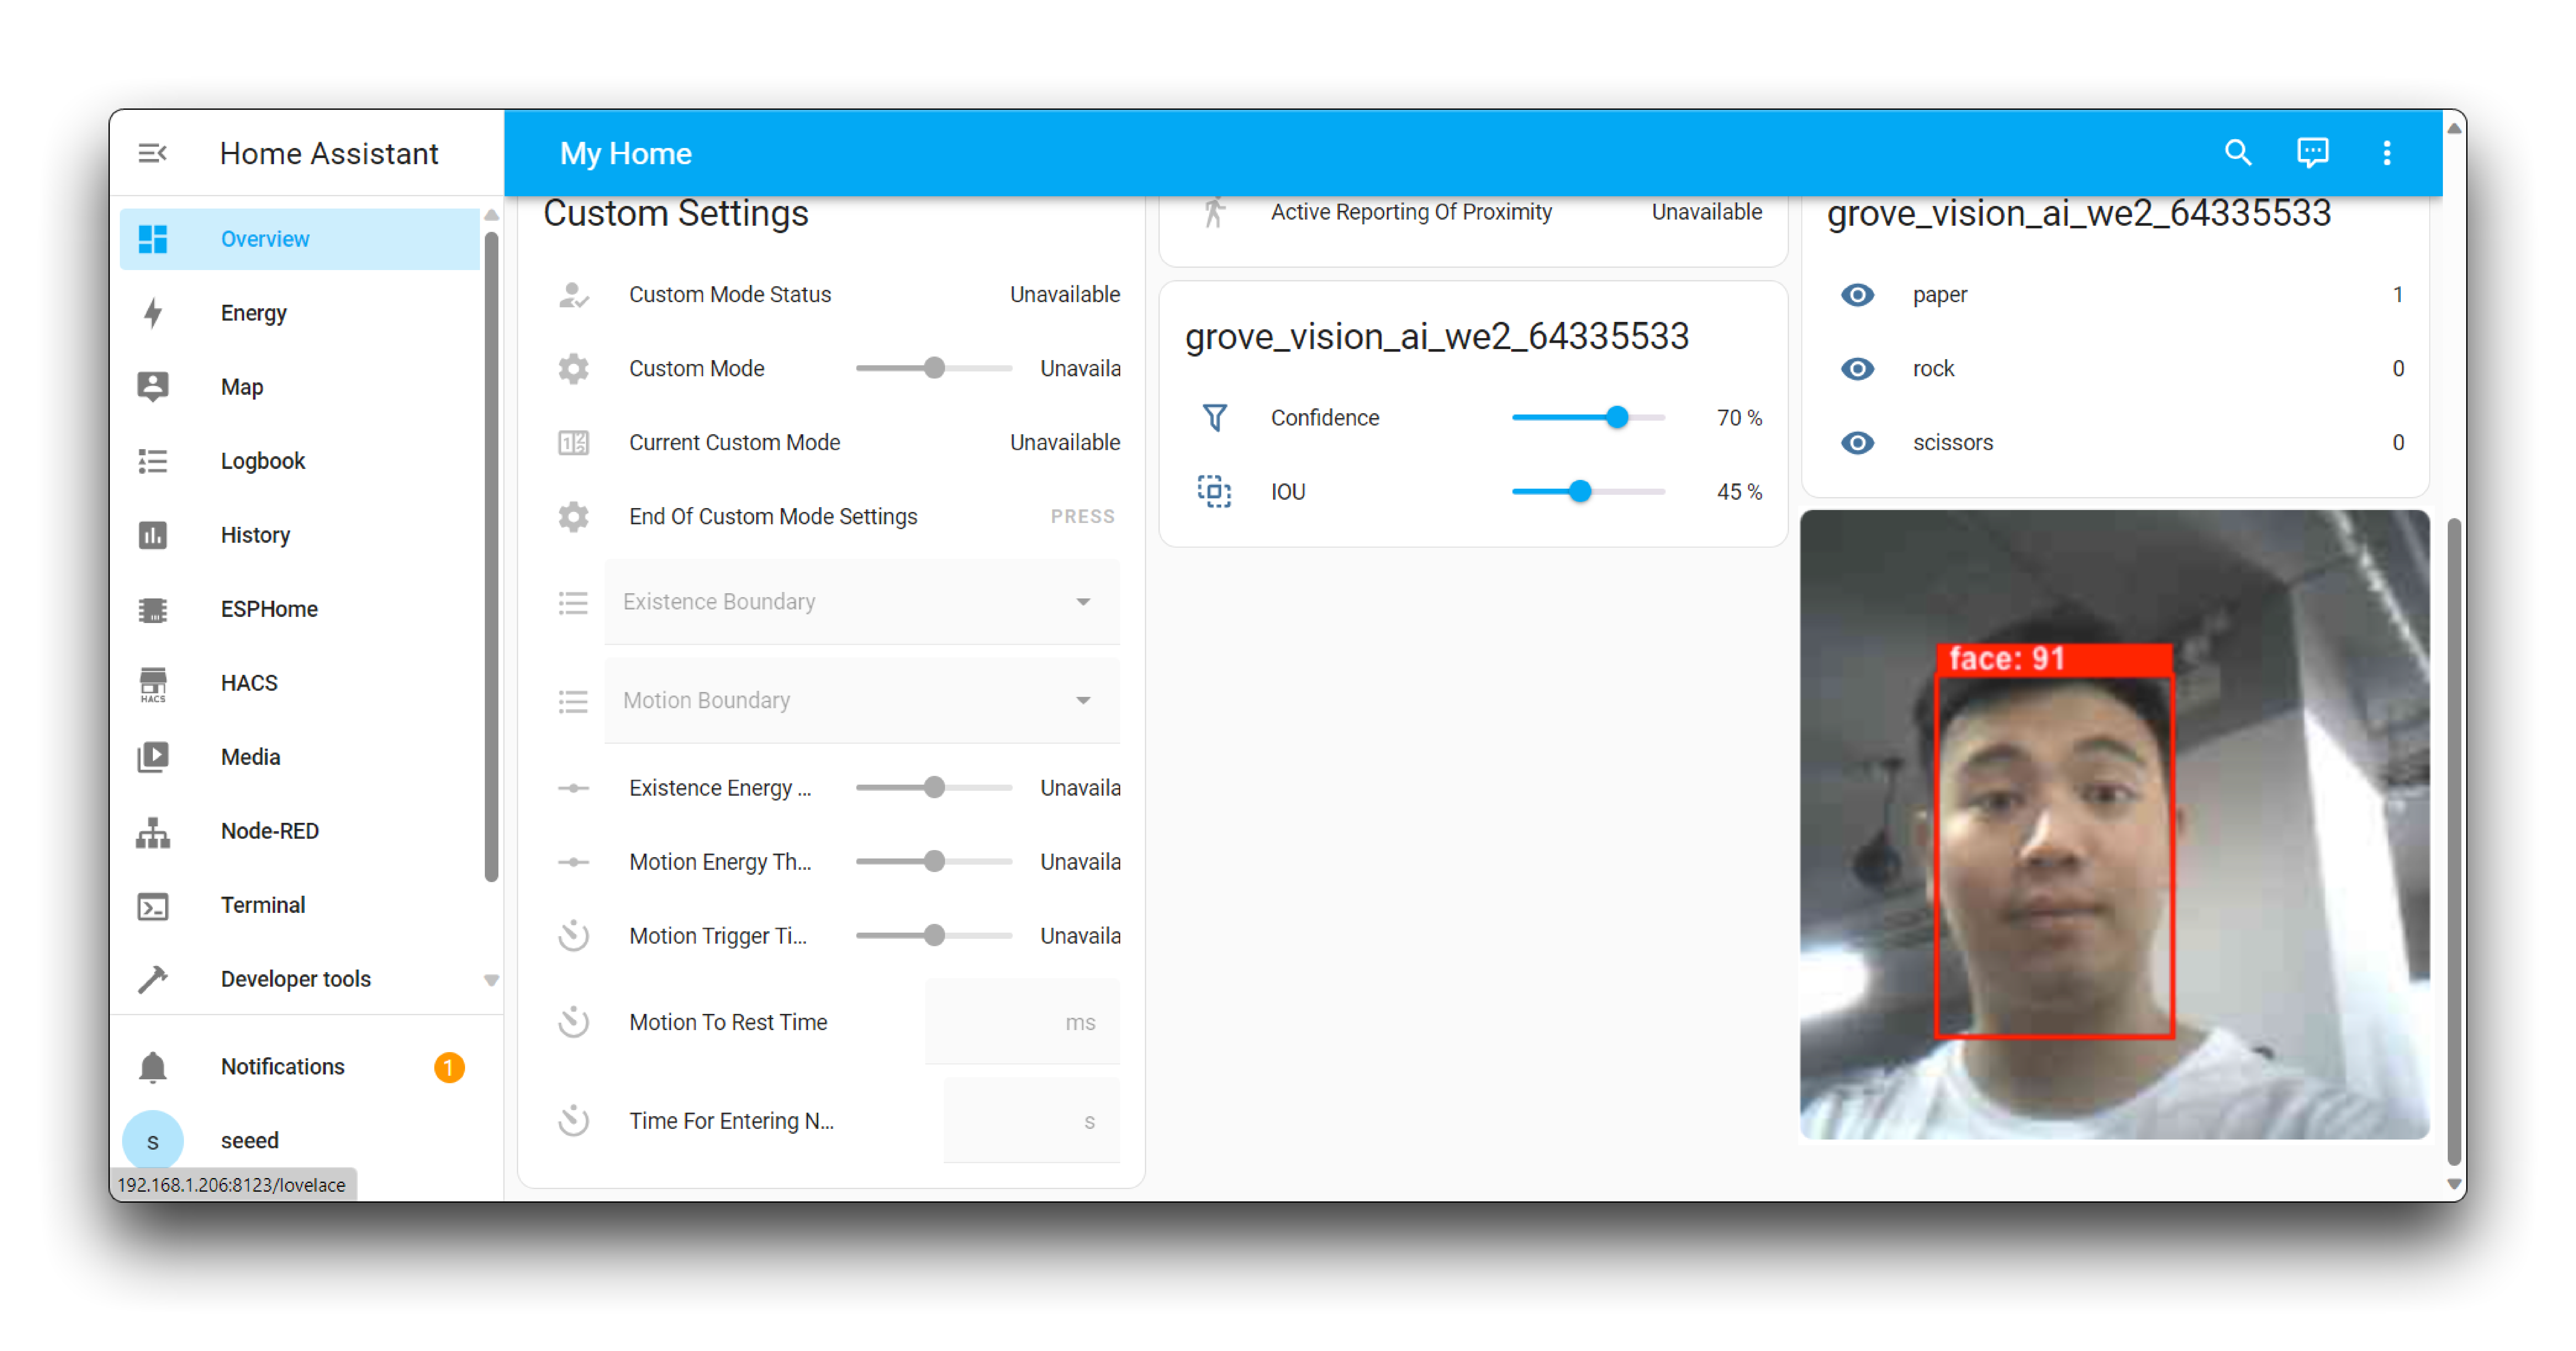
Integrating Grove Vision AI V2 into Home Assistant can elevate your smart home setup by adding advanced visual sensing capabilities. This integration allows for real-time environmental analysis and customized automation, making your home environment more intelligent and responsive.
To facilitate this integration, the SenseCraft-HomeAssistant plugin, accessible via the HACS store, connects your Grove Vision AI V2 to Home Assistant through the SenseCraft Data Platform. This process is streamlined and user-friendly, requiring just a SenseCraft account login to bring your device and sensor data into the Home Assistant ecosystem, ready for you to customize and control.
Below is the main content framework of this article.
- Installing the HACS plugin: Install the Home Assistant Community Store (HACS) to enable the installation of Seeed Studio’s SenseCraft plugin within Home Assistant.
- Installing the SenseCraft plugin: Install the SenseCraft plugin by Seeed Studio, which allows for the swift deployment of Seeed Studio’s products into Home Assistant.
- Preparing the model for Grove Vision AI V2: Select and deploy the model you wish to use for the Grove Vision AI V2, and thereafter, Home Assistant will receive the information of the recognition scene and results from Vision AI.
- Building MQTT Services at Home Assistant: Leverage a local MQTT service to transmit data from the Grove Vision AI V2 and XIAO to Home Assistant.
- Integrate Grove Vision AI V2 into Home Assistant: Integrate Grove Vision AI V2 into Home Assistant and set up a visual dashboard for configuration.
Getting Started
Section titled “Getting Started”Before the tutorial content of this article begins, you may need to have the following hardware ready.
Materials Required
Section titled “Materials Required”| Grove Vision AI V2 | XIAO ESP32C3 | Home Assistant Green |
|---|---|---|
 | 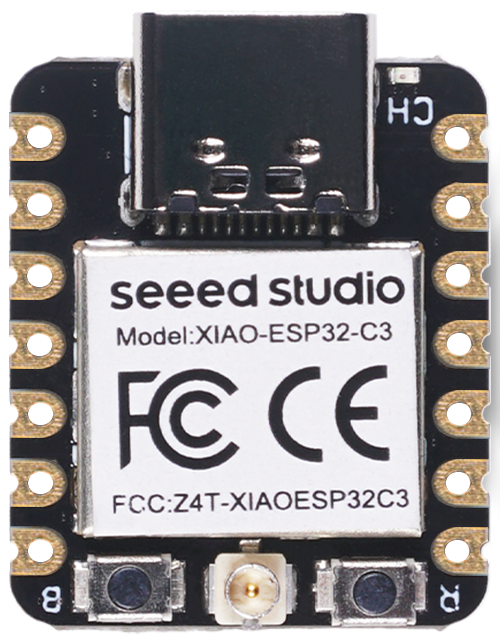 |  |
Home Assistant Green is the easiest and most privacy-focused way to automate your home. It offers an effortless setup and allows you to control all the smart devices with just one system, where all the data is stored locally by default. This board benefits from the thriving Home Assistant ecosystem and it will be improved every month by open source.
We recommend using Home Assistant Green as the Home Assistant host for this tutorial, or you can use any Home Assistant host with a Supervisor.
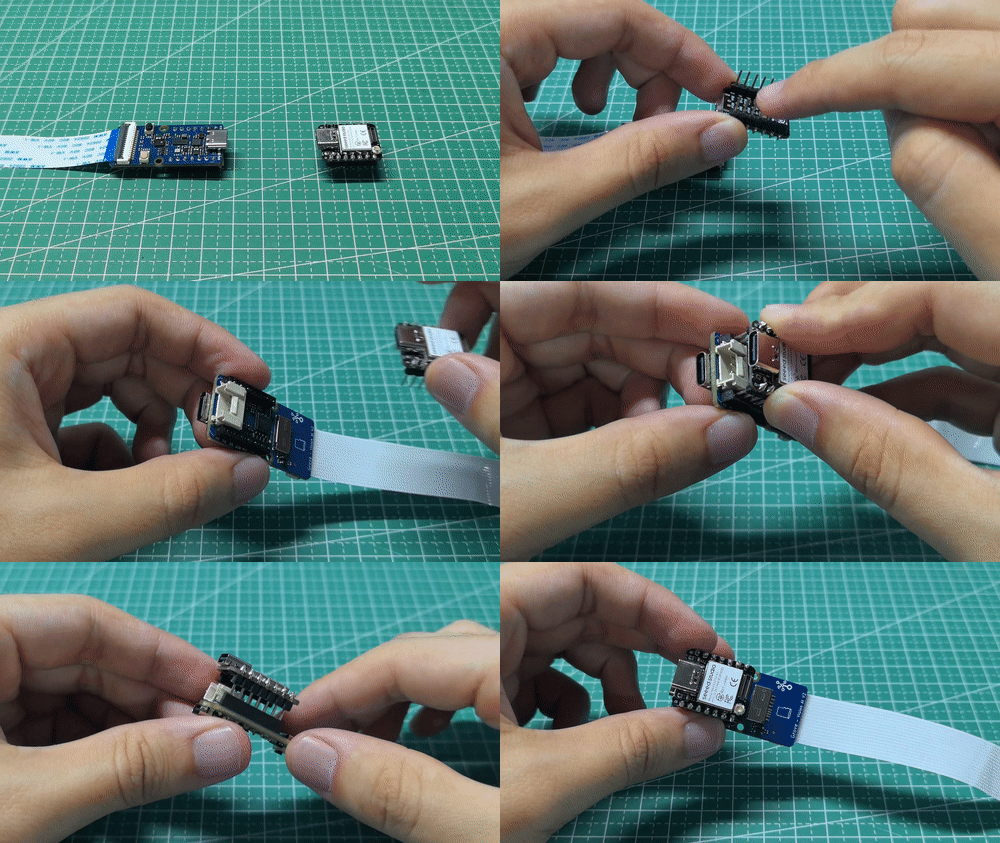
You then need to connect the XIAO and Grove Vision AI V2 via the row of pins (or use the expansion board and Grove interface).
Installing the HACS plugin
Section titled “Installing the HACS plugin”Step 1. Open Advanced Mode in Home Assistant
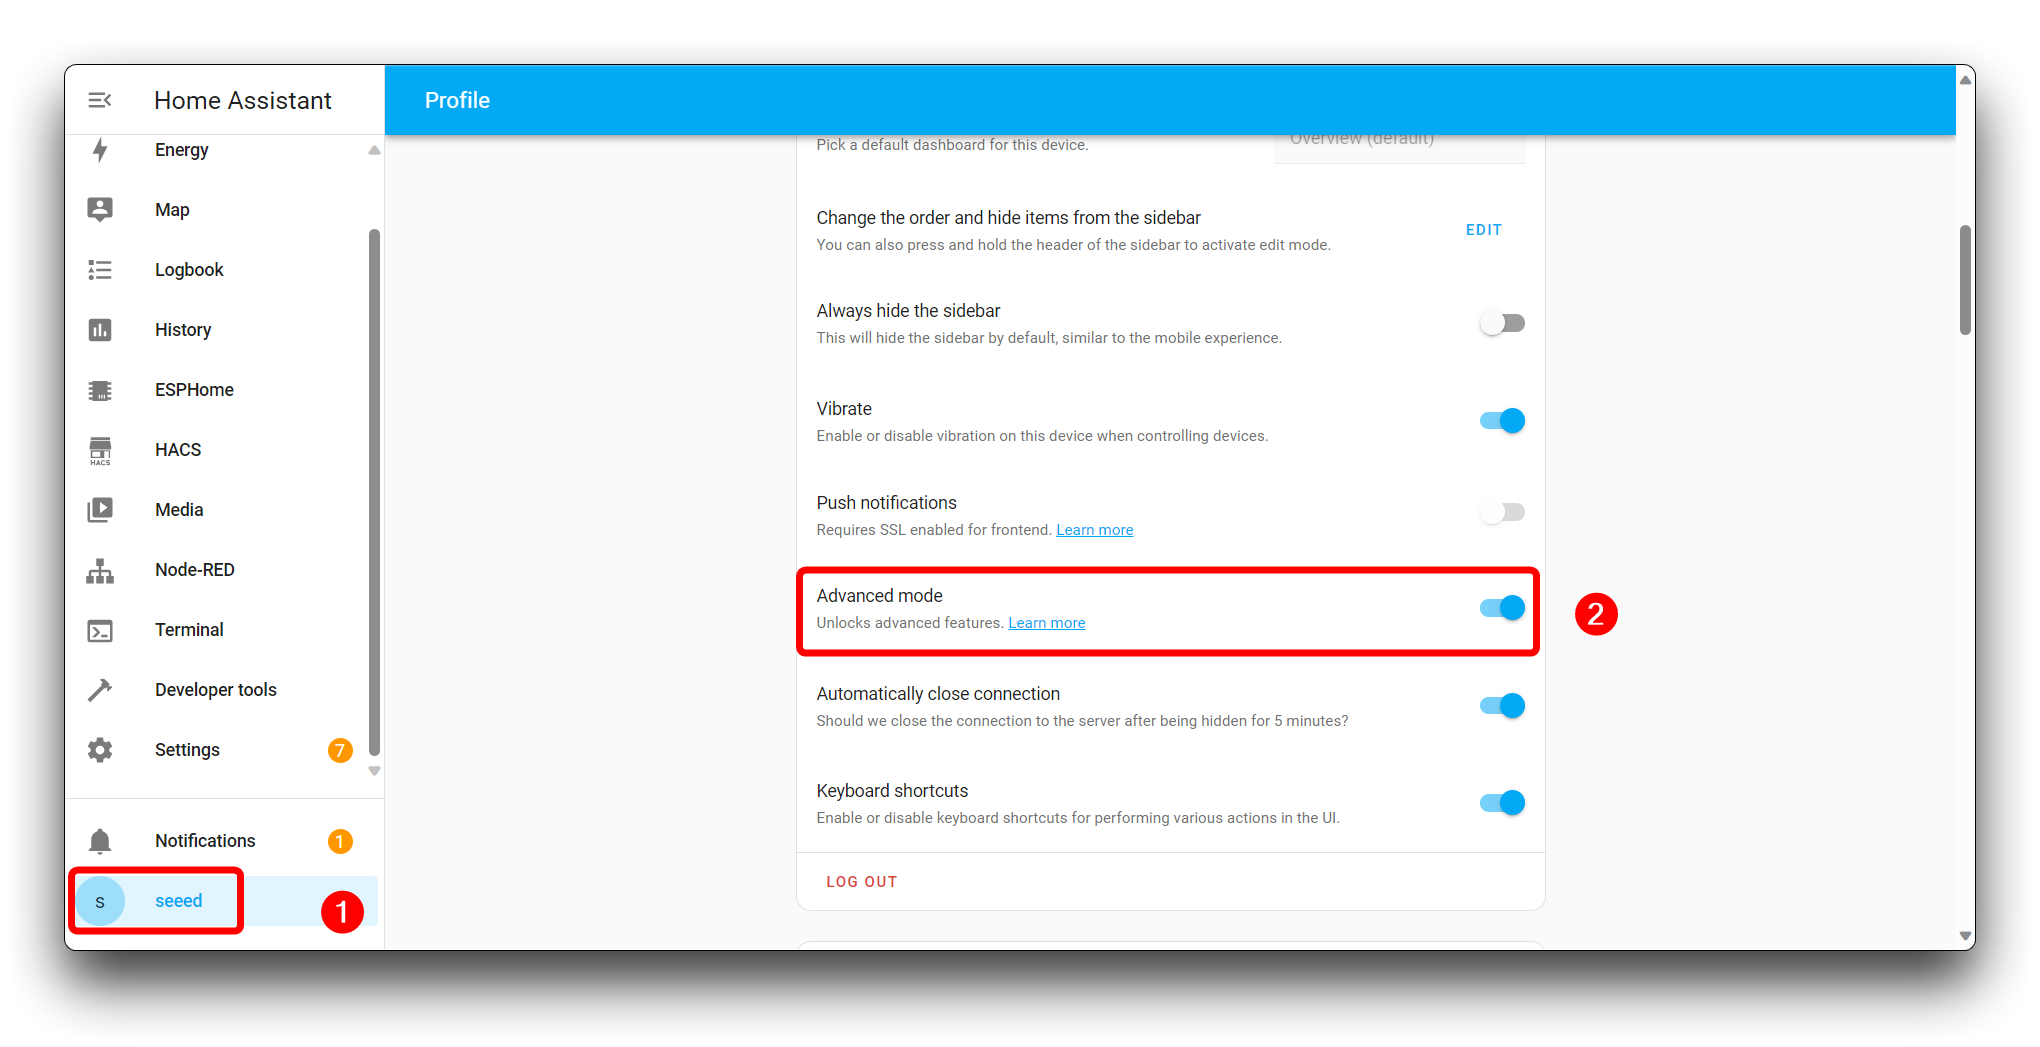
Section titled “Step 1. Open Advanced Mode in Home Assistant”To unlock the full potential of Home Assistant and gain access to advanced features, you can enable “Advanced Mode” in the user interface.
Navigate to your Home Assistant web interface. Click on your profile icon at the bottom left corner of the Home Assistant sidebar. On your profile page, scroll down to find the Advanced Mode toggle. Switch the toggle to the on position.
Step 2. Install Terminal & SSH
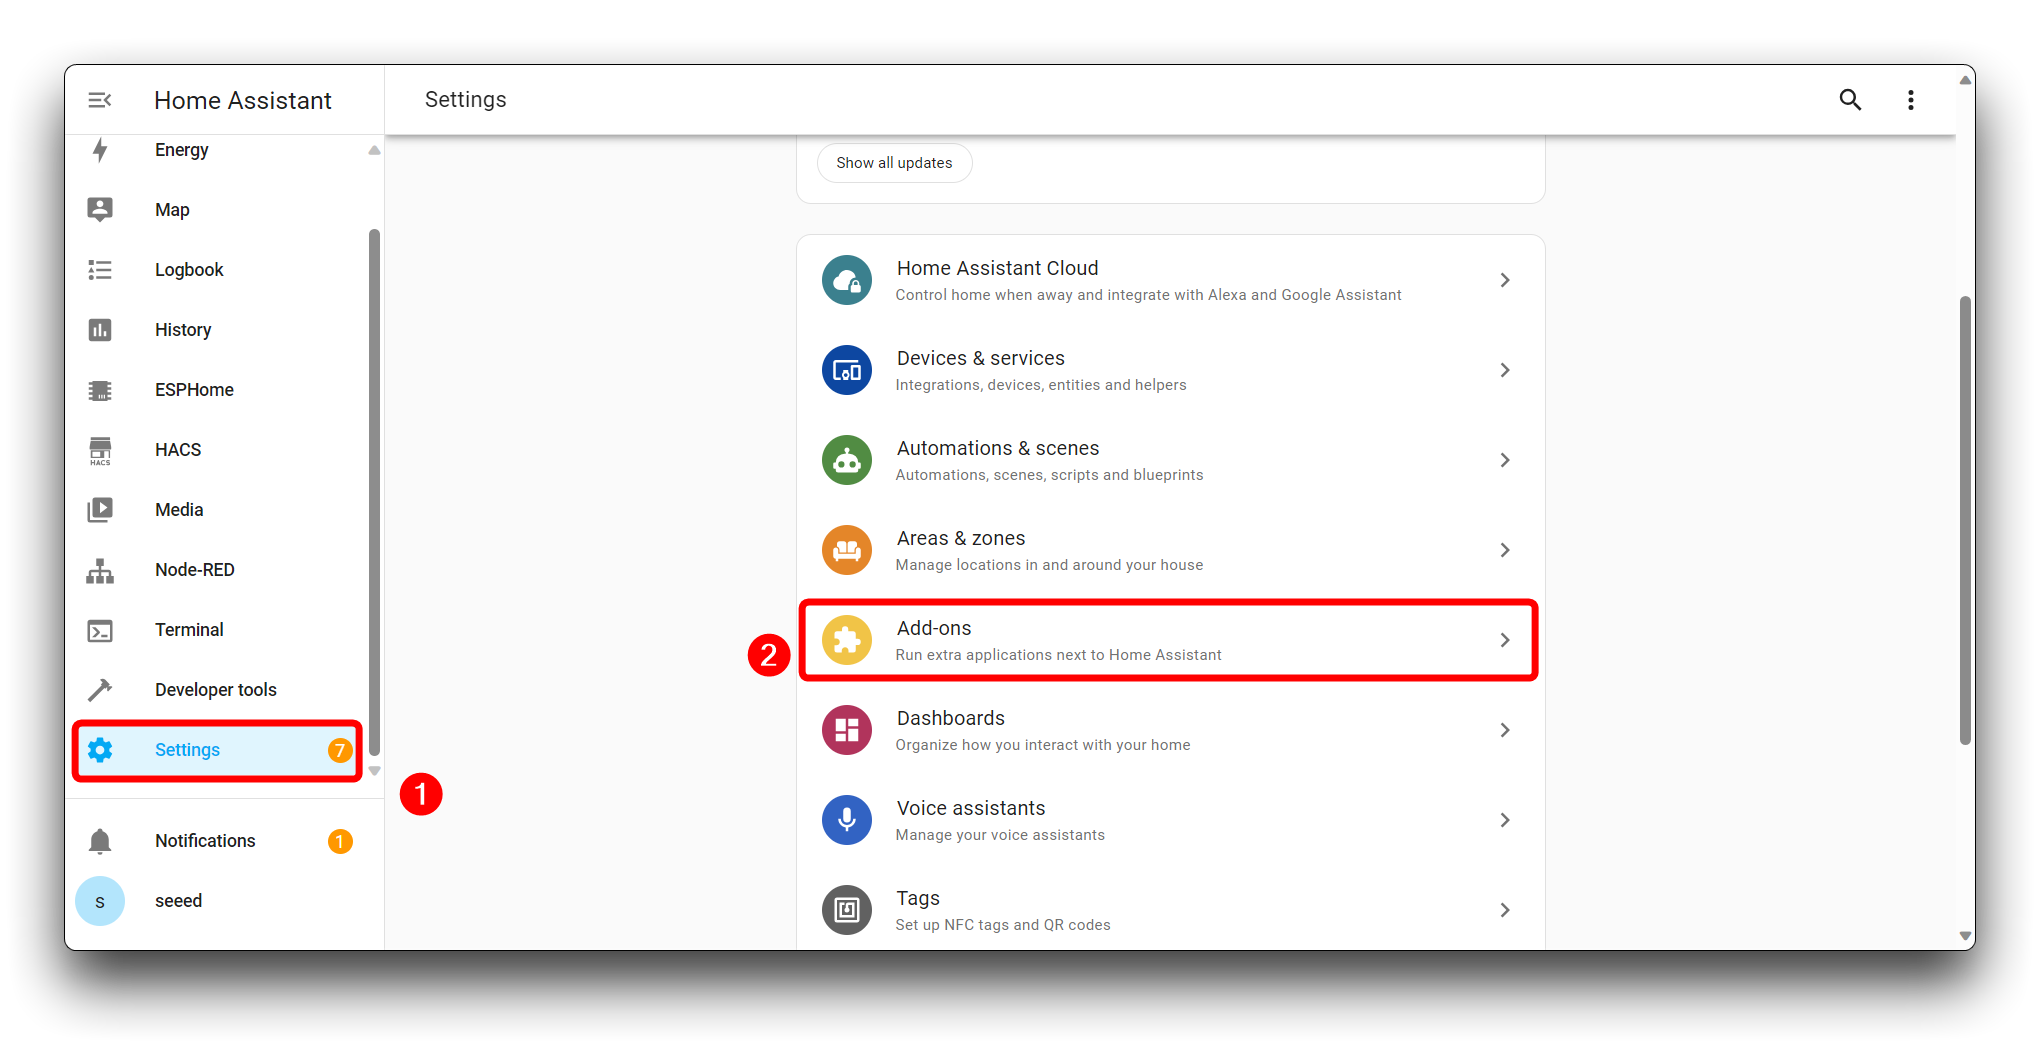
Section titled “Step 2. Install Terminal & SSH”Click on Settings in the sidebar to access the settings menu. Click on Add-ons to access the add-on store.
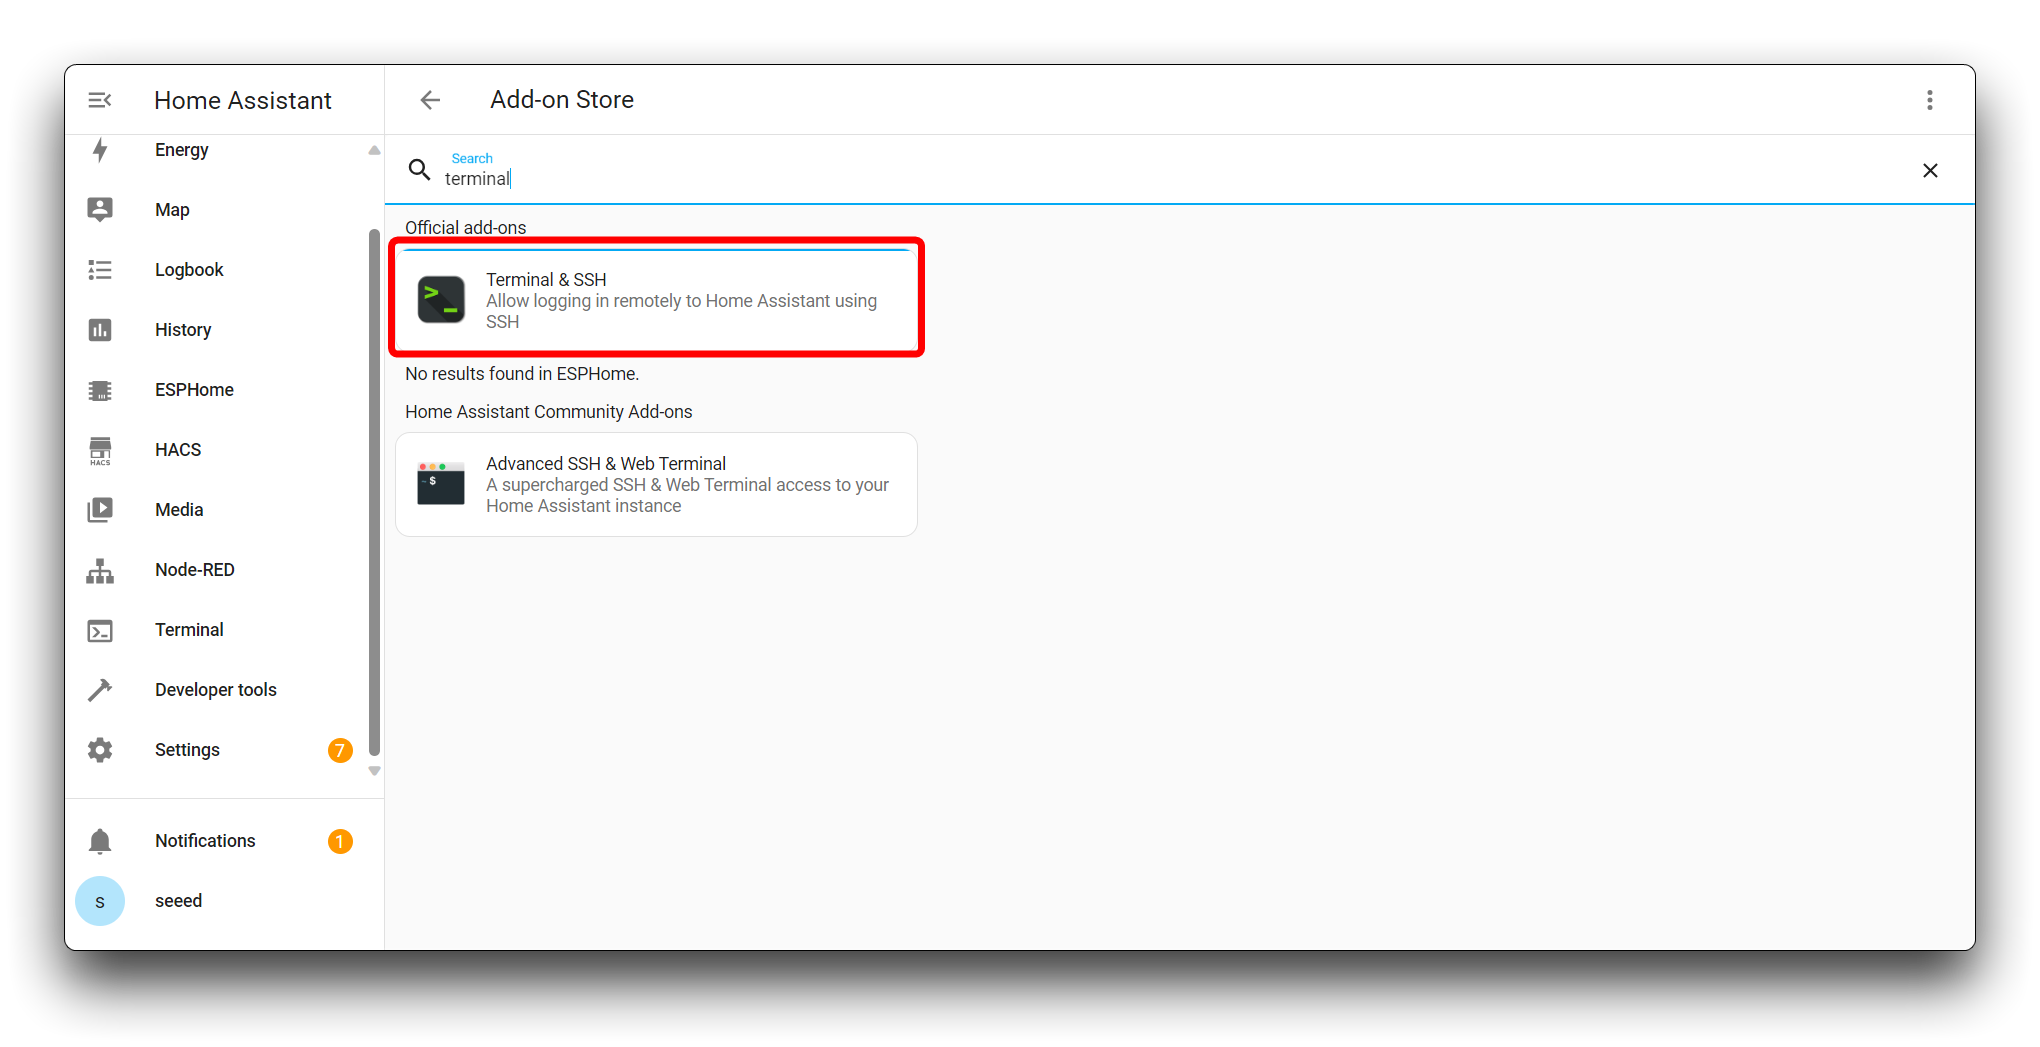
Use the search bar or browse through the available add-ons to find Terminal & SSH.
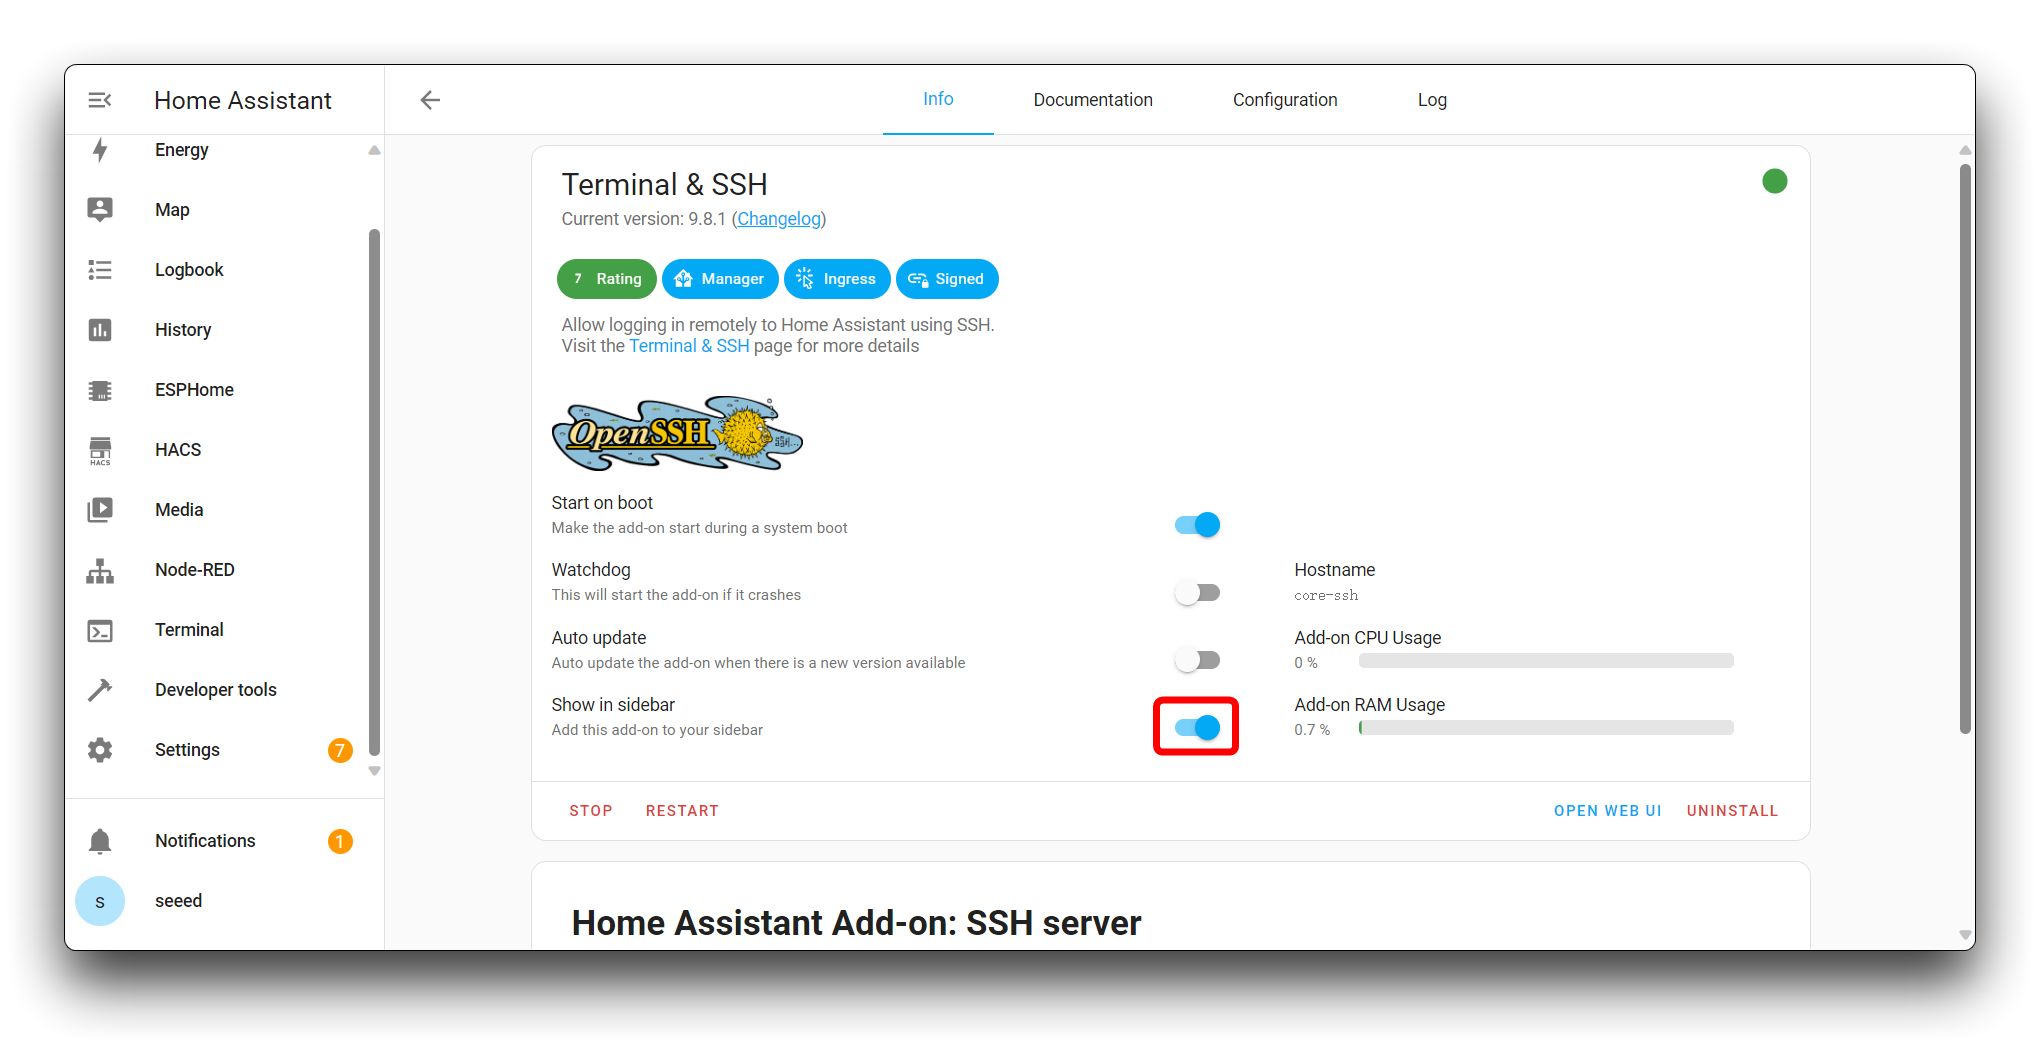
Once you’ve located Terminal & SSH, click on it to view the details. On the add-on’s page, you’ll see an overview, documentation, and configuration options. To install the add-on, click the Install button.
Step 3. Install HACS
Section titled “Step 3. Install HACS”Find the recently downloaded Terminal & SSH in the sidebar. In the terminal, navigate to the config directory, which is the root of your Home Assistant configuration:
cd /configExecute the following command to download and run the HACS installation script:
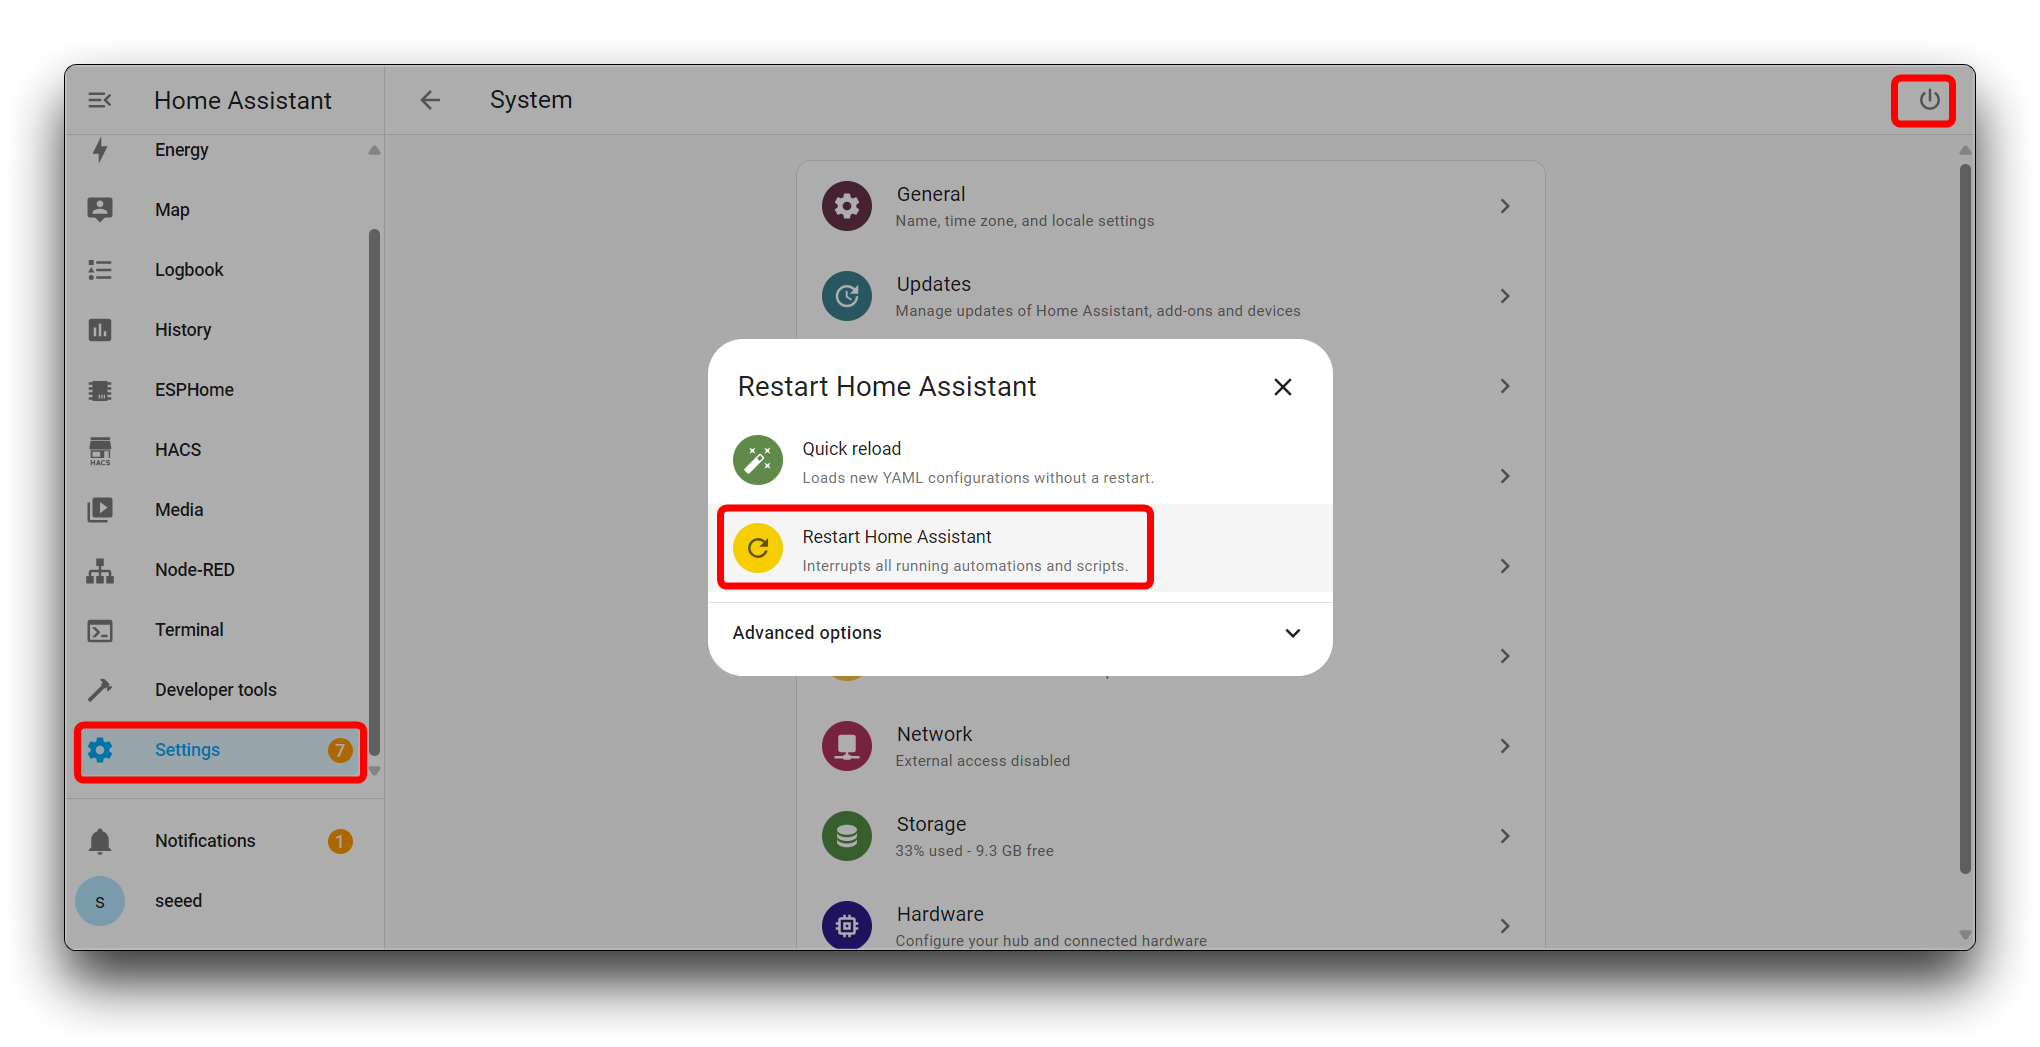
wget -q -O - https://install.hacs.xyz | bash -After the installation script has finished, you need to restart Home Assistant to apply the changes. You can restart Home Assistant through the UI by going to Settings > System > Restart.
After the reboot, click on Settings in the sidebar to open the settings menu. Within the settings menu, navigate to Devices & Services.
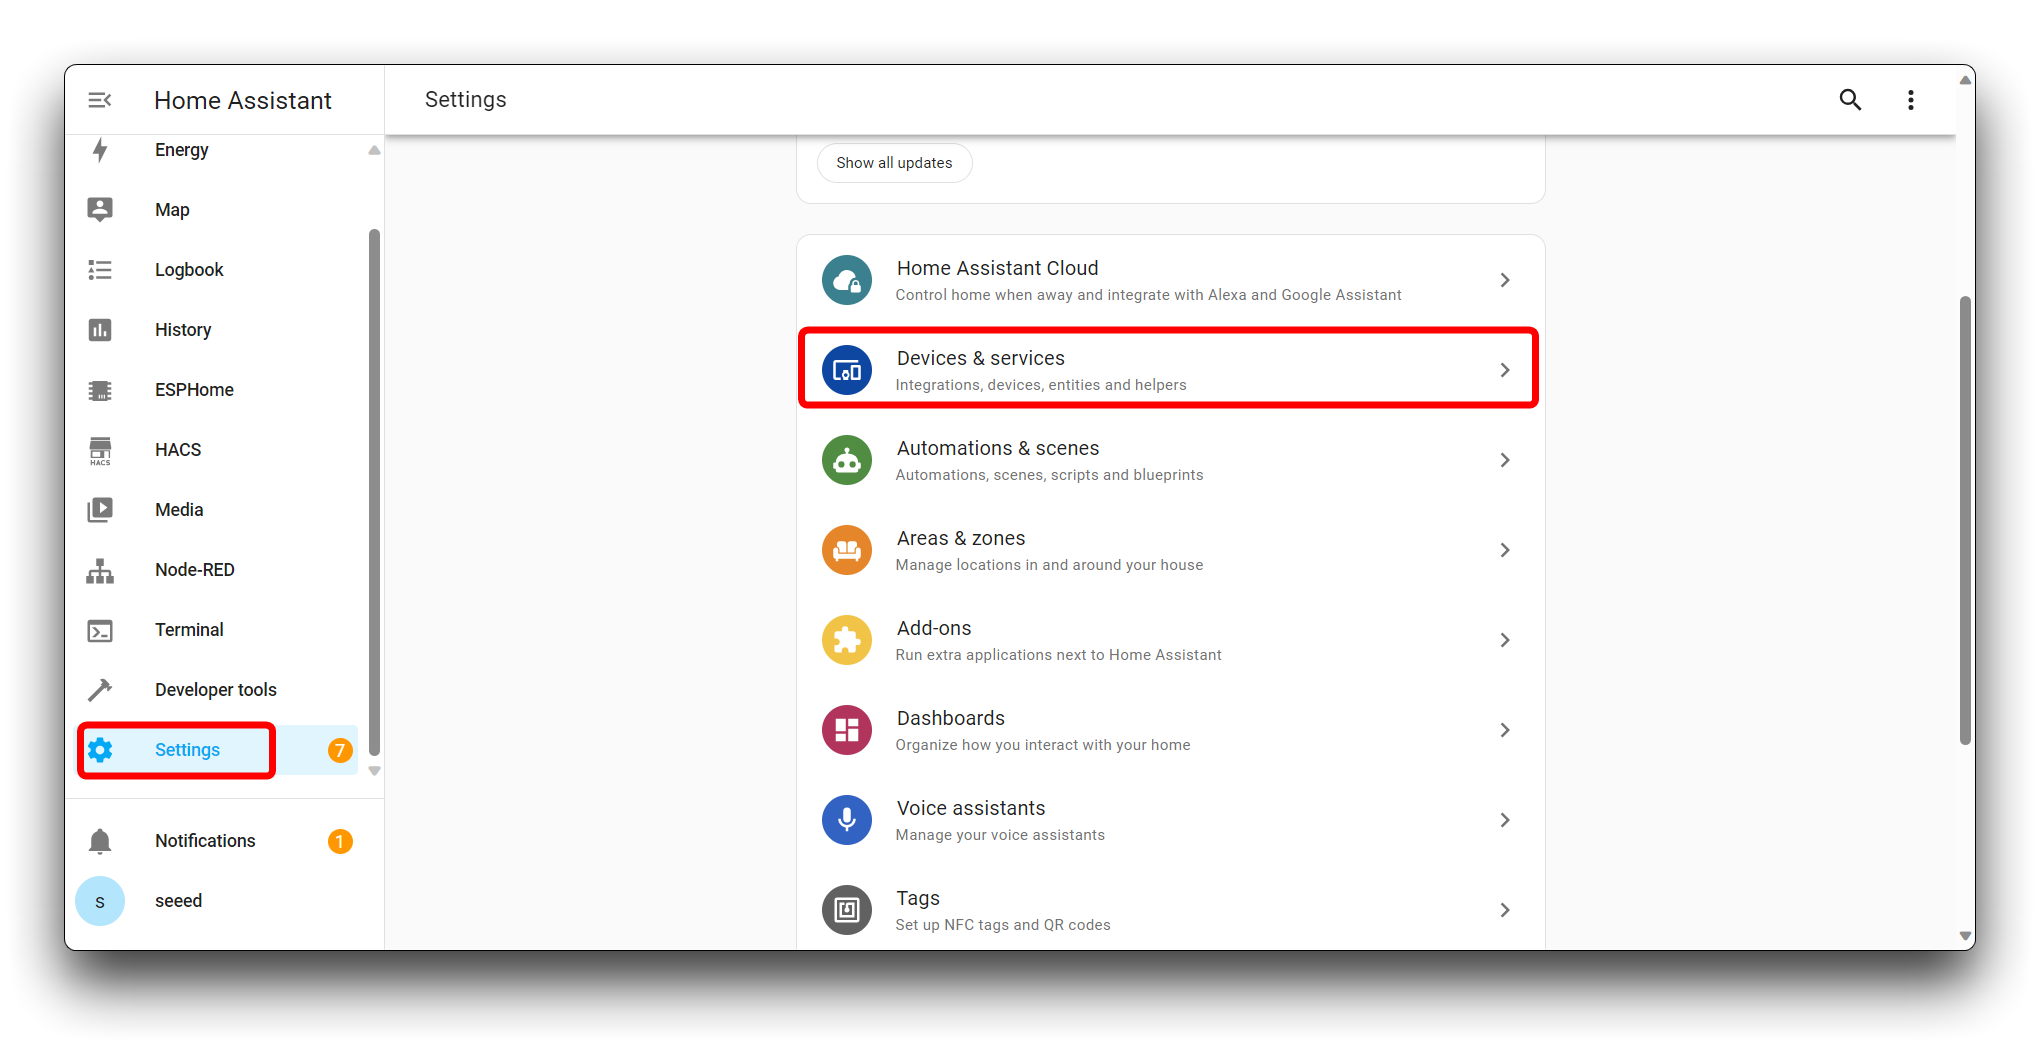
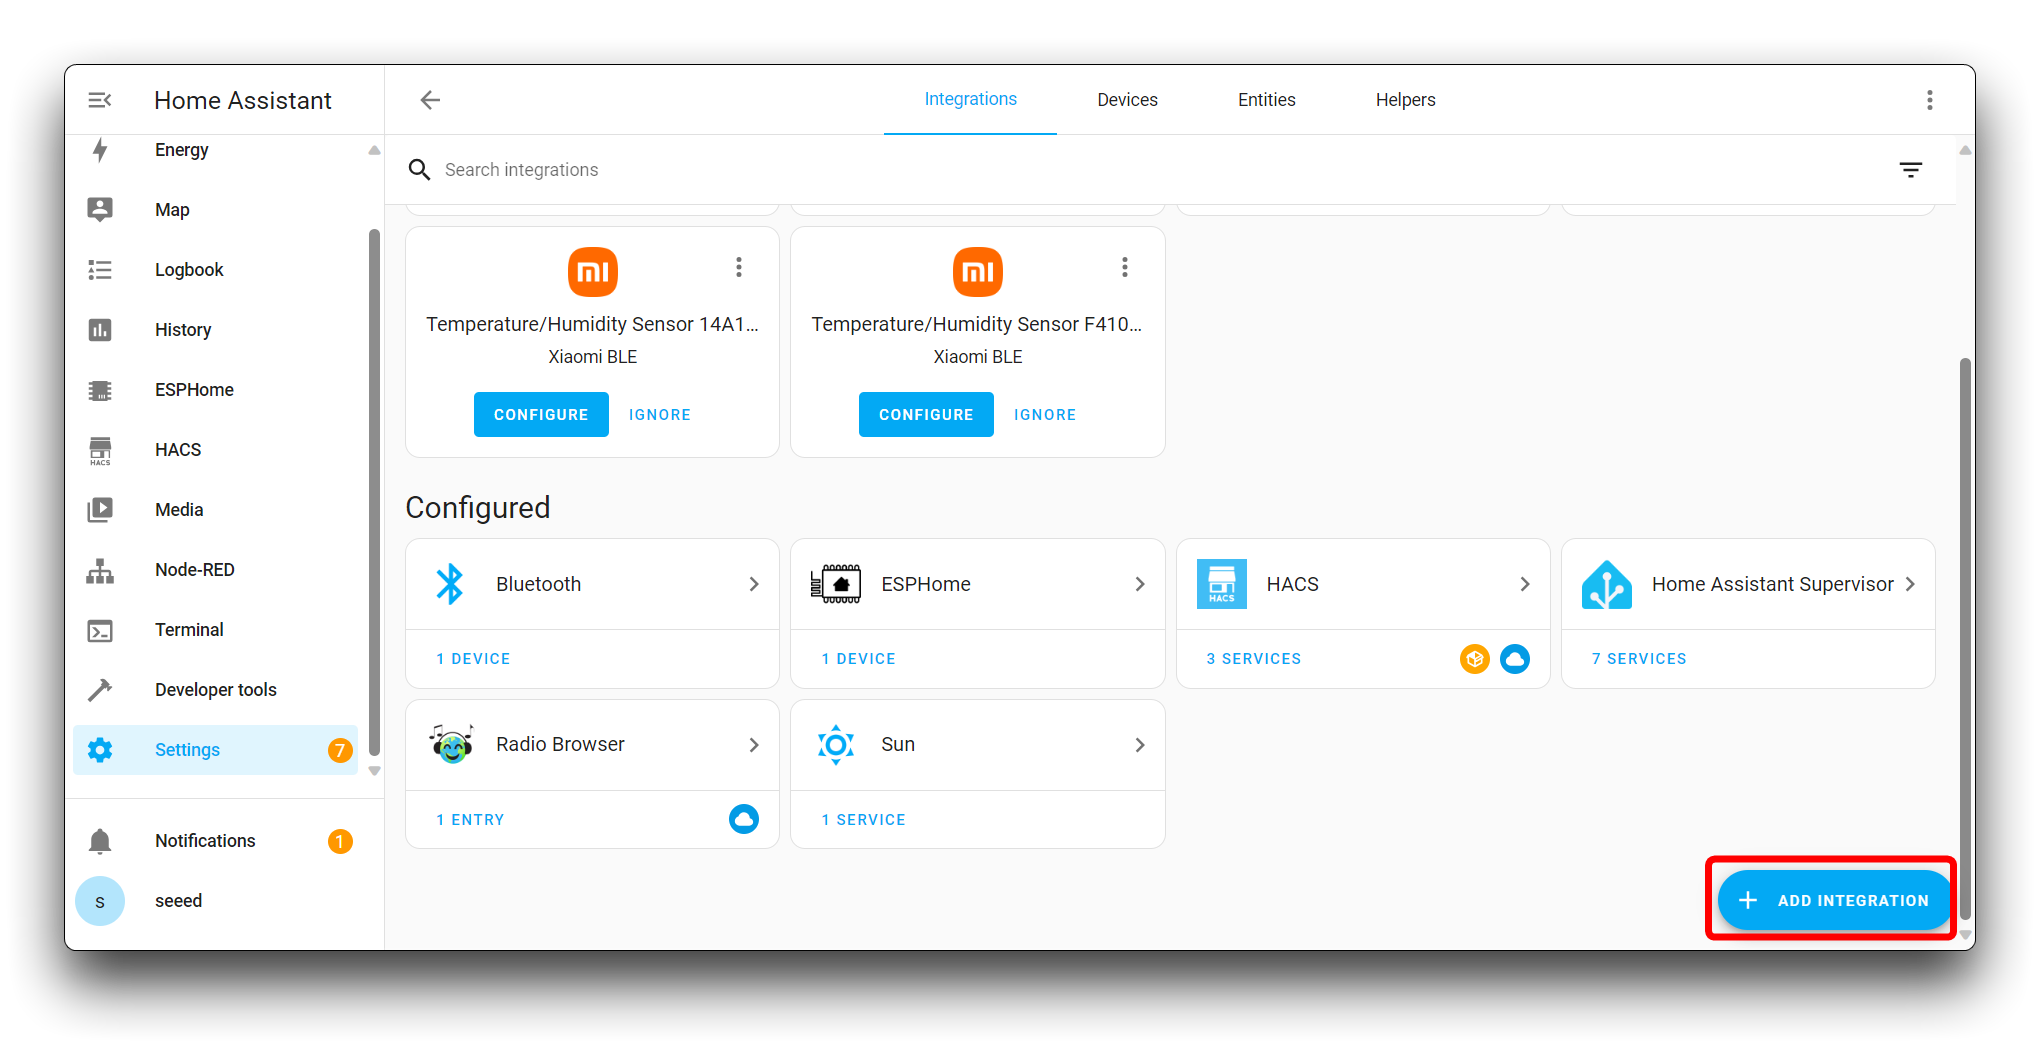
Click on ADD INTEGRATION to add a new integration to your Home Assistant setup.
In the search bar, type HACS to look for the Home Assistant Community Store integration.
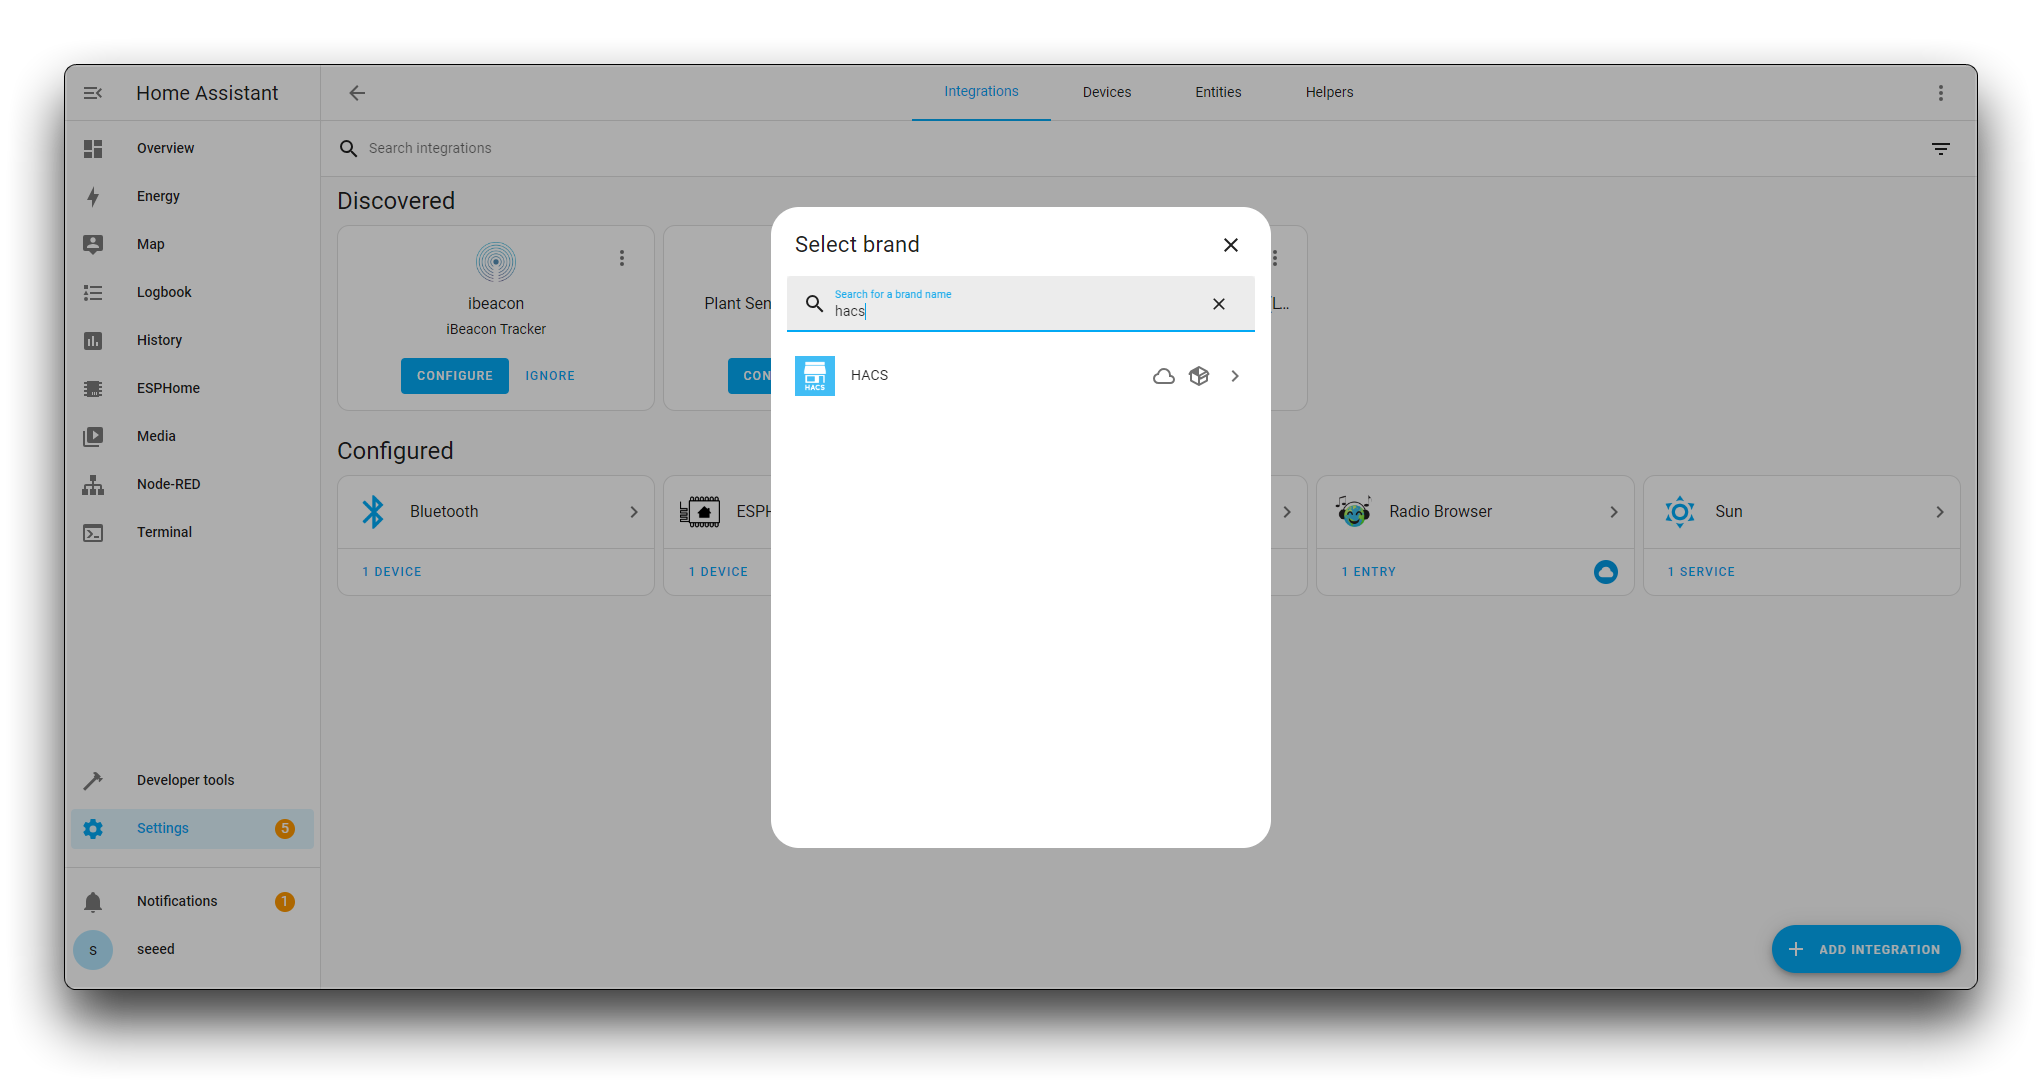
If HACS is found, it should appear in the list of available integrations. Click on it to start the installation process.
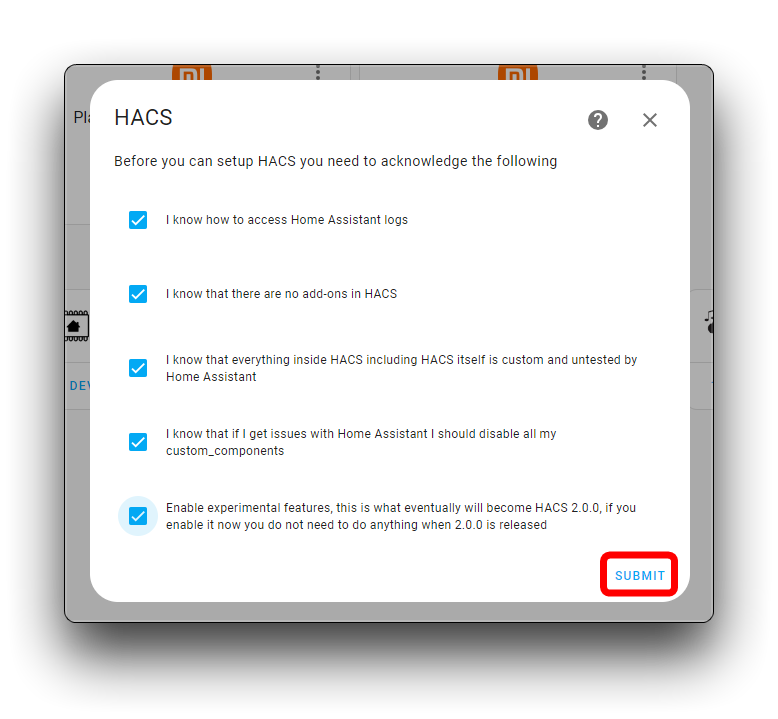
A license agreement or terms of service may pop up. Read through the agreement carefully, and if you agree to the terms, check all the boxes to indicate your agreement. Click SUBMIT to proceed with the installation.
Next, you will be prompted to log in with your GitHub account. This is necessary because HACS integrates with GitHub to manage the installation of community-created integrations and plugins.
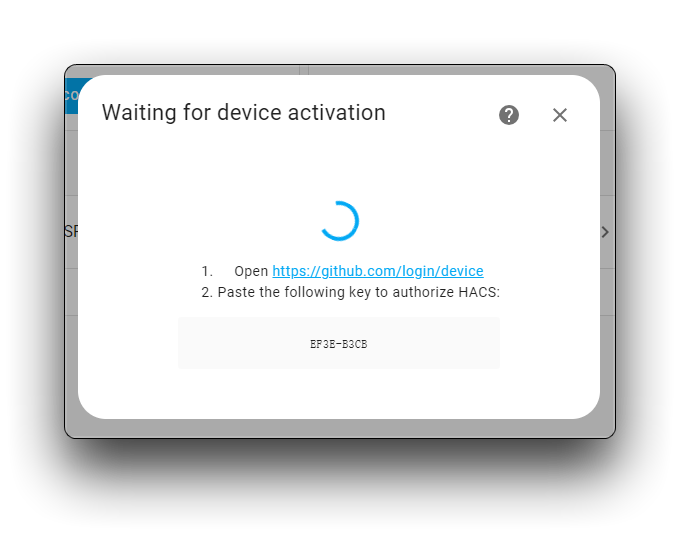
Follow the instructions to authorize Home Assistant to access your GitHub account. This will typically involve entering a verification code provided by GitHub to confirm your identity.
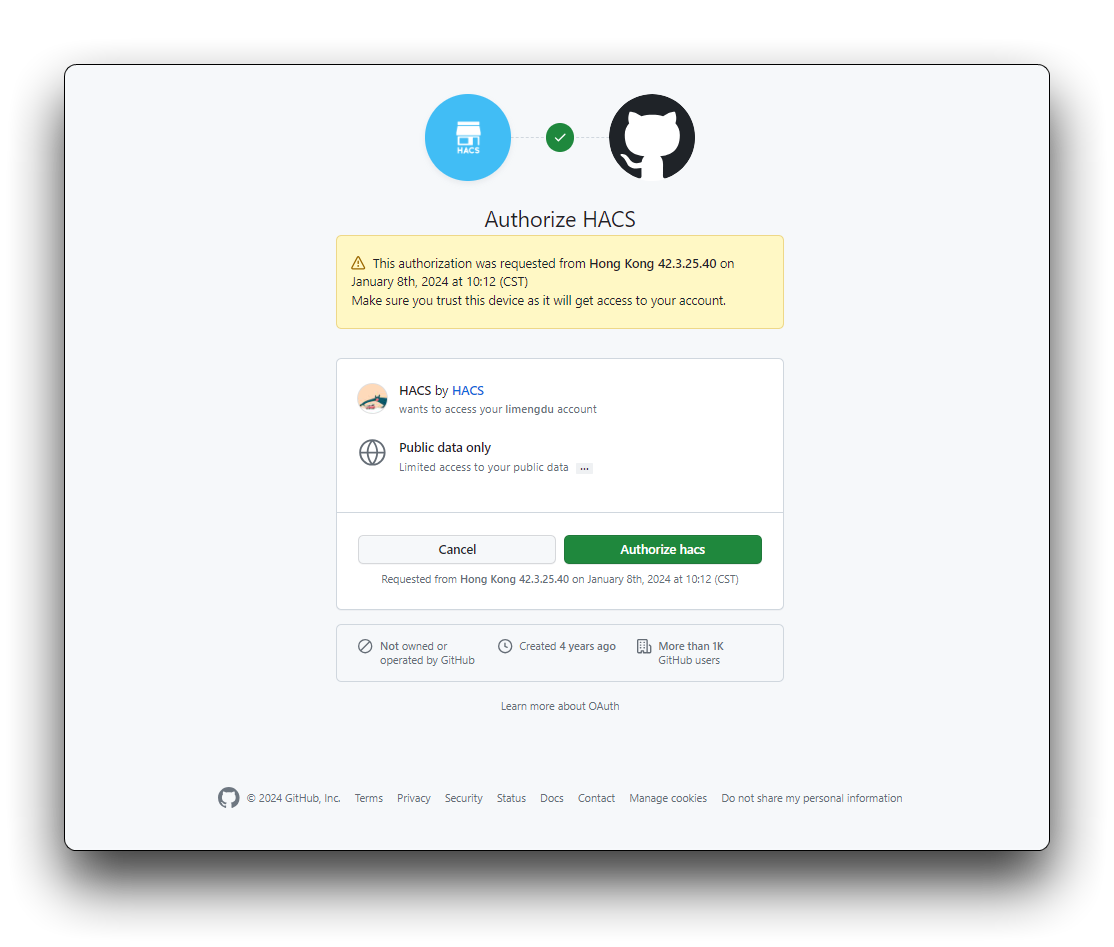
Once you have authorized Home Assistant to use your GitHub account, HACS will finish installing.
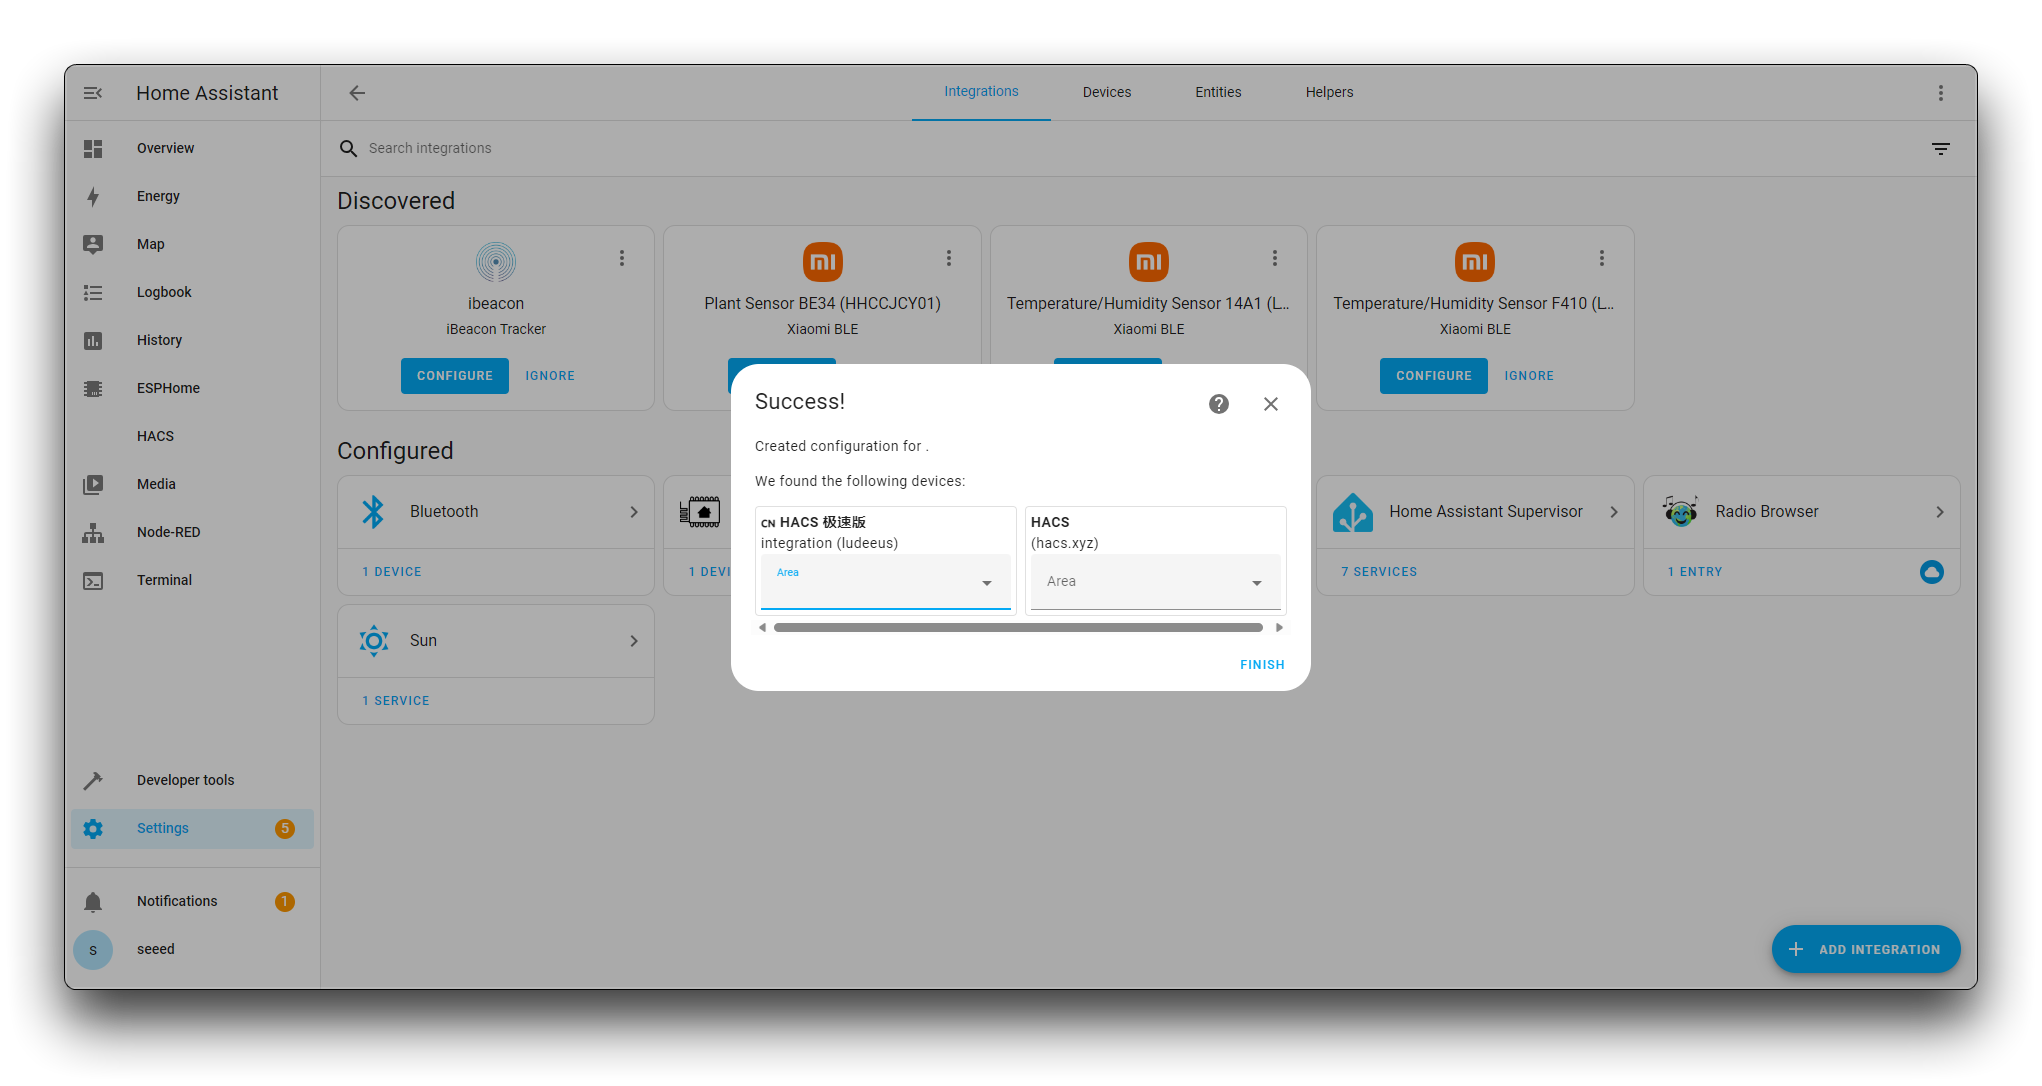
You may need to restart Home Assistant for HACS to fully integrate into your system.
Installing the SenseCraft plugin
Section titled “Installing the SenseCraft plugin”Step 4. Installation of the SenseCraft plugin via HACS
Section titled “Step 4. Installation of the SenseCraft plugin via HACS”Look for HACS in the sidebar and click on it to open the HACS interface. In the bottom right corner, you’ll find a menu button (three dots or a plus sign, depending on your HACS version). Click on Custom repositories.
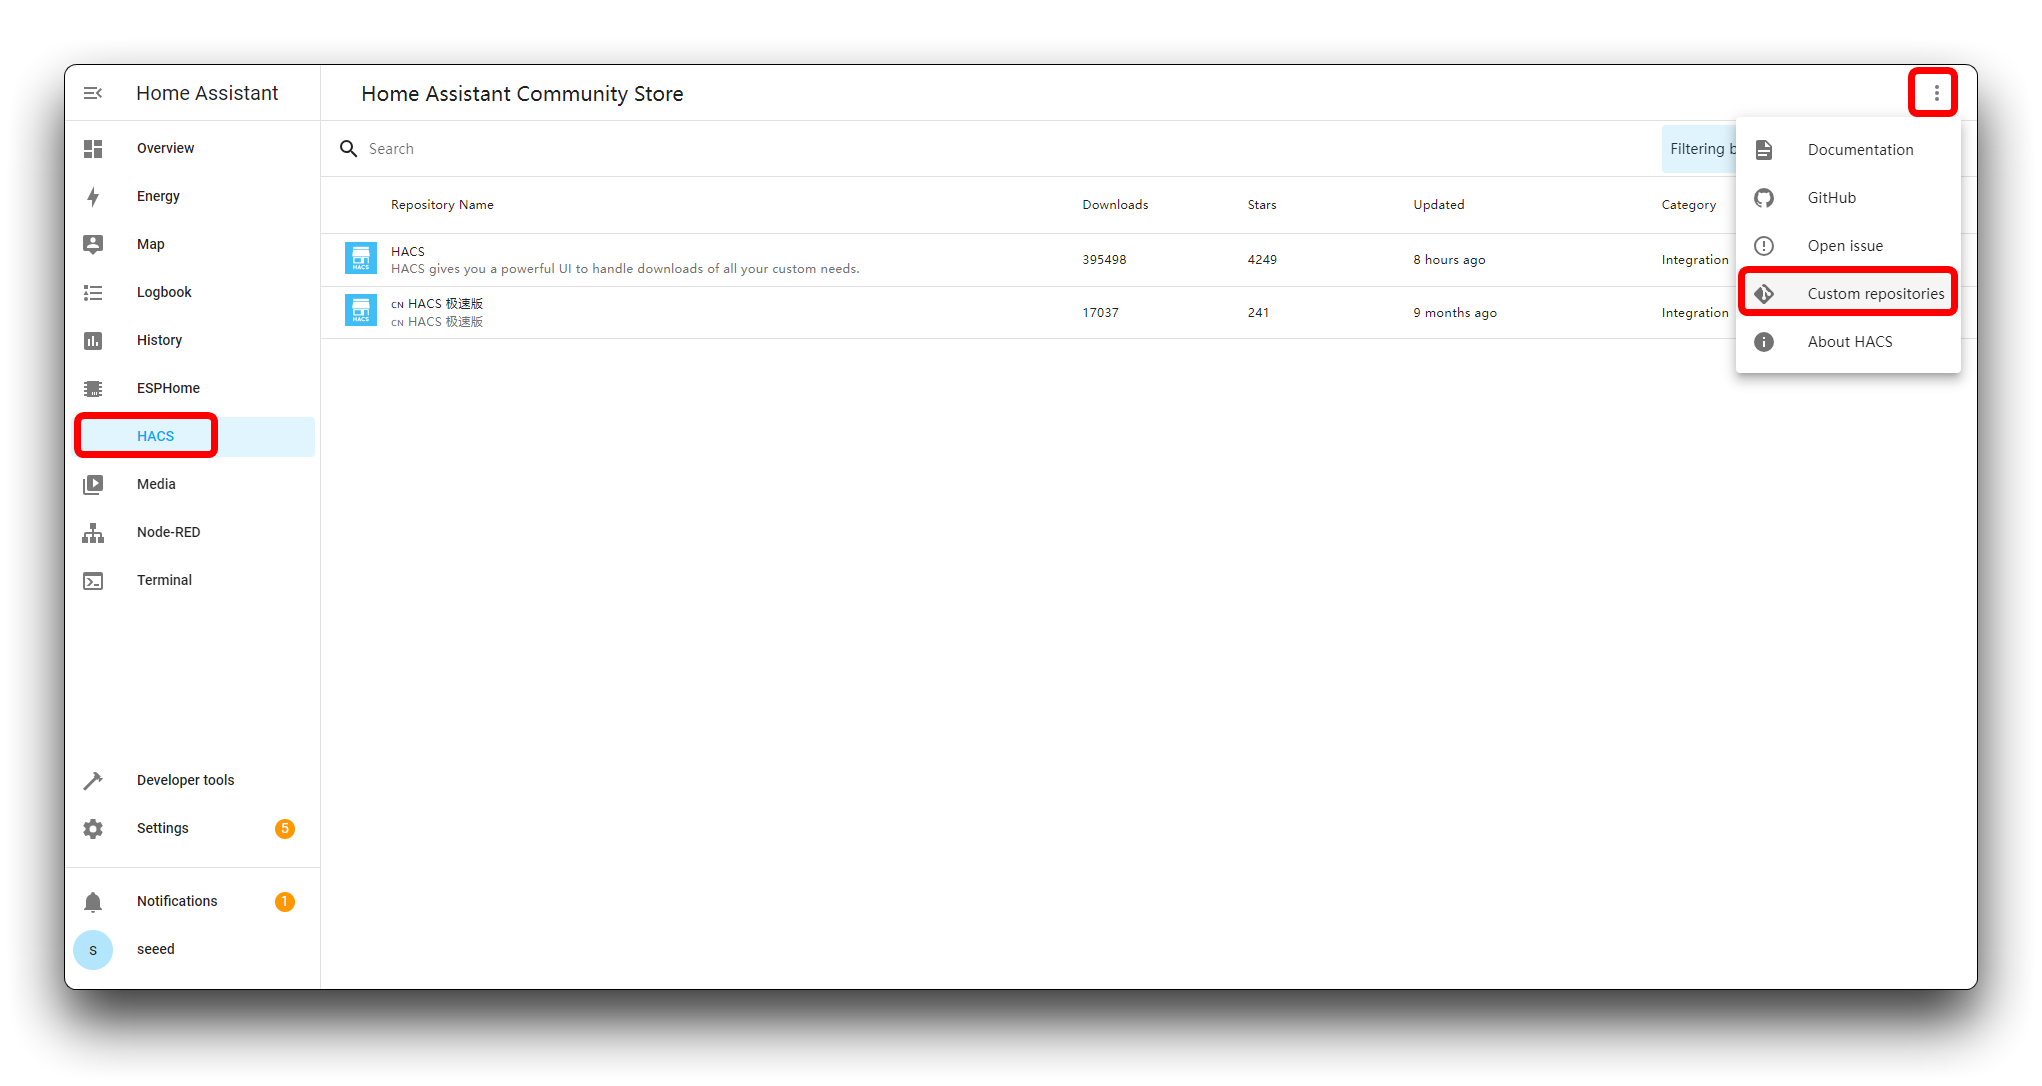
A dialog box will appear asking you to input the repository URL. Here, you will enter the custom repository URL for the SenseCraft integration. After entering the URL, select the category (for the SenseCraft integration, you would select Integration).
https://github.com/Seeed-Solution/SenseCraft-HomeAssistant.git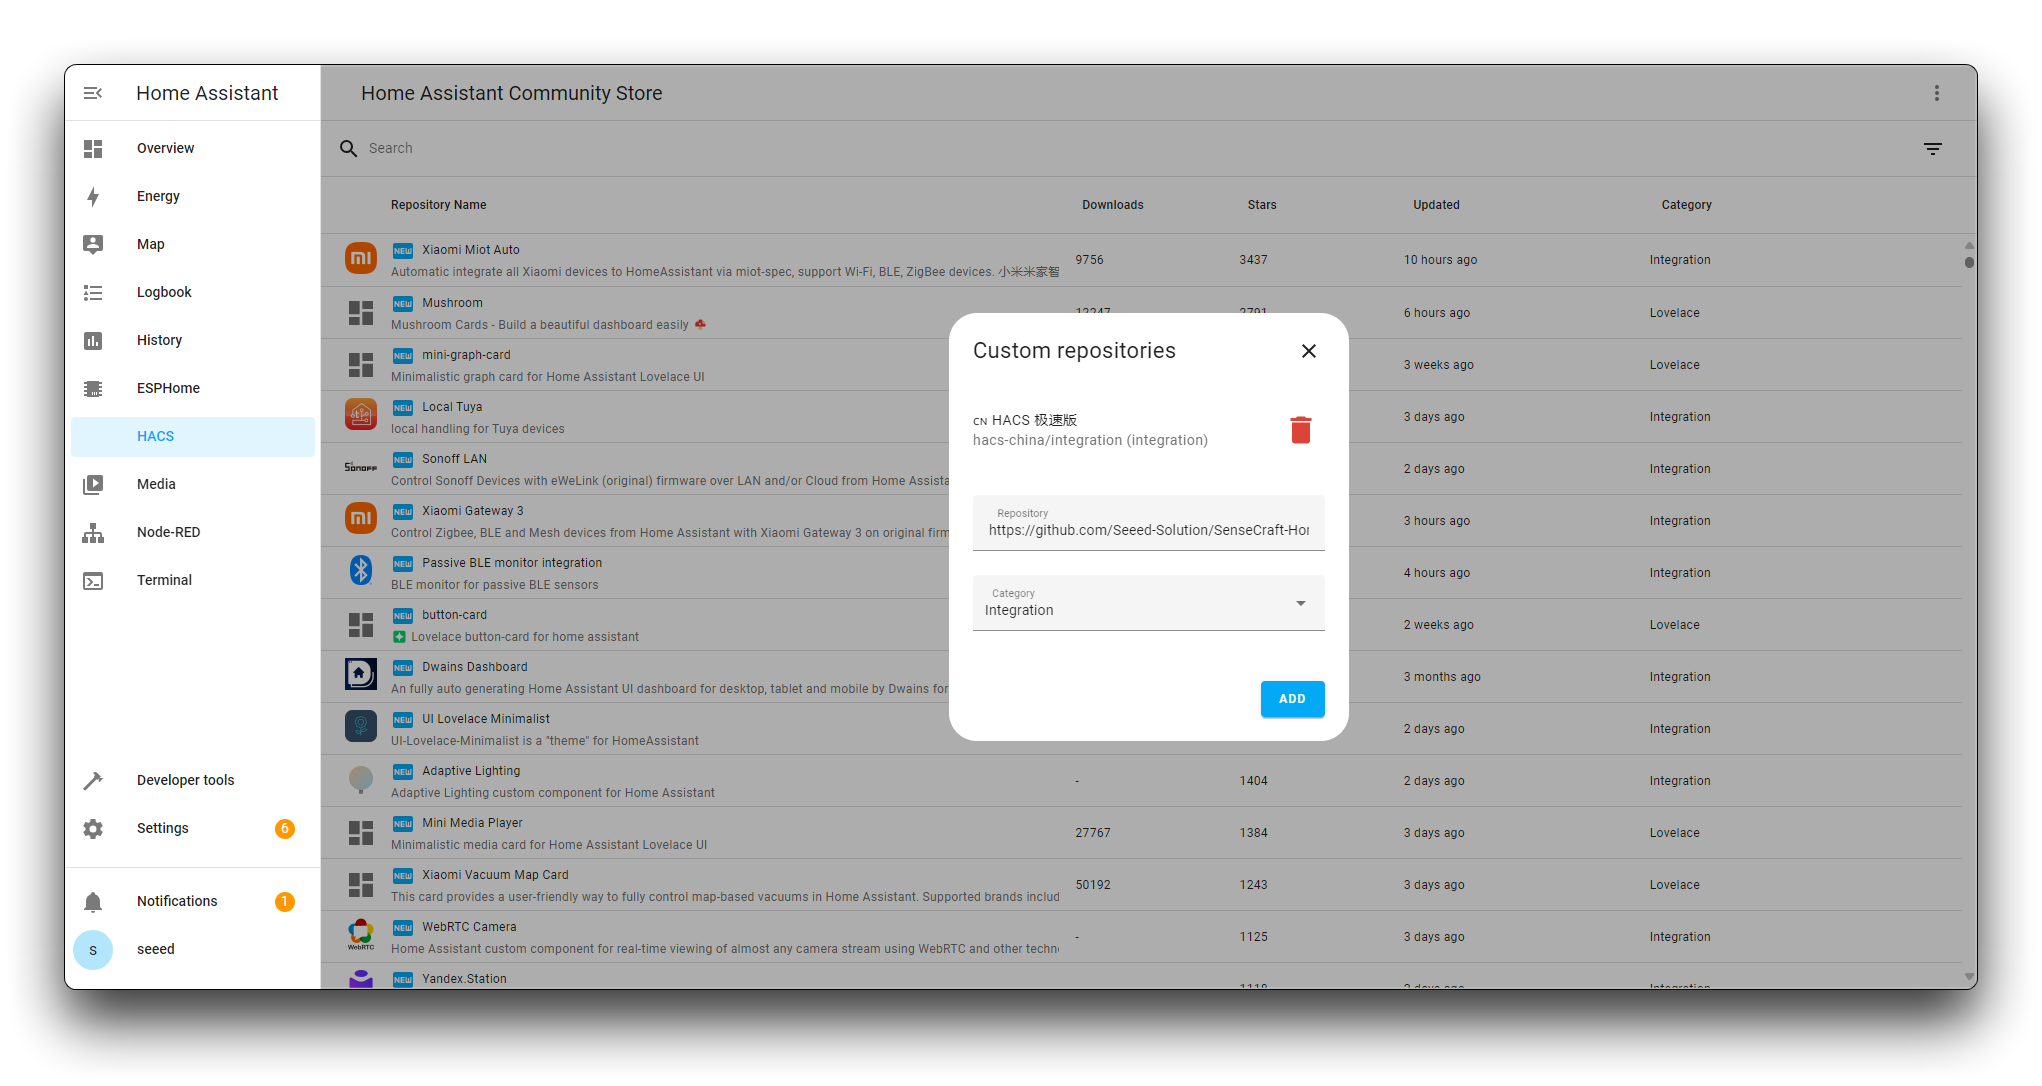
Click on Add. The repository is now added to your HACS, and you should be able to find the SenseCraft integration in the list under Integrations.
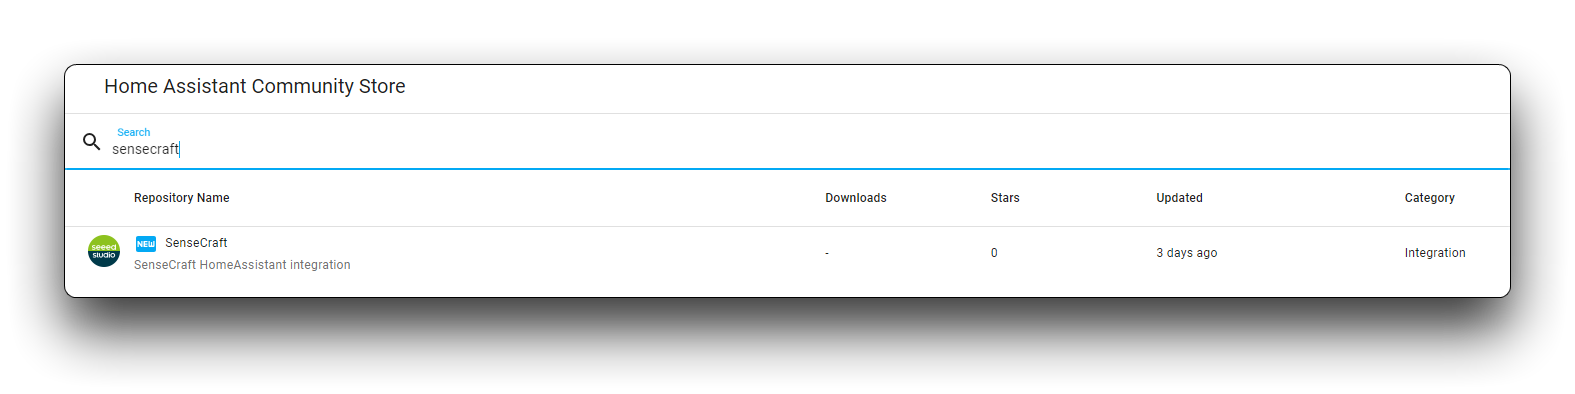
Locate the SenseCraft integration and click “DOWNLOAD”.
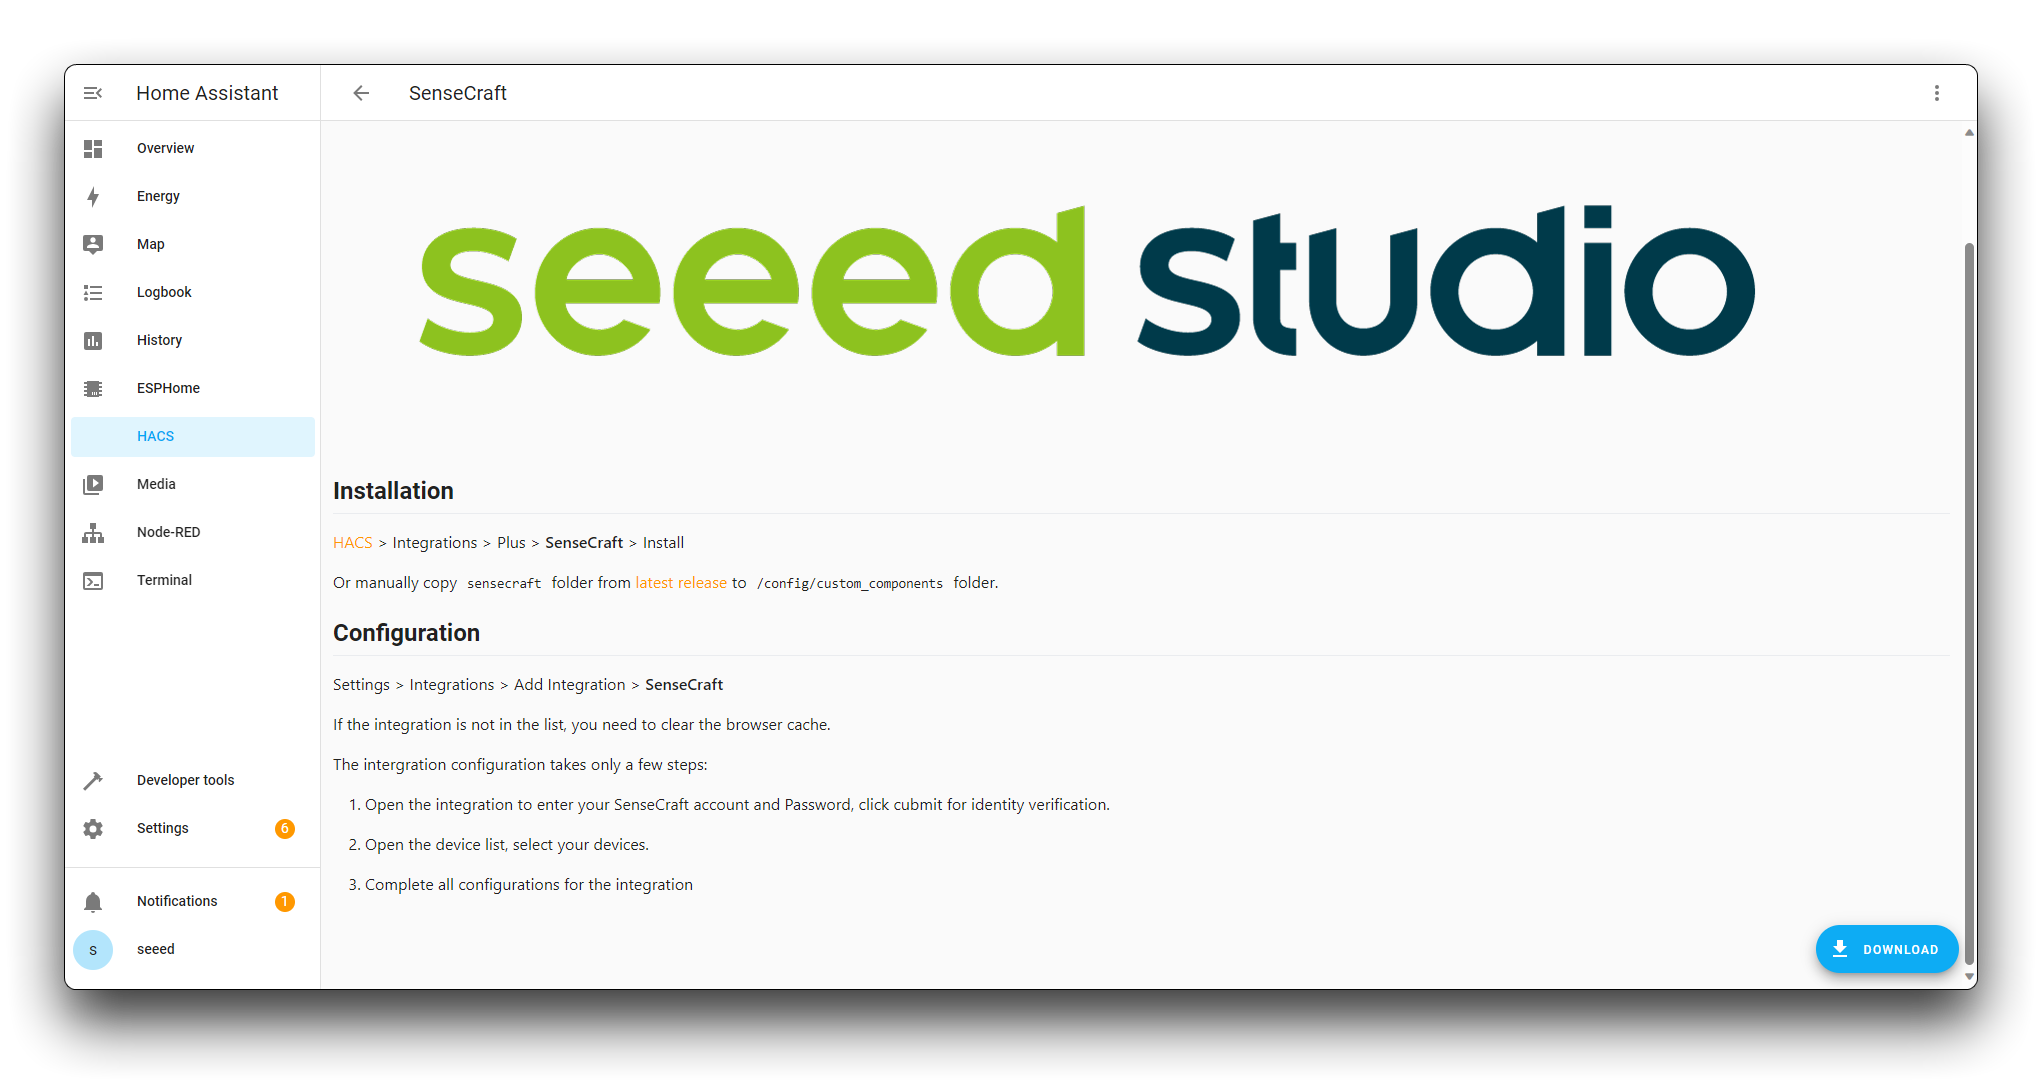
By this point, we have successfully completed the installation of the SenseCraft plugin.
Preparing the model for Grove Vision AI V2
Section titled “Preparing the model for Grove Vision AI V2”Step 5. Flash Firmware for XIAO ESP32C3
Section titled “Step 5. Flash Firmware for XIAO ESP32C3”Connect the XIAO ESP32C3 to your computer using a suitable USB-C cable. Ensure the device drivers are installed correctly.
Open the SenseCraft Model Assistant Tool in your web browser.
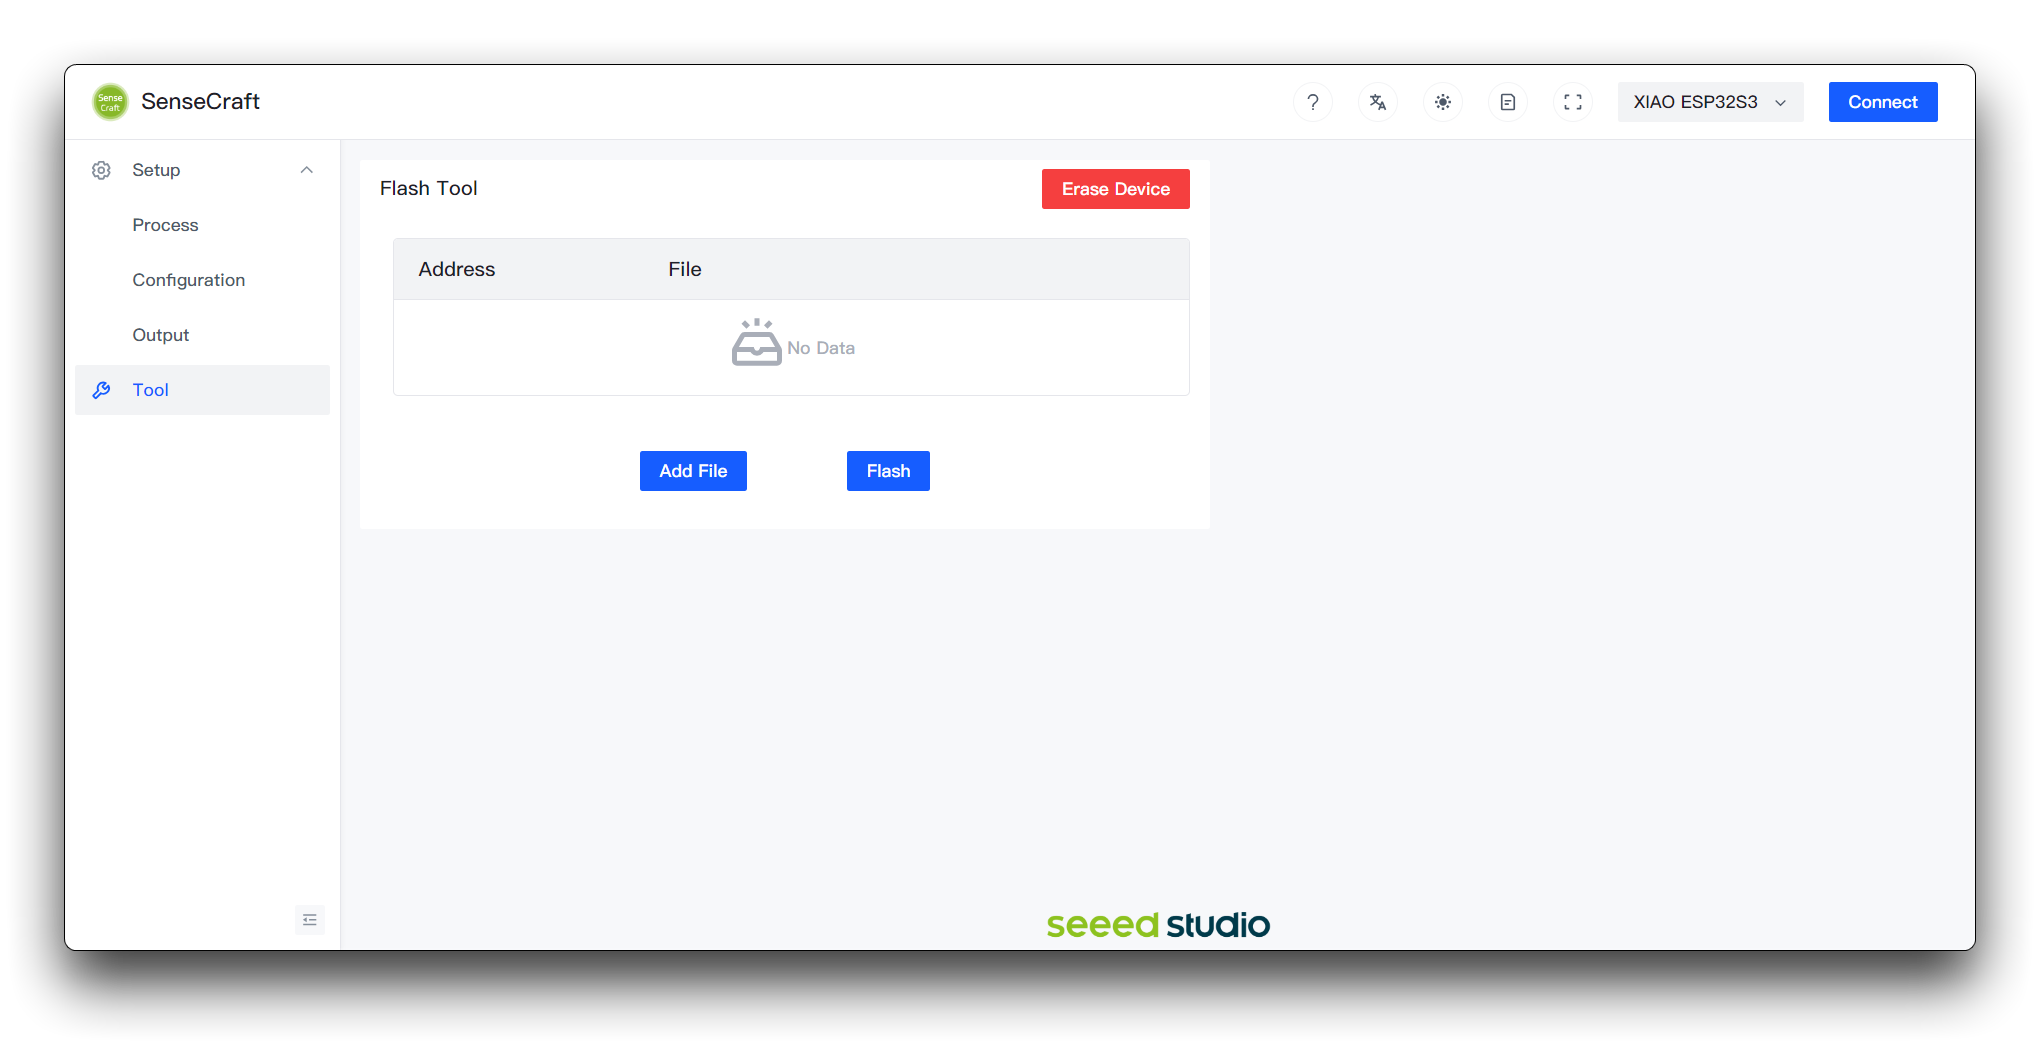
Then select XIAO ESP32S3 and click Connect.
Click the button below to download the firmware file and click the Add File button on the web page to flash the SSCMA_XIAO_ESP32C3_adapter_sensecraft_v1.1.8.bin firmware for the 0x0 address.
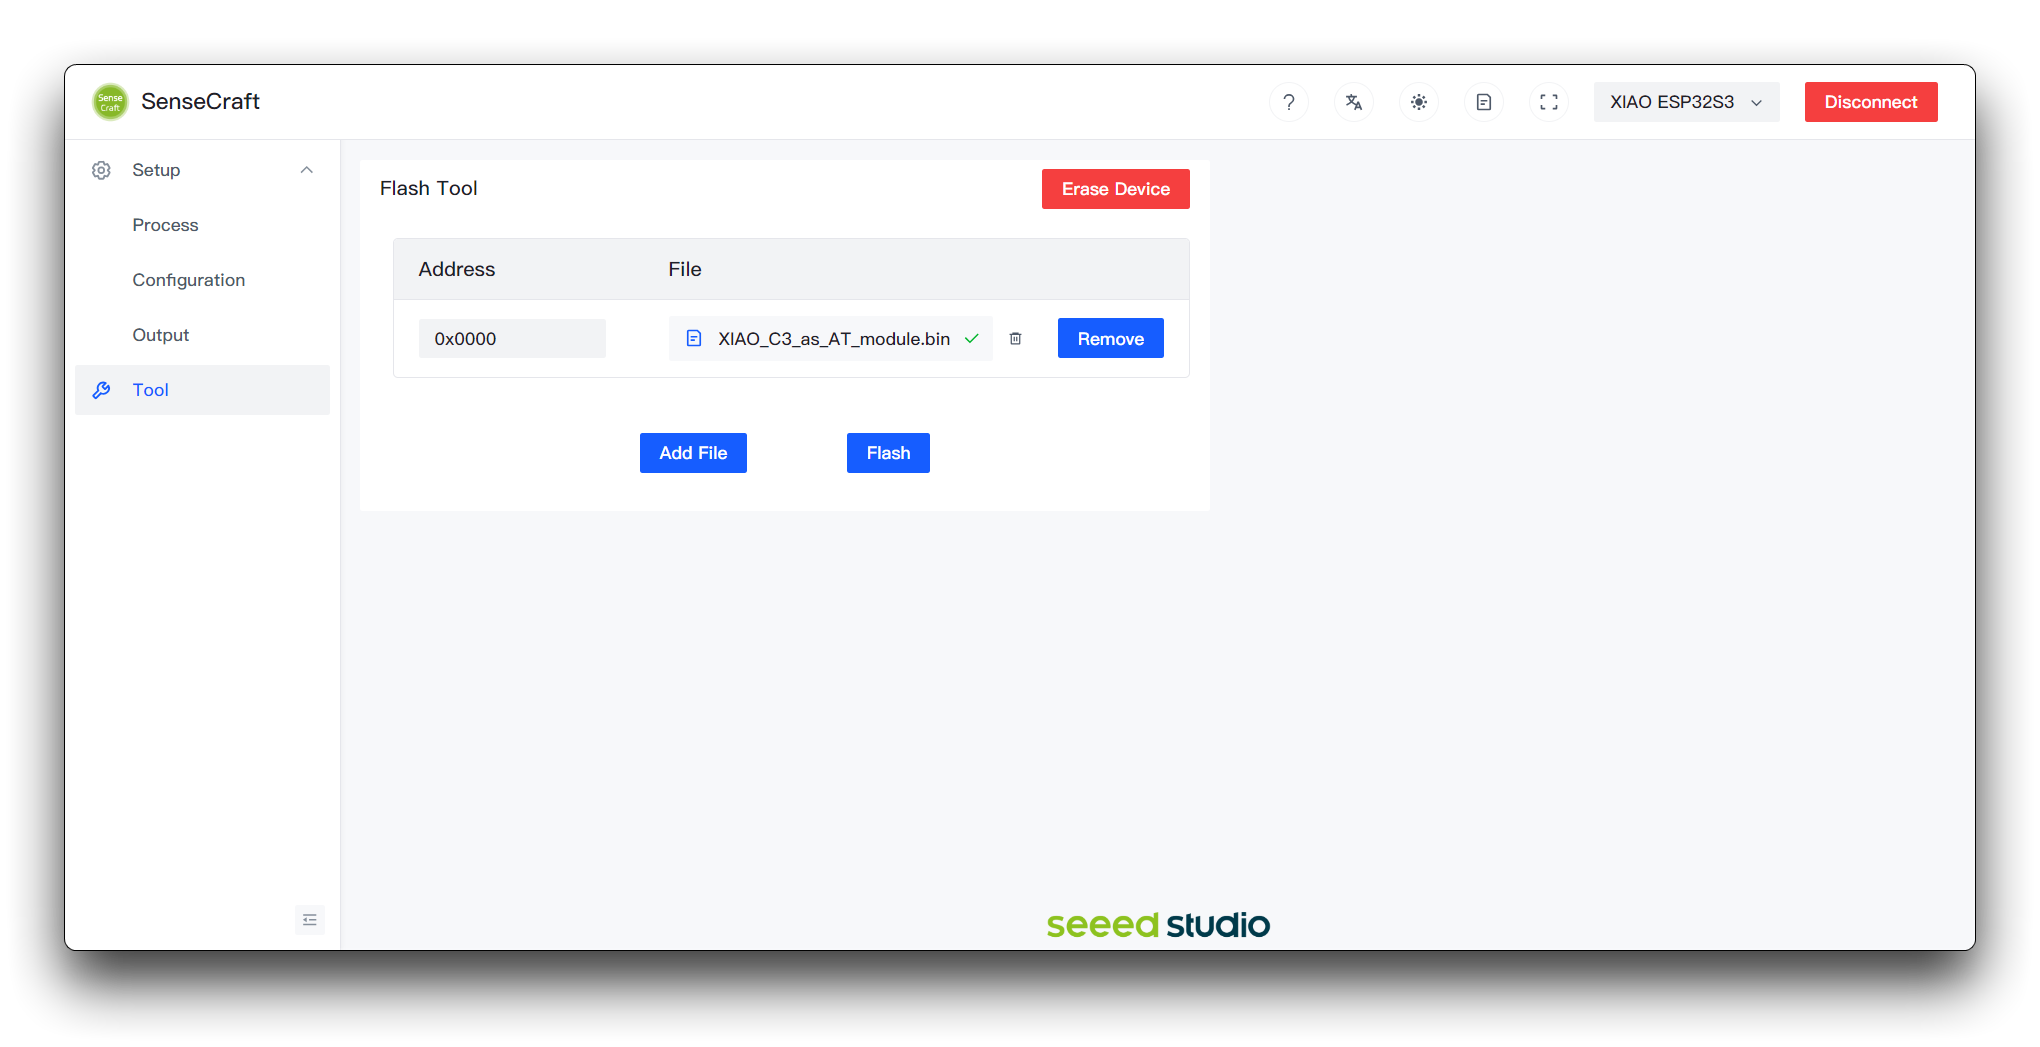
Finally, click the Flash button and wait for the programme to be uploaded successfully before disconnecting the XIAO ESP32C3 from the computer.
Step 6. Connect the Grove Vision AI V2 to the SenseCraft AI Model Assistant
Section titled “Step 6. Connect the Grove Vision AI V2 to the SenseCraft AI Model Assistant”Access the Grove Vision AI V2 workspace via SenseCraft AI > Models > Workspace > Grove Vision AI V2, or use the direct link to the workspace.
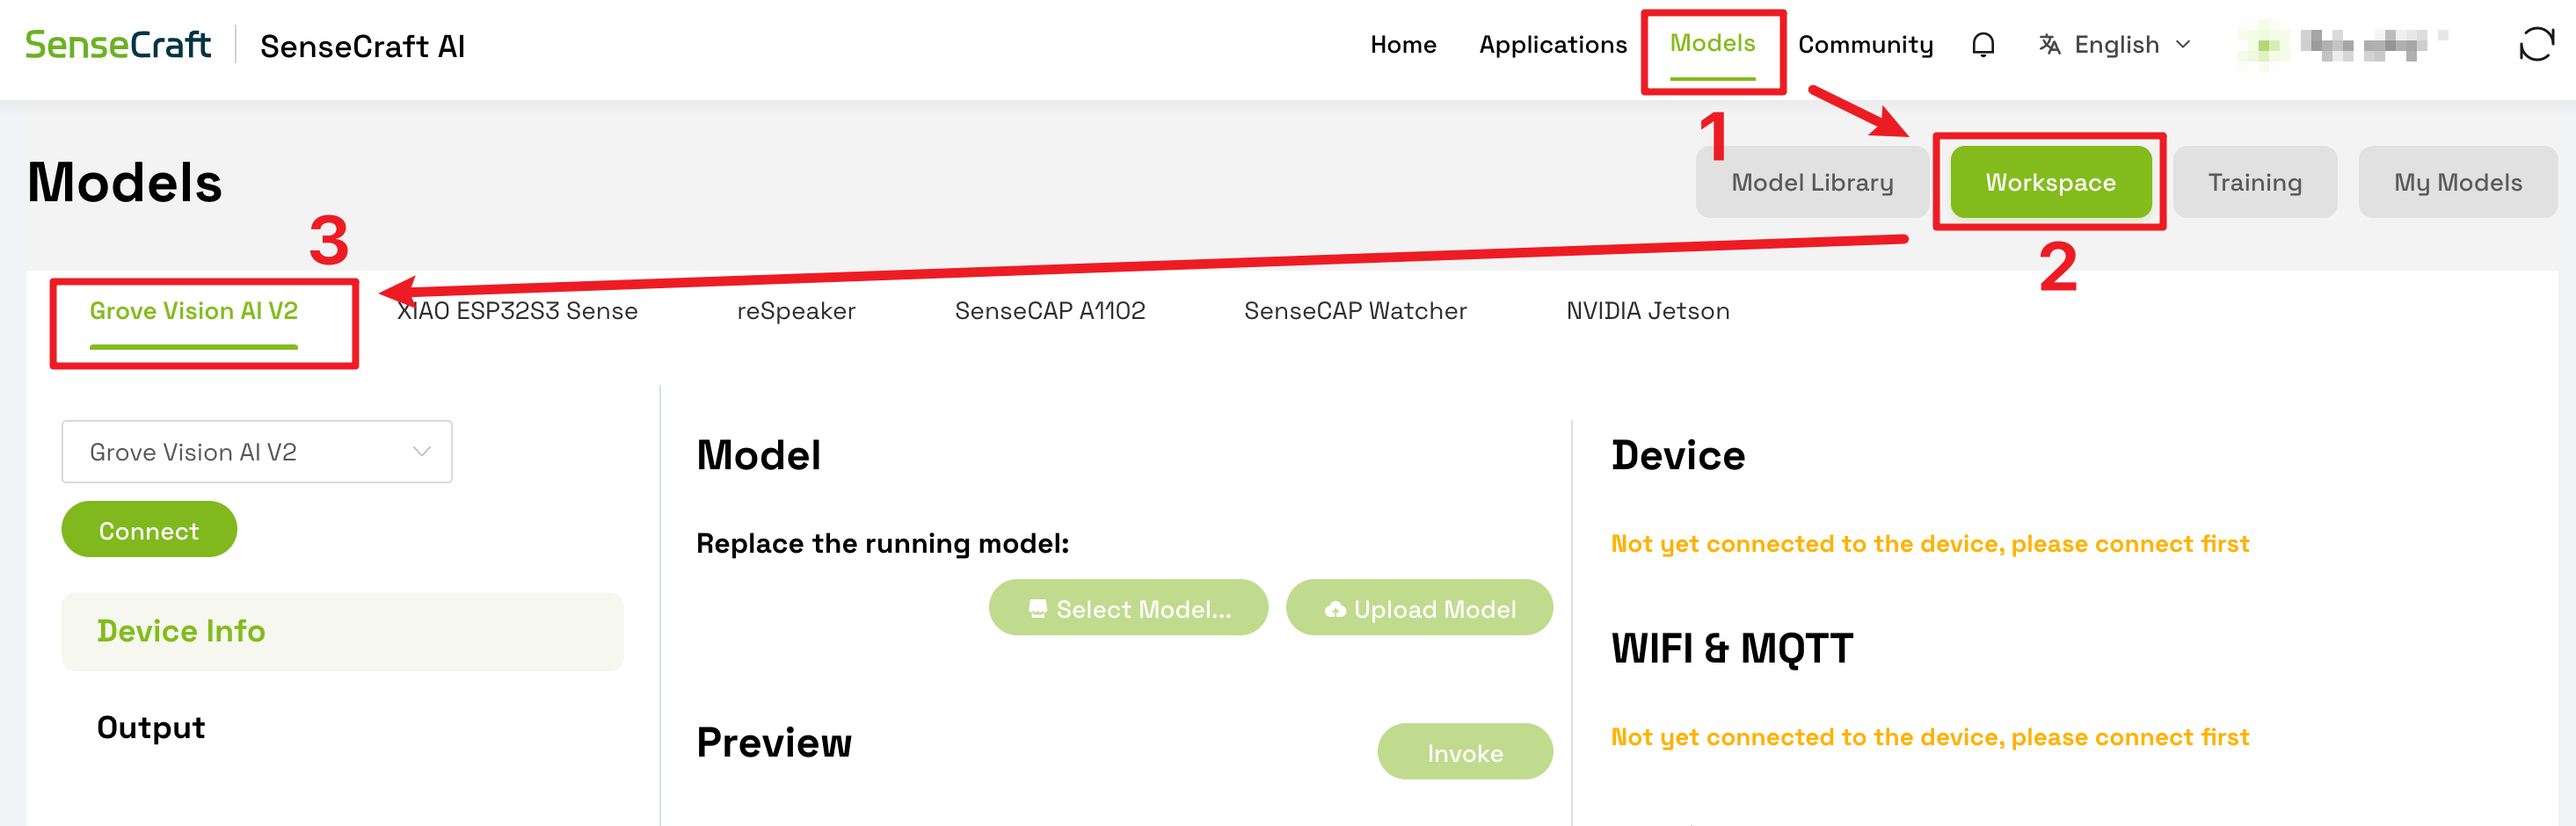
Please use a Type-C type cable to connect Grove Vision AI V2 to your computer.
Then click the Connect button in the upper left corner and select the port number of the device.

Step 7. Upload a suitable model
Section titled “Step 7. Upload a suitable model”Then, please select the appropriate model you want to use after clicking Select Model to upload it to Grove Vision AI V2.

Wait for 1~2 minutes for the model to be uploaded.
Step 8. Observations
Section titled “Step 8. Observations”Once the model is uploaded successfully, you will be able to see the live feed from the Grove Vision AI V2 camera in the Preview on the right.

We can see that in the Preview Settings on the right hand side, there are two setting options that can be changed to optimise the recognition accuracy of the model.
Building MQTT Services at Home Assistant
Section titled “Building MQTT Services at Home Assistant”Step 9. Install EMQX
Section titled “Step 9. Install EMQX”Click on Settings in the sidebar to access the settings menu. Click on Add-ons to access the add-on store.
Use the search bar or browse through the available add-ons to find emqx.
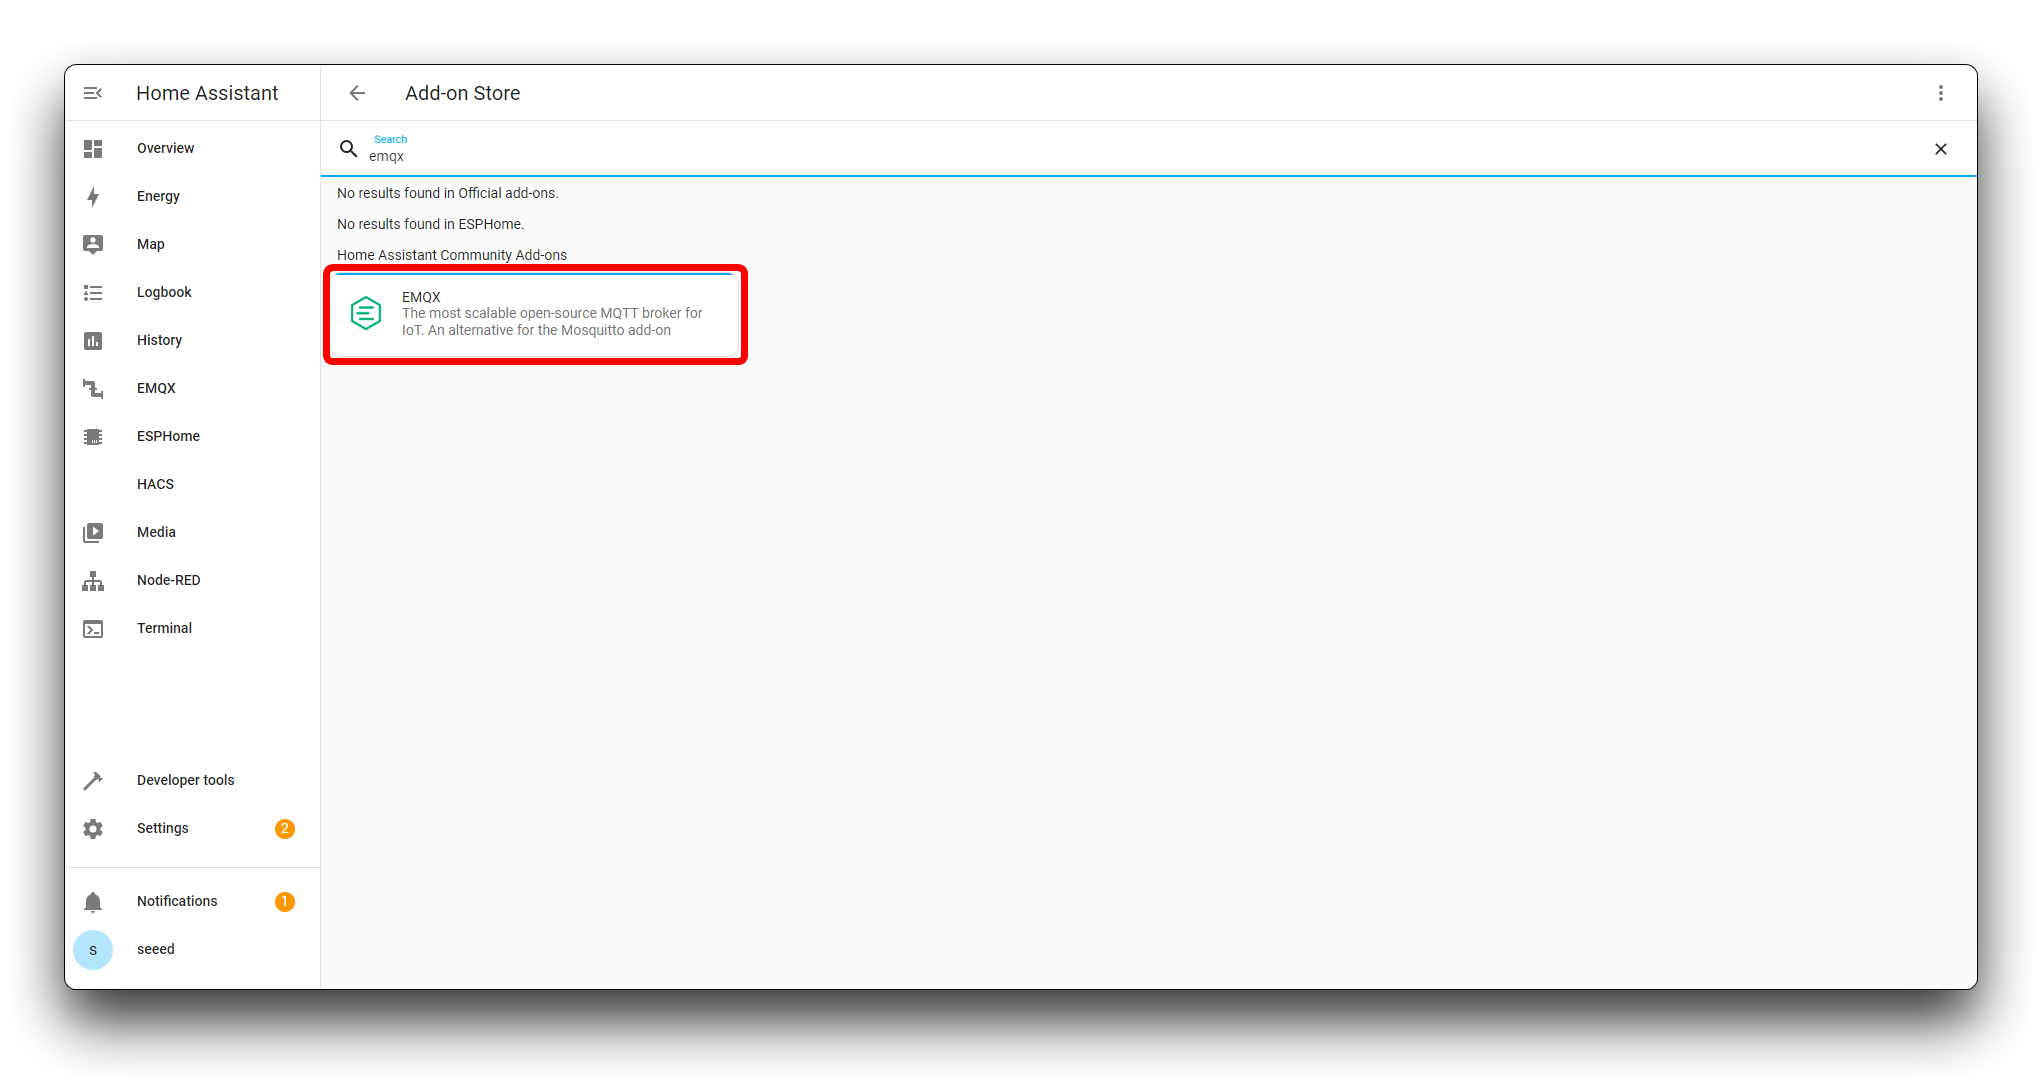
Once you’ve located EMQX, click on it to view the details. On the add-on’s page, you’ll see an overview, documentation, and configuration options. To install the add-on, click the Install button.
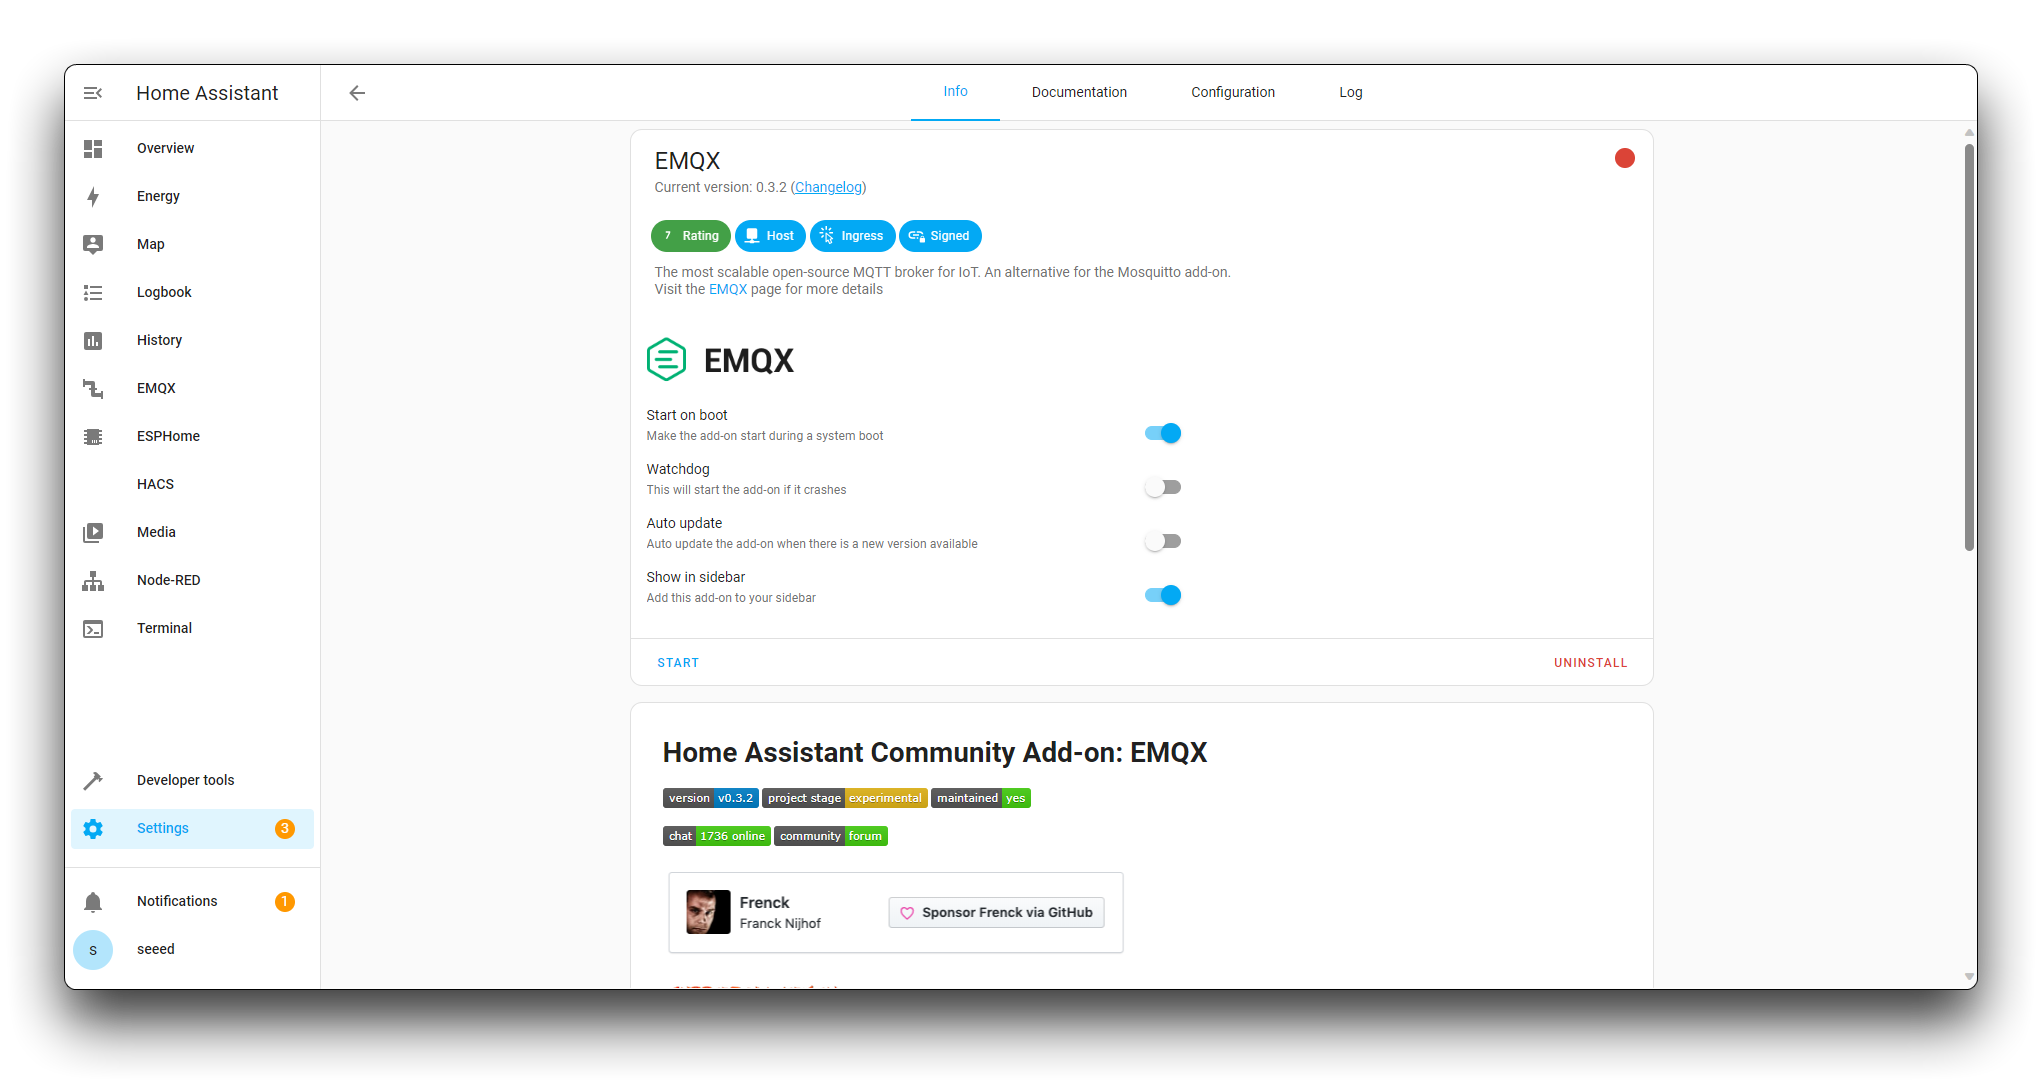
Once the EMQX Add-on is installed, turn on the Start on boot, Watchdog and Show in sidebar toggles. Click Start to start EMQX.
In the EMQX Dashboard login page, enter the default username and password.
- Default username: admin
- Default password: public
Click on the “Login” button to access the EMQX Dashboard.
In the EMQX Dashboard, navigate to the Authentication section from the left sidebar menu. Click on the Databases tab.
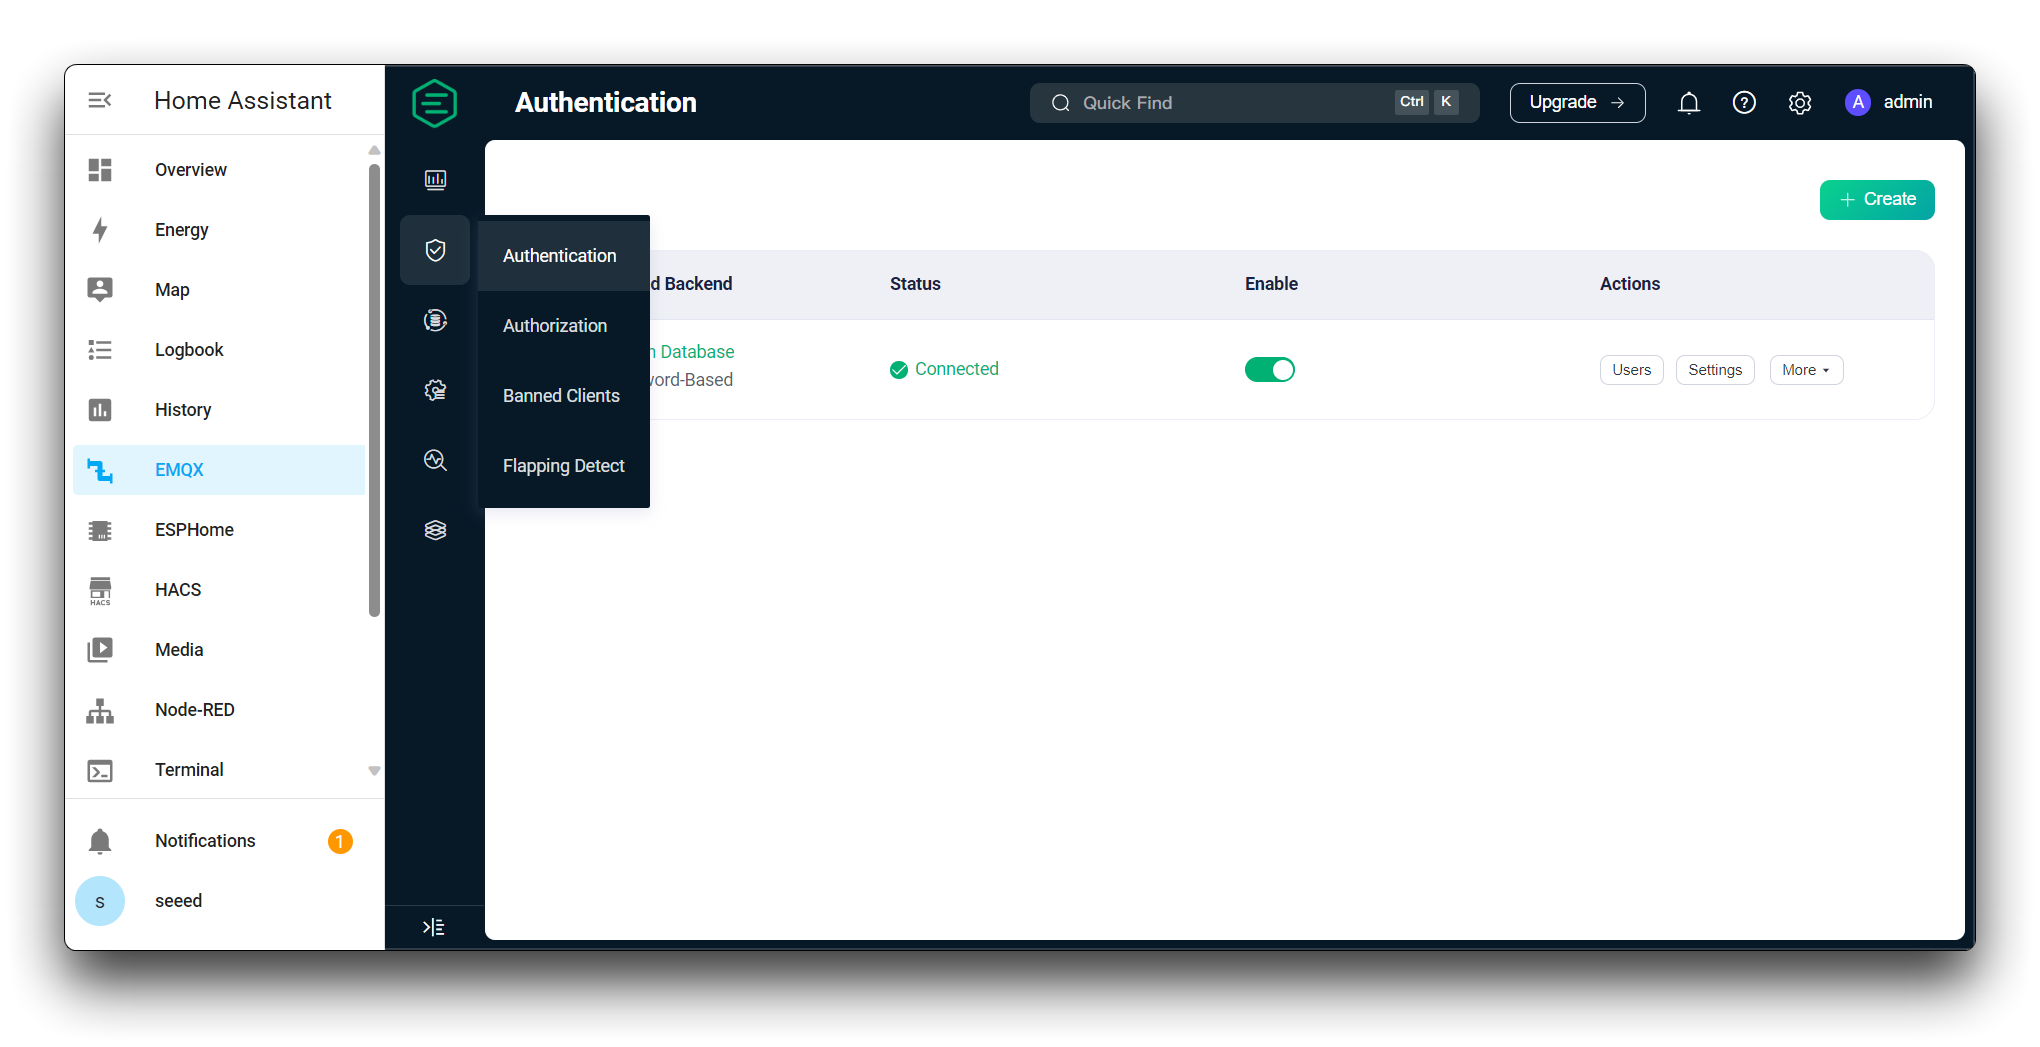
Click on the Create button. In the Mechanism dropdown, select Password-Based, In the Backend dropdown, select Built-in Database. Click on the “Create” button to create the Built-in Database.
After creating the Built-in Database, click on the Users tab in the “Authentication” section. Click on the “Add User” button.
- In the “Username” field, enter “seeed”.
- In the “Password” field, enter “seeed”.
Go back to the “Databases” tab in the “Authentication” section. Locate the previously created database in the list of databases.
Click on the toggle switch next to the database to enable it. The database status should change to “Enabled”.
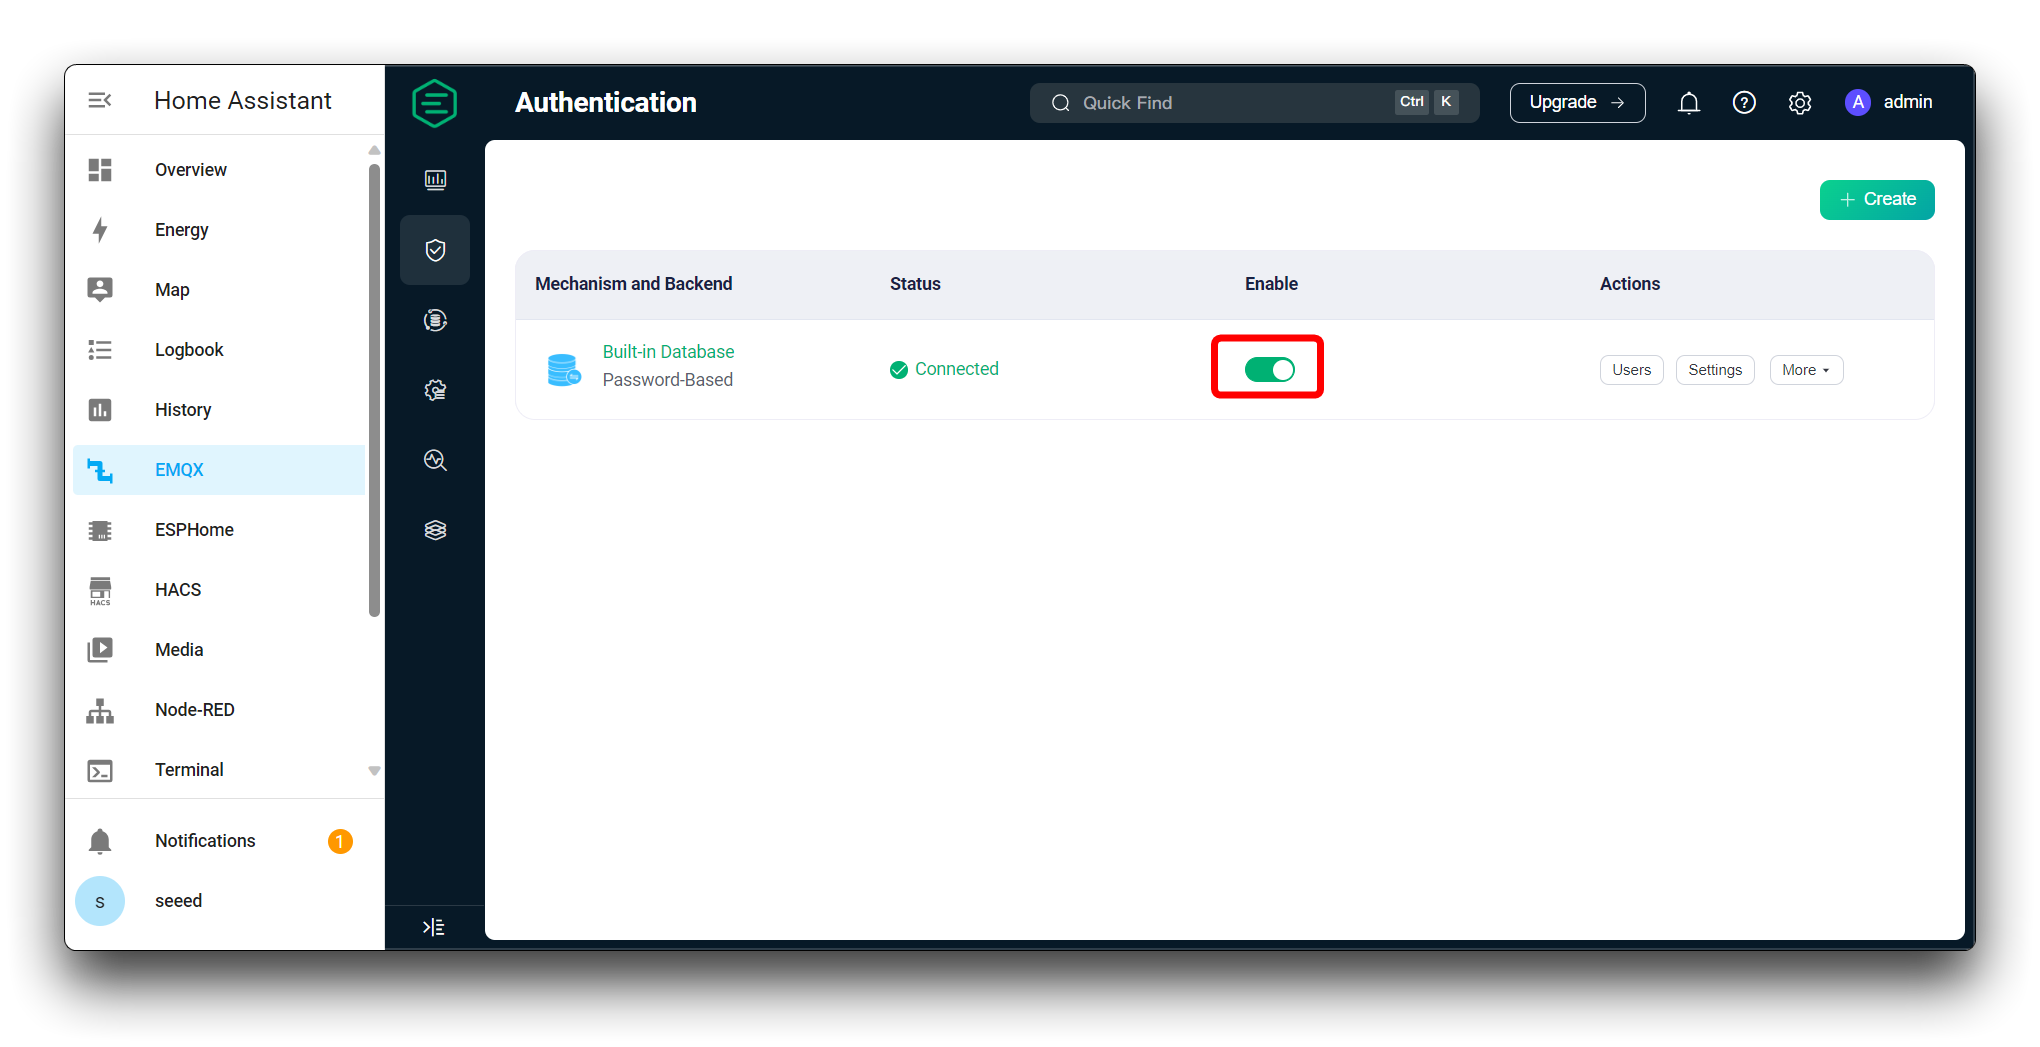
Integrate Grove Vision AI V2 into Home Assistant
Section titled “Integrate Grove Vision AI V2 into Home Assistant”Step 10. Configuring the network for Grove Vision AI V2 & XIAO
Section titled “Step 10. Configuring the network for Grove Vision AI V2 & XIAO”Connect the Grove Vision AI V2 to your computer and open the Grove Vision AI V2 configuration page.

After clicking on the top left corner to connect to Grove Vision AI V2, please turn on the MQTT button and enter the following information that you need to fill in the page.
- SSID & Password: The device needs to be on the same LAN as the host where the Home Asistant is installed. So please configure the network under the same LAN. XIAO only supports 2.4G WiFi, 5G network is not available.
- Encryption: Select AUTO.
- Host: IP address of the host where Home Assistant is installed.
- Port:
1883. - clientId: For the device identification number, please prefix it with
grove_vision_ai_v2_followed by the custom ID number. - username: The name of the EMQX database you just create.
- password: The password of the EMQX database you just create.
Then click the Apply button below. After saving, it does not mean that Grove Vision AI is connected to the network, please go back to Process in the left menu bar and check if the IP address of the device has appeared and if the status of the MQTT connection is correct.

Step 11. Integration into Home Assistant
Section titled “Step 11. Integration into Home Assistant”By this point, normally, you can already search for Grove Vision AI V2 inside Settings->Devices & services in Home Assistant.
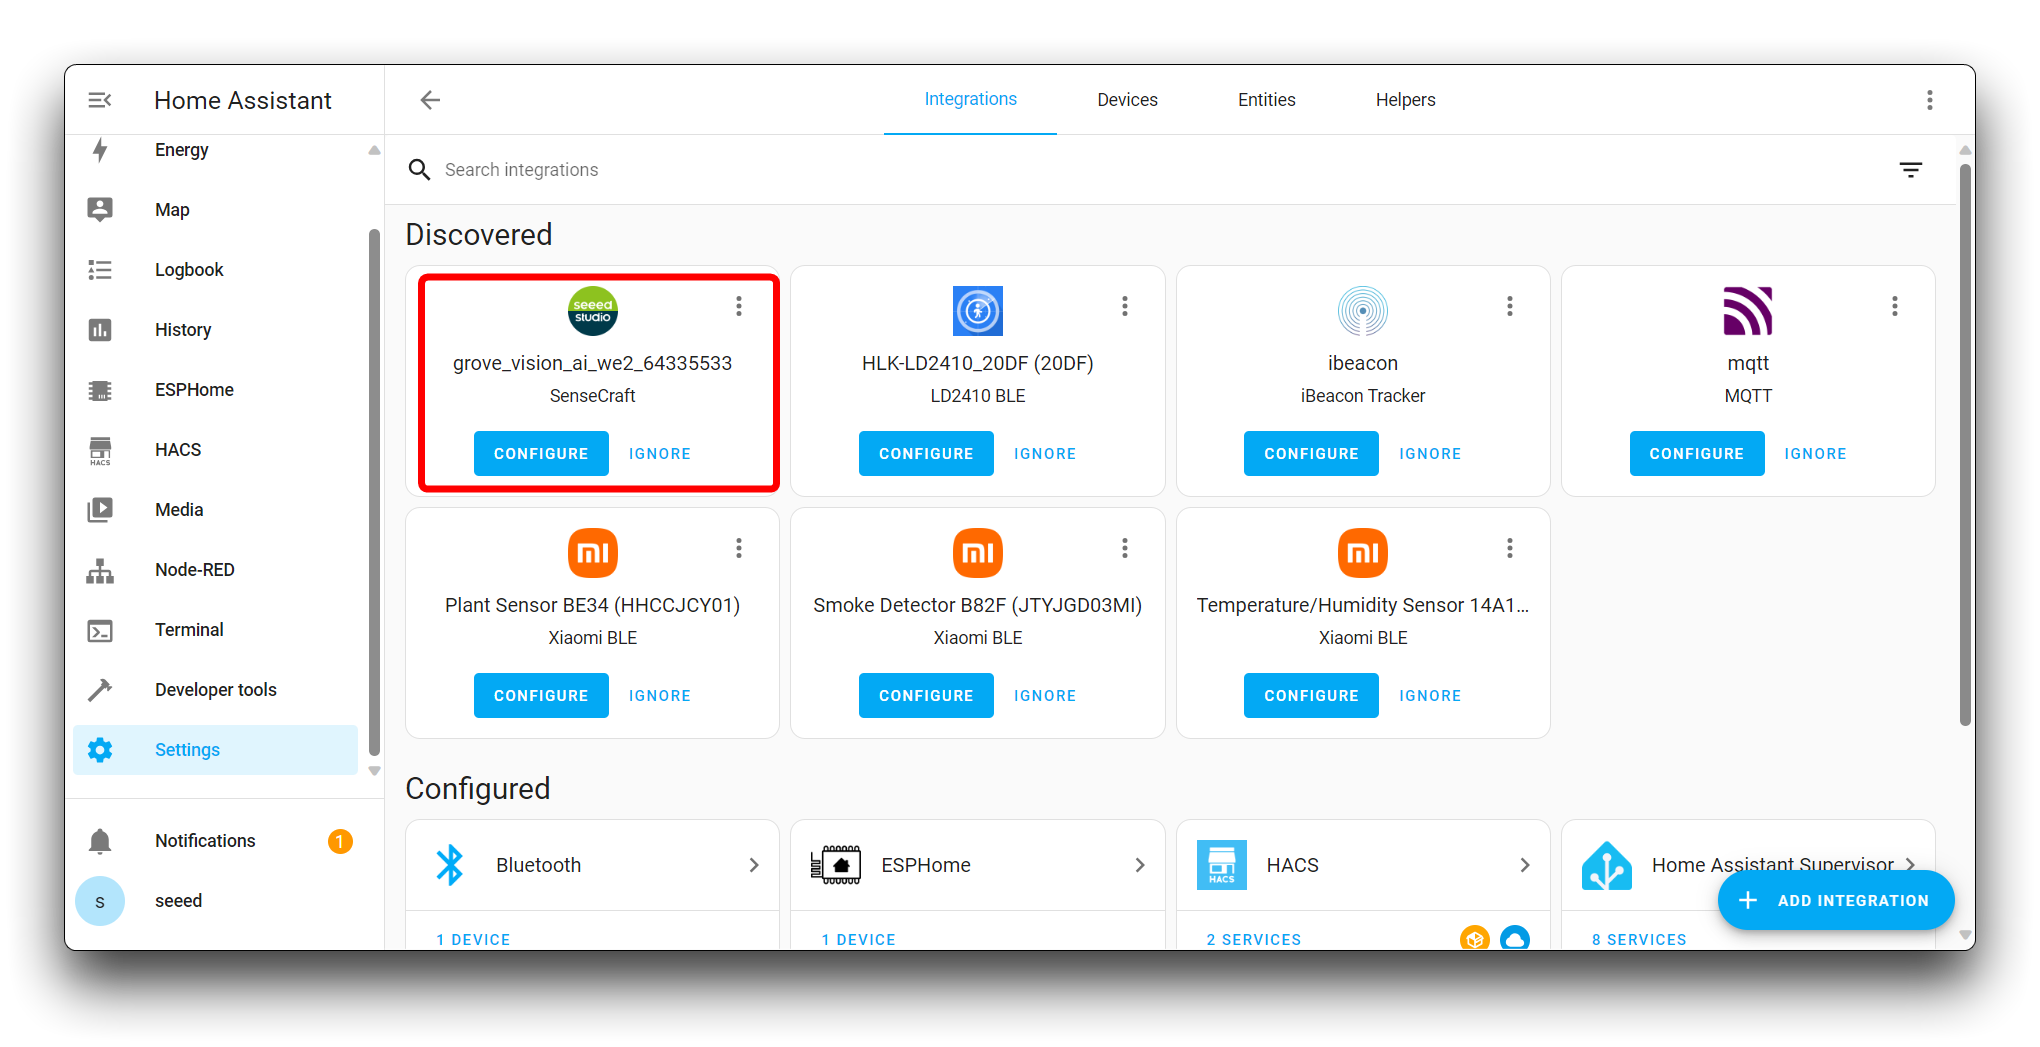
Please click the Configure button to set the relevant information, and you have finished adding the device.
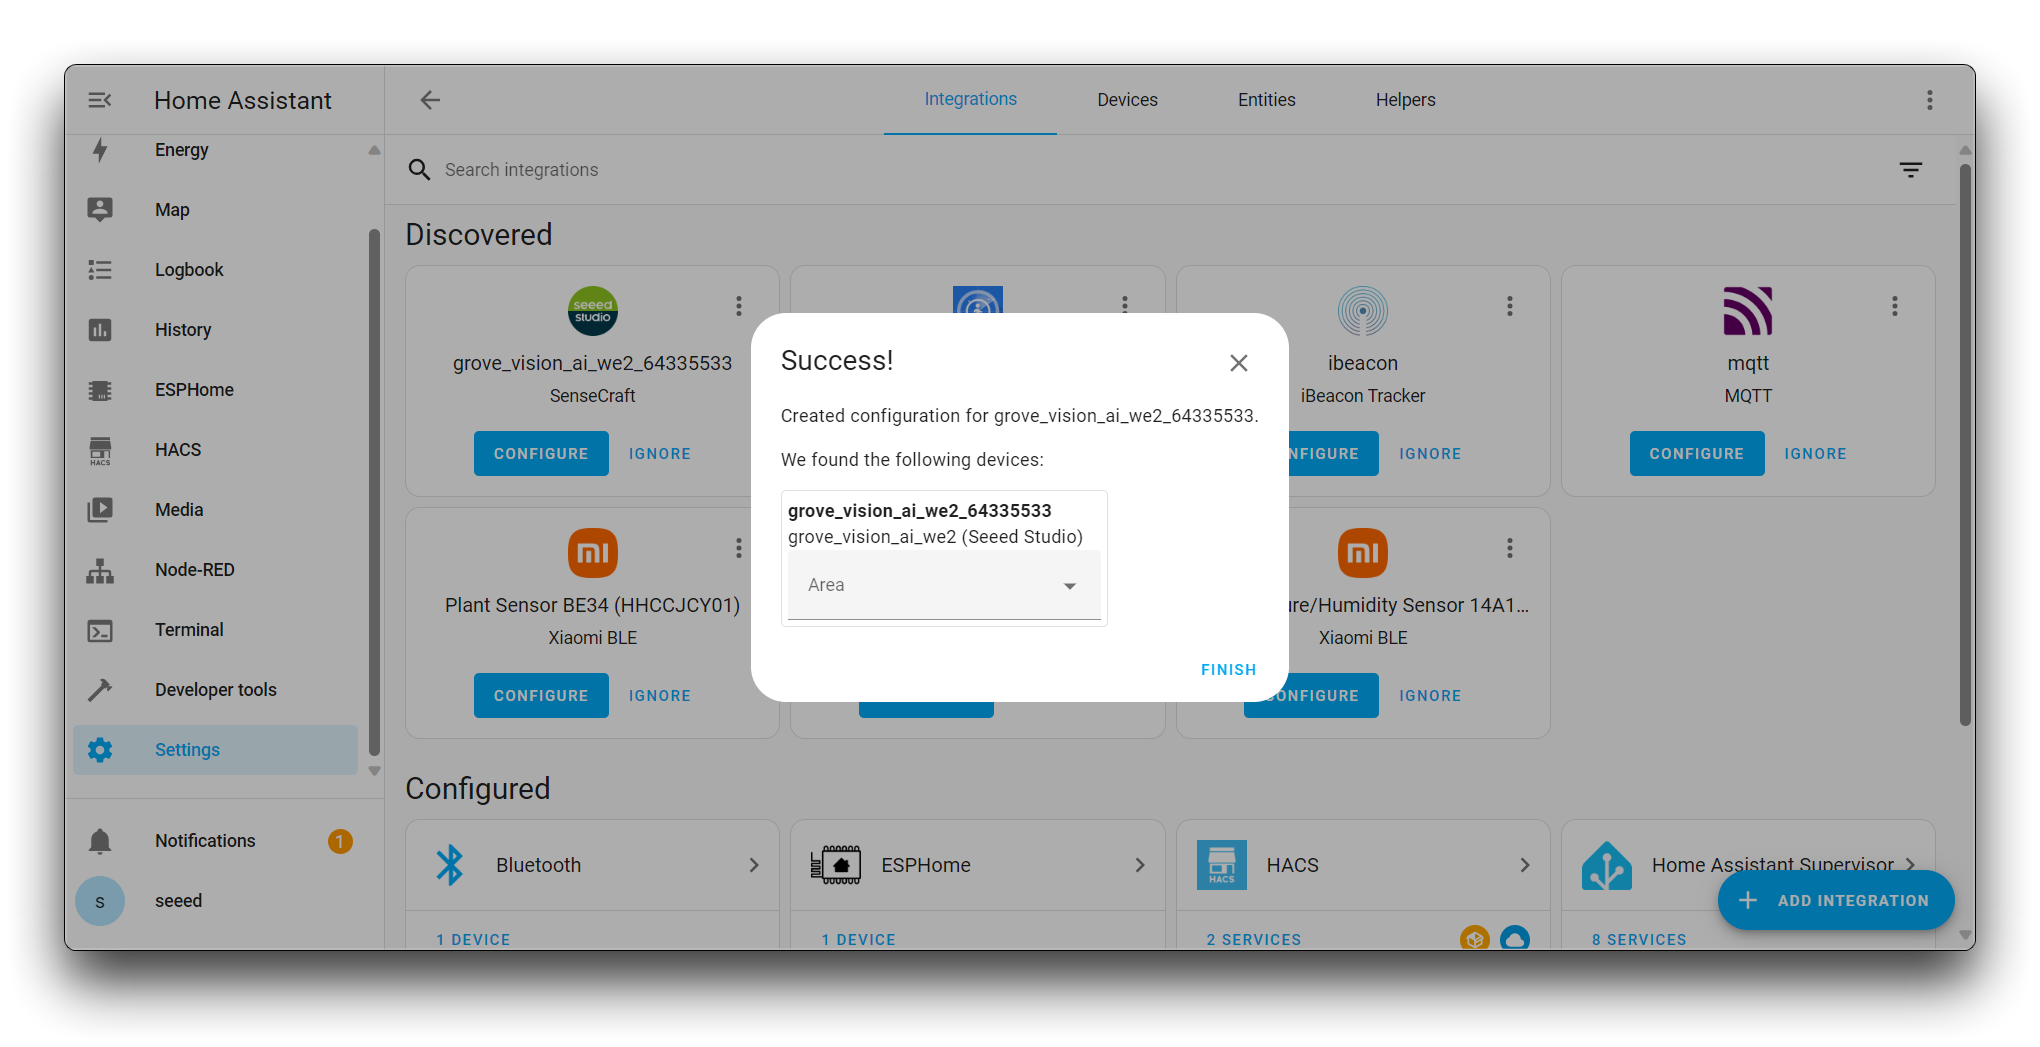
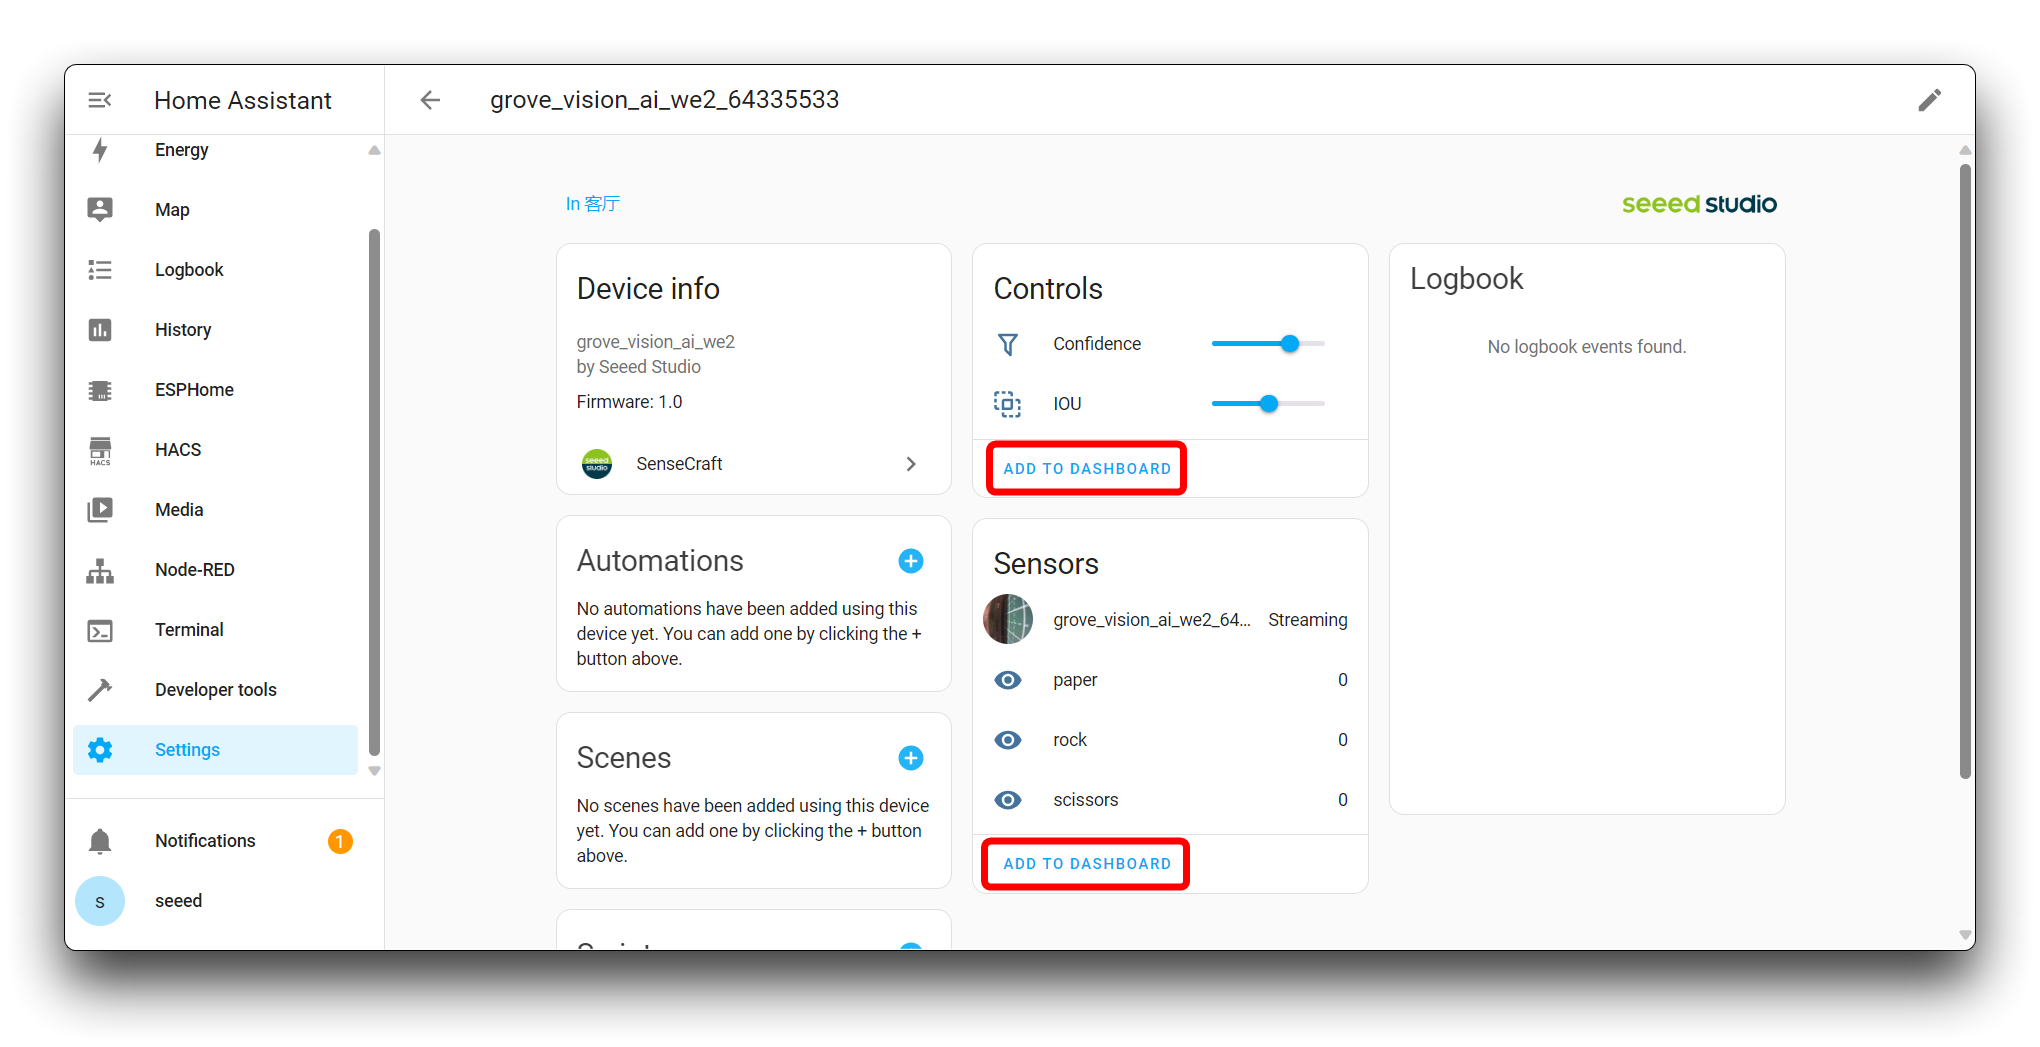
In Settings->Devices & services, you will be able to see the details of the device and show the supported tabs, you can add as many tabs as you want to show in the overview.
If there are too many devices in your home, they may not be directly searchable by Home Assistant sometimes. Then at this time you may need to add devices manually.
In the Settings page, choose Devices & Services.
Then click the ADD INTEGRATION button in the bottom right corner and search for SenseCraft.
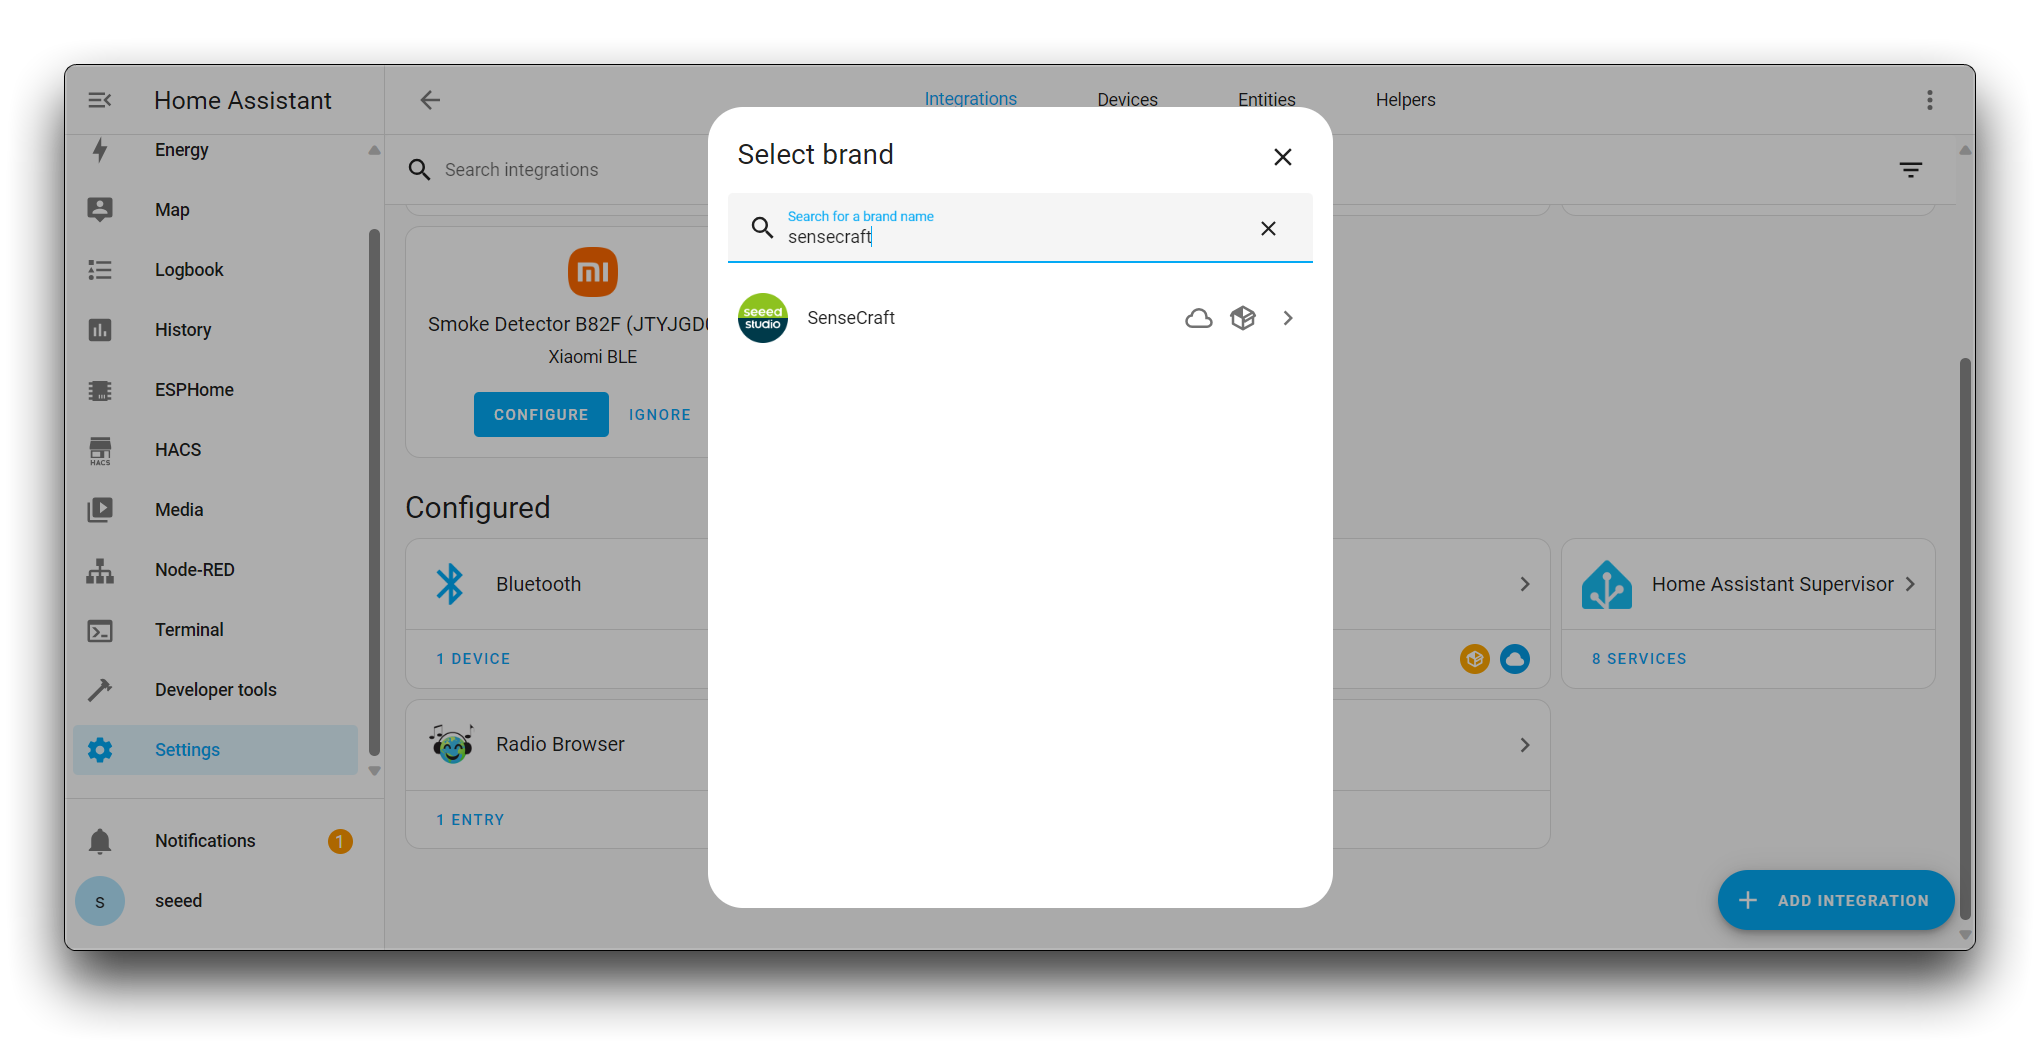
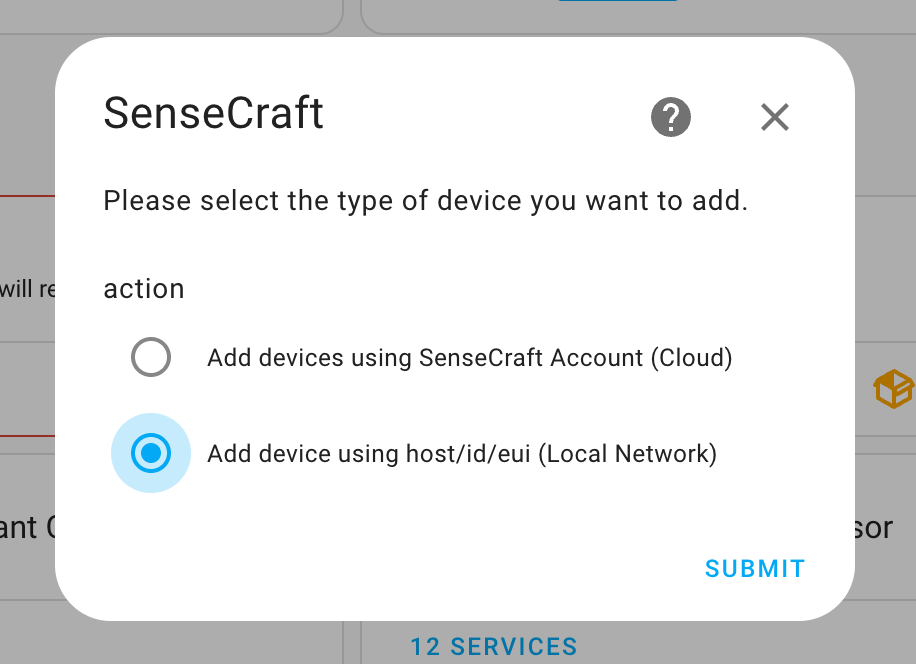
Click on SenseCraft and select Action as Add device using host/id.
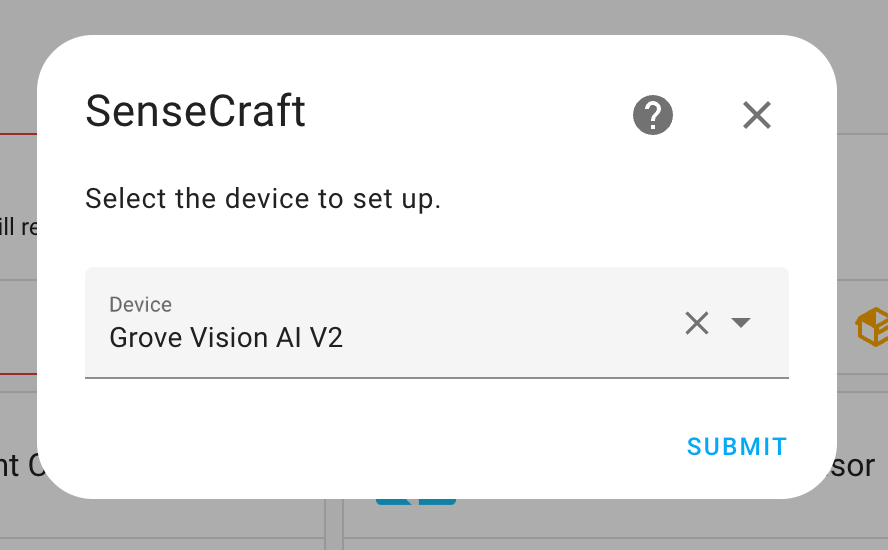
Click SUBMIT, then select your device type from the dropdown menu, such as Grove Vision AI V2, and click SUBMIT again.
In the following input field, enter the exact ID of your device. This ID is usually found on the device itself or on the SenseCraft AI website.


The next step is to configure the MQTT service. Enter the information that matches the MQTT service details you have set up on the website. If you haven’t set up a username and password previously, you don’t need to fill them in here. Then click SUBMIT.

- Broker: Home Assistant’s IP address.
- Port:
1883. - clientId: For the device identification number, please prefix it with
grove_vision_ai_v2_followed by the custom ID number. - username: The name of the EMQX database you just create.
- password: The password of the EMQX database you just create.
If the setup is successful, the system will usually prompt you to select a location for your device. Choose the appropriate room or area based on your actual situation and click Finish.
Once the configuration is complete, you can view your device and its status on the “Overview” page of Home Assistant.
Following these steps should allow you to successfully add the “SenseCraft” device to your Home Assistant instance and configure it to use the MQTT service.
Troubleshooting
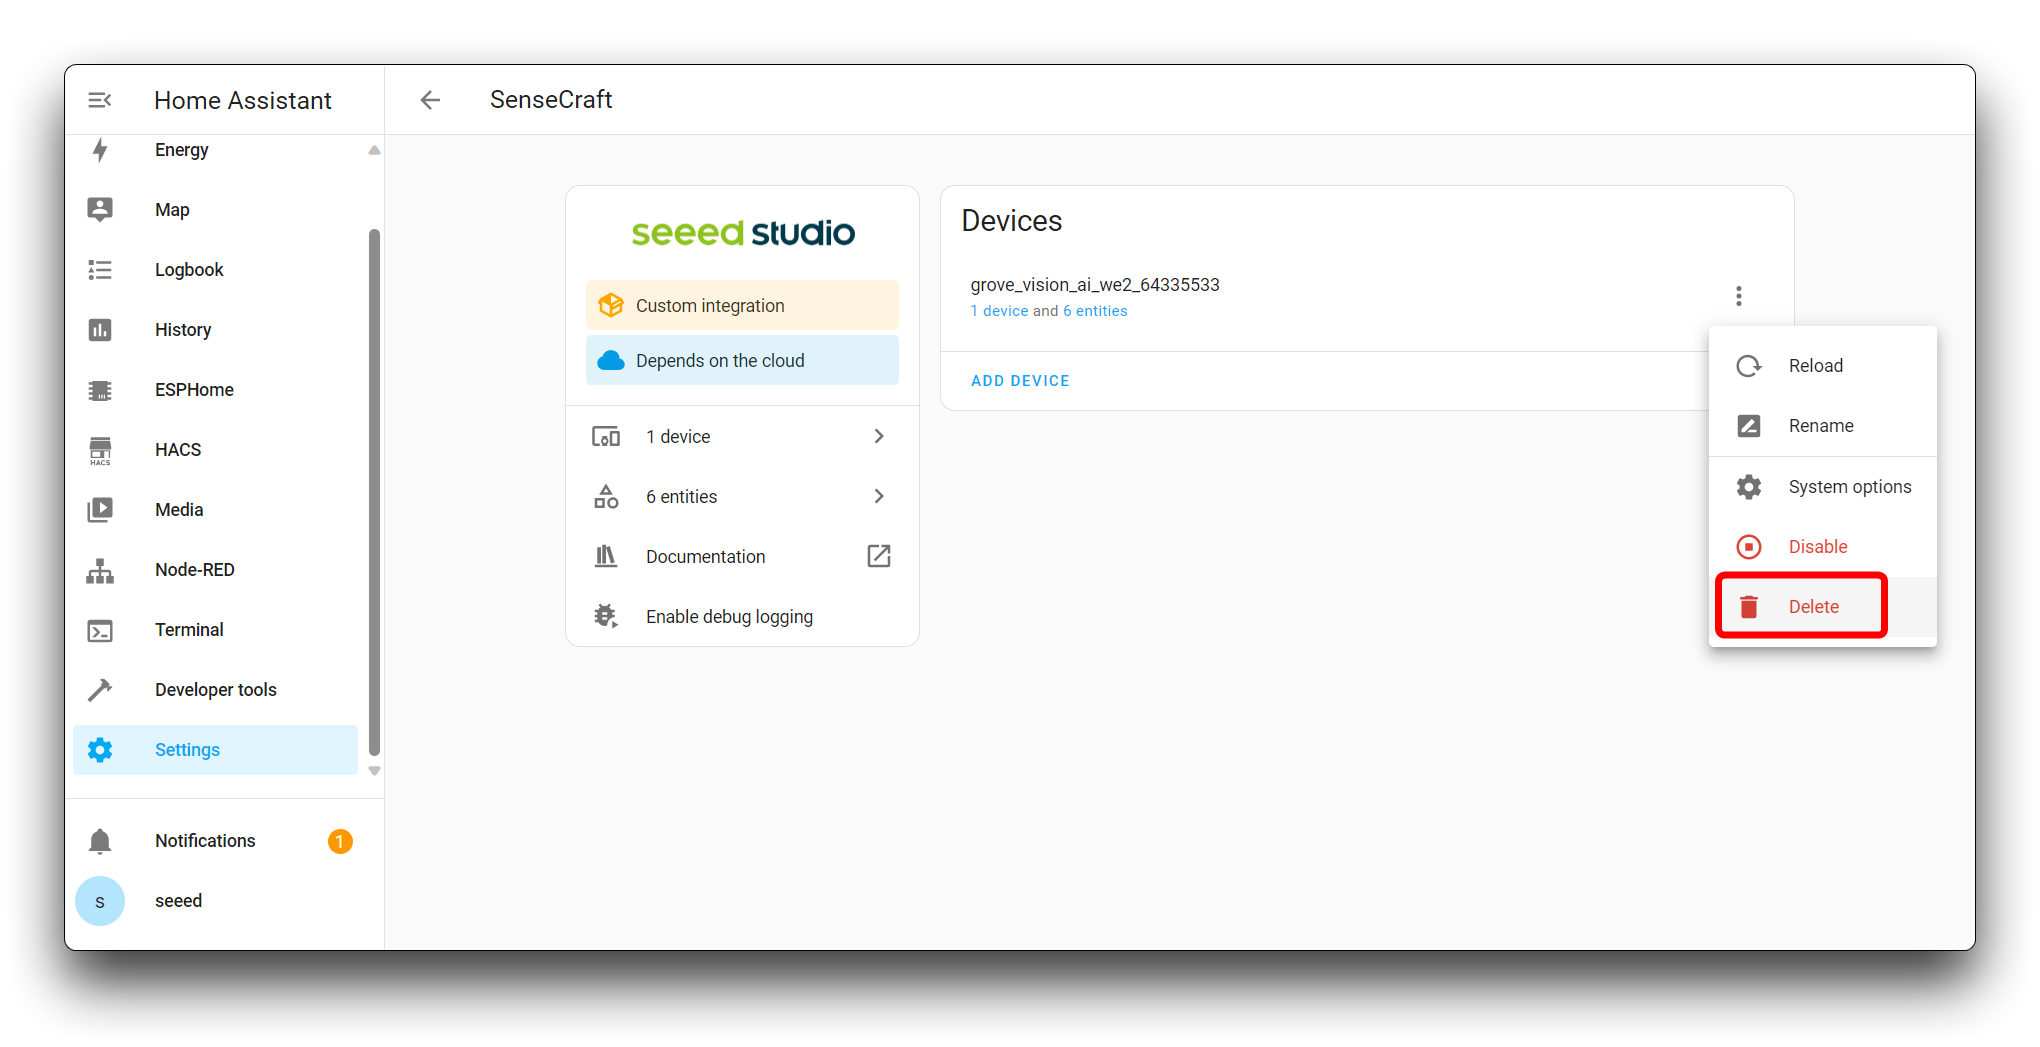
Section titled “Troubleshooting”Q1: What should I do if I never see the data messages in HA again after the Grove Vision AI V2 drops?
Section titled “Q1: What should I do if I never see the data messages in HA again after the Grove Vision AI V2 drops?”You may need to delete the device and re-add it in SenseCraft. After deleting it may not be able to be automatically searched again and you will need to manually add the device. Please refer to the steps here to re-add the device.
Tech Support & Product Discussion
Section titled “Tech Support & Product Discussion”Thank you for choosing our products! We are here to provide you with different support to ensure that your experience with our products is as smooth as possible. We offer several communication channels to cater to different preferences and needs.