Project Result
This project brings Flipper One's FlipCTL interface and the official Hello World app to Seeed Studio reComputer RK3576 running Armbian Linux. Build the application-enabled runtime once, connect from a PC browser, then verify device information and interactive app controls.
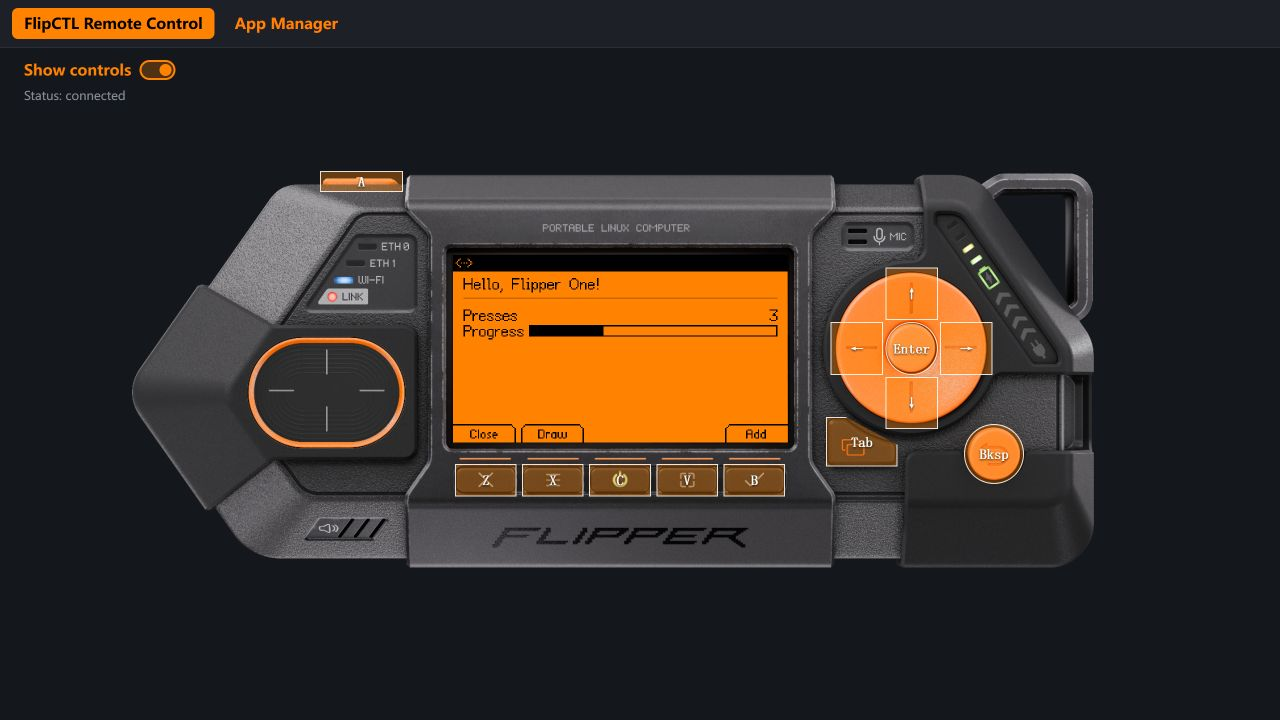
The result below shows a working remote connection, Presses = 3, and Progress = 30% after three Enter presses.
Requirements
| Item | Requirement |
|---|---|
| Device | reComputer RK3576 / RK3576 DevKit |
| Operating system | ARM64 Armbian; the verified setup uses Debian Bookworm with glibc 2.36 |
| Source and build tools | Rust 1.92 or newer for Slint 1.17; install the native build tools in Step 1 |
| Network | SSH access from the PC, plus access to Rust crates and GitHub release downloads |
| PC | An SSH client and a web browser |
Commands use seeed as the example Linux username and ~/flipper-test/flipctl-slint as the source directory. Adjust them for your installation. Replace <BOARD_IP> with the board's actual IP address, without the angle brackets.
Where to run commands: SSH connection and tunnel commands run on your PC. Package installation, compilation, packaging, and FlipCTL startup run in the board's SSH terminal as your regular Linux user.
Step 1: Prepare the Board and Rust Toolchain
On your PC, connect to the board:
ssh seeed@<BOARD_IP>In the board's SSH terminal, install Sway for headless Wayland application hosting, FUSE support, and the packaging tools:
sudo apt update
sudo apt install -y \
  git curl ca-certificates file build-essential pkg-config \
  sway fuse3 desktop-file-utils python3 binutils
Check the compositor, architecture, and system C library:
sway --version
uname -m
getconf GNU_LIBC_VERSION
The architecture should be aarch64. On the verified Bookworm system, getconf reports glibc 2.36.
FlipCTL starts its own headless Sway session for applications. Keep the board's existing desktop environment; there is no need to log into a Sway desktop.
Check the Rust toolchain:
rustc --version
cargo --version
Slint 1.17 requires Rust 1.92 or newer. If Rust is already installed and compatible, continue to Step 2; the rustup installation and environment-loading commands below are not needed. If Rust is missing or too old, install a current version through rustup:
curl --proto '=https' --tlsv1.2 -sSf \
  https://sh.rustup.rs -o /tmp/rustup-init.sh
sh /tmp/rustup-init.sh
Follow the installer prompts, then reload the shell environment and confirm:
source "$HOME/.cargo/env"
rustc --version
cargo --version
Step 2: Get the Source and Build FlipCTL
Stop an existing FlipCTL instance before rebuilding. If it is running in a terminal, press Ctrl+C there. If it was started in the background, identify and stop that FlipCTL process first.
For a fresh setup, run the clone commands below. If ~/flipper-test/flipctl-slint already exists, reuse it and check git rev-parse HEAD instead of cloning again. Continue only with revision 8aeb387dc4d13fcef9056267b2a3dd7409099834.
Create a dedicated working directory:
mkdir -p ~/flipper-test
cd ~/flipper-test
Clone the official FlipCTL Slint implementation:
git clone --recurse-submodules --branch dev \
  https://github.com/flipperdevices/flipctl-slint.git

cd flipctl-slint
git checkout --detach 8aeb387dc4d13fcef9056267b2a3dd7409099834
git submodule update --init --recursive
The checkout pins the source to the revision used for this project's board verification, so later updates to dev do not change the build. Git's detached HEAD message is expected here.
The repository contains the Cargo.toml workspace, a FlipCTL executable in bin/flipctl, and browser resources under crates/flipper-ui/assets/remote.
Do not run
build_deploy.shorrun_me.shon reComputer RK3576. These scripts are intended for Flipper One hardware and install or restart system services. This project compiles and launches the executable directly, without modifying the Armbian bootloader or existing services.
Build FlipCTL with wayland added to the features:
cd ~/flipper-test/flipctl-slint

export CARGO_PROFILE_RELEASE_LTO=false
export CARGO_PROFILE_RELEASE_CODEGEN_UNITS=16

cargo build --locked --release -p flipctl \
--features device,slint,remote,wayland| Feature | Purpose |
|---|---|
device | Enables device-related runtime functions |
slint | Enables the graphical interface |
remote | Enables browser viewing and control |
wayland | Enables hosted graphical applications and AppImage discovery |
Wait for Cargo to finish successfully before continuing.
Optional: Render a Test Image
Before launching the web interface, you can test the UI renderer:
./target/release/flipctl \
  --png /tmp/flipctl-test.png \
  --screen main

file /tmp/flipctl-test.png
If successful, a PNG file is created at /tmp/flipctl-test.png.
Step 3: Build and Install Hello World
Build Hello World from the same source checkout. A prebuilt AppImage can require a newer glibc than the board provides: a package requiring GLIBC_2.39 exits immediately on the tested Bookworm system with glibc 2.36. Building on the board avoids that mismatch for this application.
Compile the Application
Keep using the board's SSH terminal and the build settings from Step 2:
cd ~/flipper-test/flipctl-slint
export CARGO_TARGET_DIR="$PWD/target"

cargo build --locked --release --manifest-path apps/hello/Cargo.toml
Check the highest glibc symbol version required by the binary:
readelf --version-info target/release/hello-app \
  | grep -oE 'GLIBC_[0-9.]+' | sort -Vu | tail -n 1
The verified native build requires up to GLIBC_2.35, which runs on the board's glibc 2.36. If your output requires a newer version than the board provides, resolve the toolchain or build-environment mismatch before packaging.
Prepare the AppImage Tools
Download only the ARM64 packer and runtime specified in the source's tools.lock. The following block checks their SHA256 values and reuses matching cached copies:
(
  set -eu
  cd ~/flipper-test/flipctl-slint
  mkdir -p target/appimage/tools

  while read -r name url checksum; do
    case "$name" in
      appimagetool-aarch64|runtime-aarch64)
        tool="target/appimage/tools/$name"
        if [ ! -f "$tool" ] || ! printf '%s  %s\n' "$checksum" "$tool" | sha256sum -c --status; then
          curl -fL --retry 3 --connect-timeout 20 --max-time 180 \
            -o "$tool" "$url"
        fi
        printf '%s  %s\n' "$checksum" "$tool" | sha256sum -c -
        chmod +x "$tool"
        ;;
    esac
  done < tools/appimage/tools.lock
)
Continue only after both tools pass the checksum checks. If downloads fail, restore access to the release files and rerun this block.
Package and Install the AppImage
Use the official staging script and the checked tools to produce the AppImage:
(
  set -eu
  cd ~/flipper-test/flipctl-slint

  python3 tools/appimage/bundle.py stage \
    apps/hello target/appimage/hello-bookworm/AppDir \
    --binary "$PWD/target/release/hello-app" \
    --version "$(git rev-parse --short HEAD)-bookworm" \
    --repo "$PWD"

  rm -f -- target/appimage/hello-bookworm-aarch64.fap.AppImage

  SOURCE_DATE_EPOCH="$(git log -1 --format=%ct)" ARCH=aarch64 \
    target/appimage/tools/appimagetool-aarch64 --appimage-extract-and-run \
    -n --comp zstd \
    --mksquashfs-opt -Xcompression-level --mksquashfs-opt 19 \
    --runtime-file "$PWD/target/appimage/tools/runtime-aarch64" \
    "$PWD/target/appimage/hello-bookworm/AppDir" \
    "$PWD/target/appimage/hello-bookworm-aarch64.fap.AppImage"

  sha256sum target/appimage/hello-bookworm-aarch64.fap.AppImage
)
Wait for packaging to report Success and print the output file's SHA256. Then install it into ~/Apps. If a Hello World package already exists, this block backs it up outside ~/Apps before replacing it:
(
  set -eu
  cd ~/flipper-test/flipctl-slint
  mkdir -p "$HOME/Apps" "$HOME/.local/share/flipctl-app-backups"

  if [ -f "$HOME/Apps/hello-aarch64.fap.AppImage" ]; then
    backup_dir="$(mktemp -d "$HOME/.local/share/flipctl-app-backups/hello-XXXXXXXX")"
    cp -p "$HOME/Apps/hello-aarch64.fap.AppImage" "$backup_dir/"
  fi

  install -m 755 target/appimage/hello-bookworm-aarch64.fap.AppImage \
    "$HOME/Apps/.hello-installing"
  mv -- "$HOME/Apps/.hello-installing" "$HOME/Apps/hello-aarch64.fap.AppImage"
  ls -lh "$HOME/Apps/hello-aarch64.fap.AppImage"
)
The backup is stored under ~/.local/share/flipctl-app-backups/. Keep only the intended installed copy in ~/Apps so the launcher does not show duplicate entries.
Step 4: Start FlipCTL with Pixman Rendering
First check port 8899 on the board:
ss -ltnp 'sport = :8899'If a process is already listening, resolve that conflict first. Stop an older FlipCTL instance before starting another. If the listener is ssh, check whether a forwarding command was mistakenly run on the board and exit that incorrect tunnel.
Start FlipCTL with Pixman software rendering for its application compositor:
cd ~/flipper-test/flipctl-slint

WLR_RENDERER=pixman ./target/release/flipctl \
  --headless \
  --remote 127.0.0.1:8899 \
  --assets "$PWD/crates/flipper-ui/assets/remote"
WLR_RENDERER=pixman applies to this process and its child compositor. It avoids the GPU allocator failure encountered on the tested RK3576 setup, without changing the system desktop configuration.
Confirm that the startup log contains:
remote view http://127.0.0.1:8899/If it instead says not serving ... Address already in use, the browser service has not started. An apps listing or first frame committed message alone does not confirm that the web service is available.
Keep this terminal open while using FlipCTL.
Step 5: Connect and Explore the Remote UI
If the PC's existing SSH tunnel is still running, reuse it. Otherwise, open a separate PC terminal—PowerShell on Windows—and run:
ssh -N -o ExitOnForwardFailure=yes -o ServerAliveInterval=30 -L 127.0.0.1:8899:127.0.0.1:8899 seeed@<BOARD_IP>Run this forwarding command on the PC, not inside an SSH session on the board. After authentication, no shell prompt appears because of -N; keep the window open. If the PC's port 8899 is already in use, check for an existing tunnel before starting another.
Open http://127.0.0.1:8899 in the PC browser. Wait for Status: connected, then enable Show controls.
Check Device Information
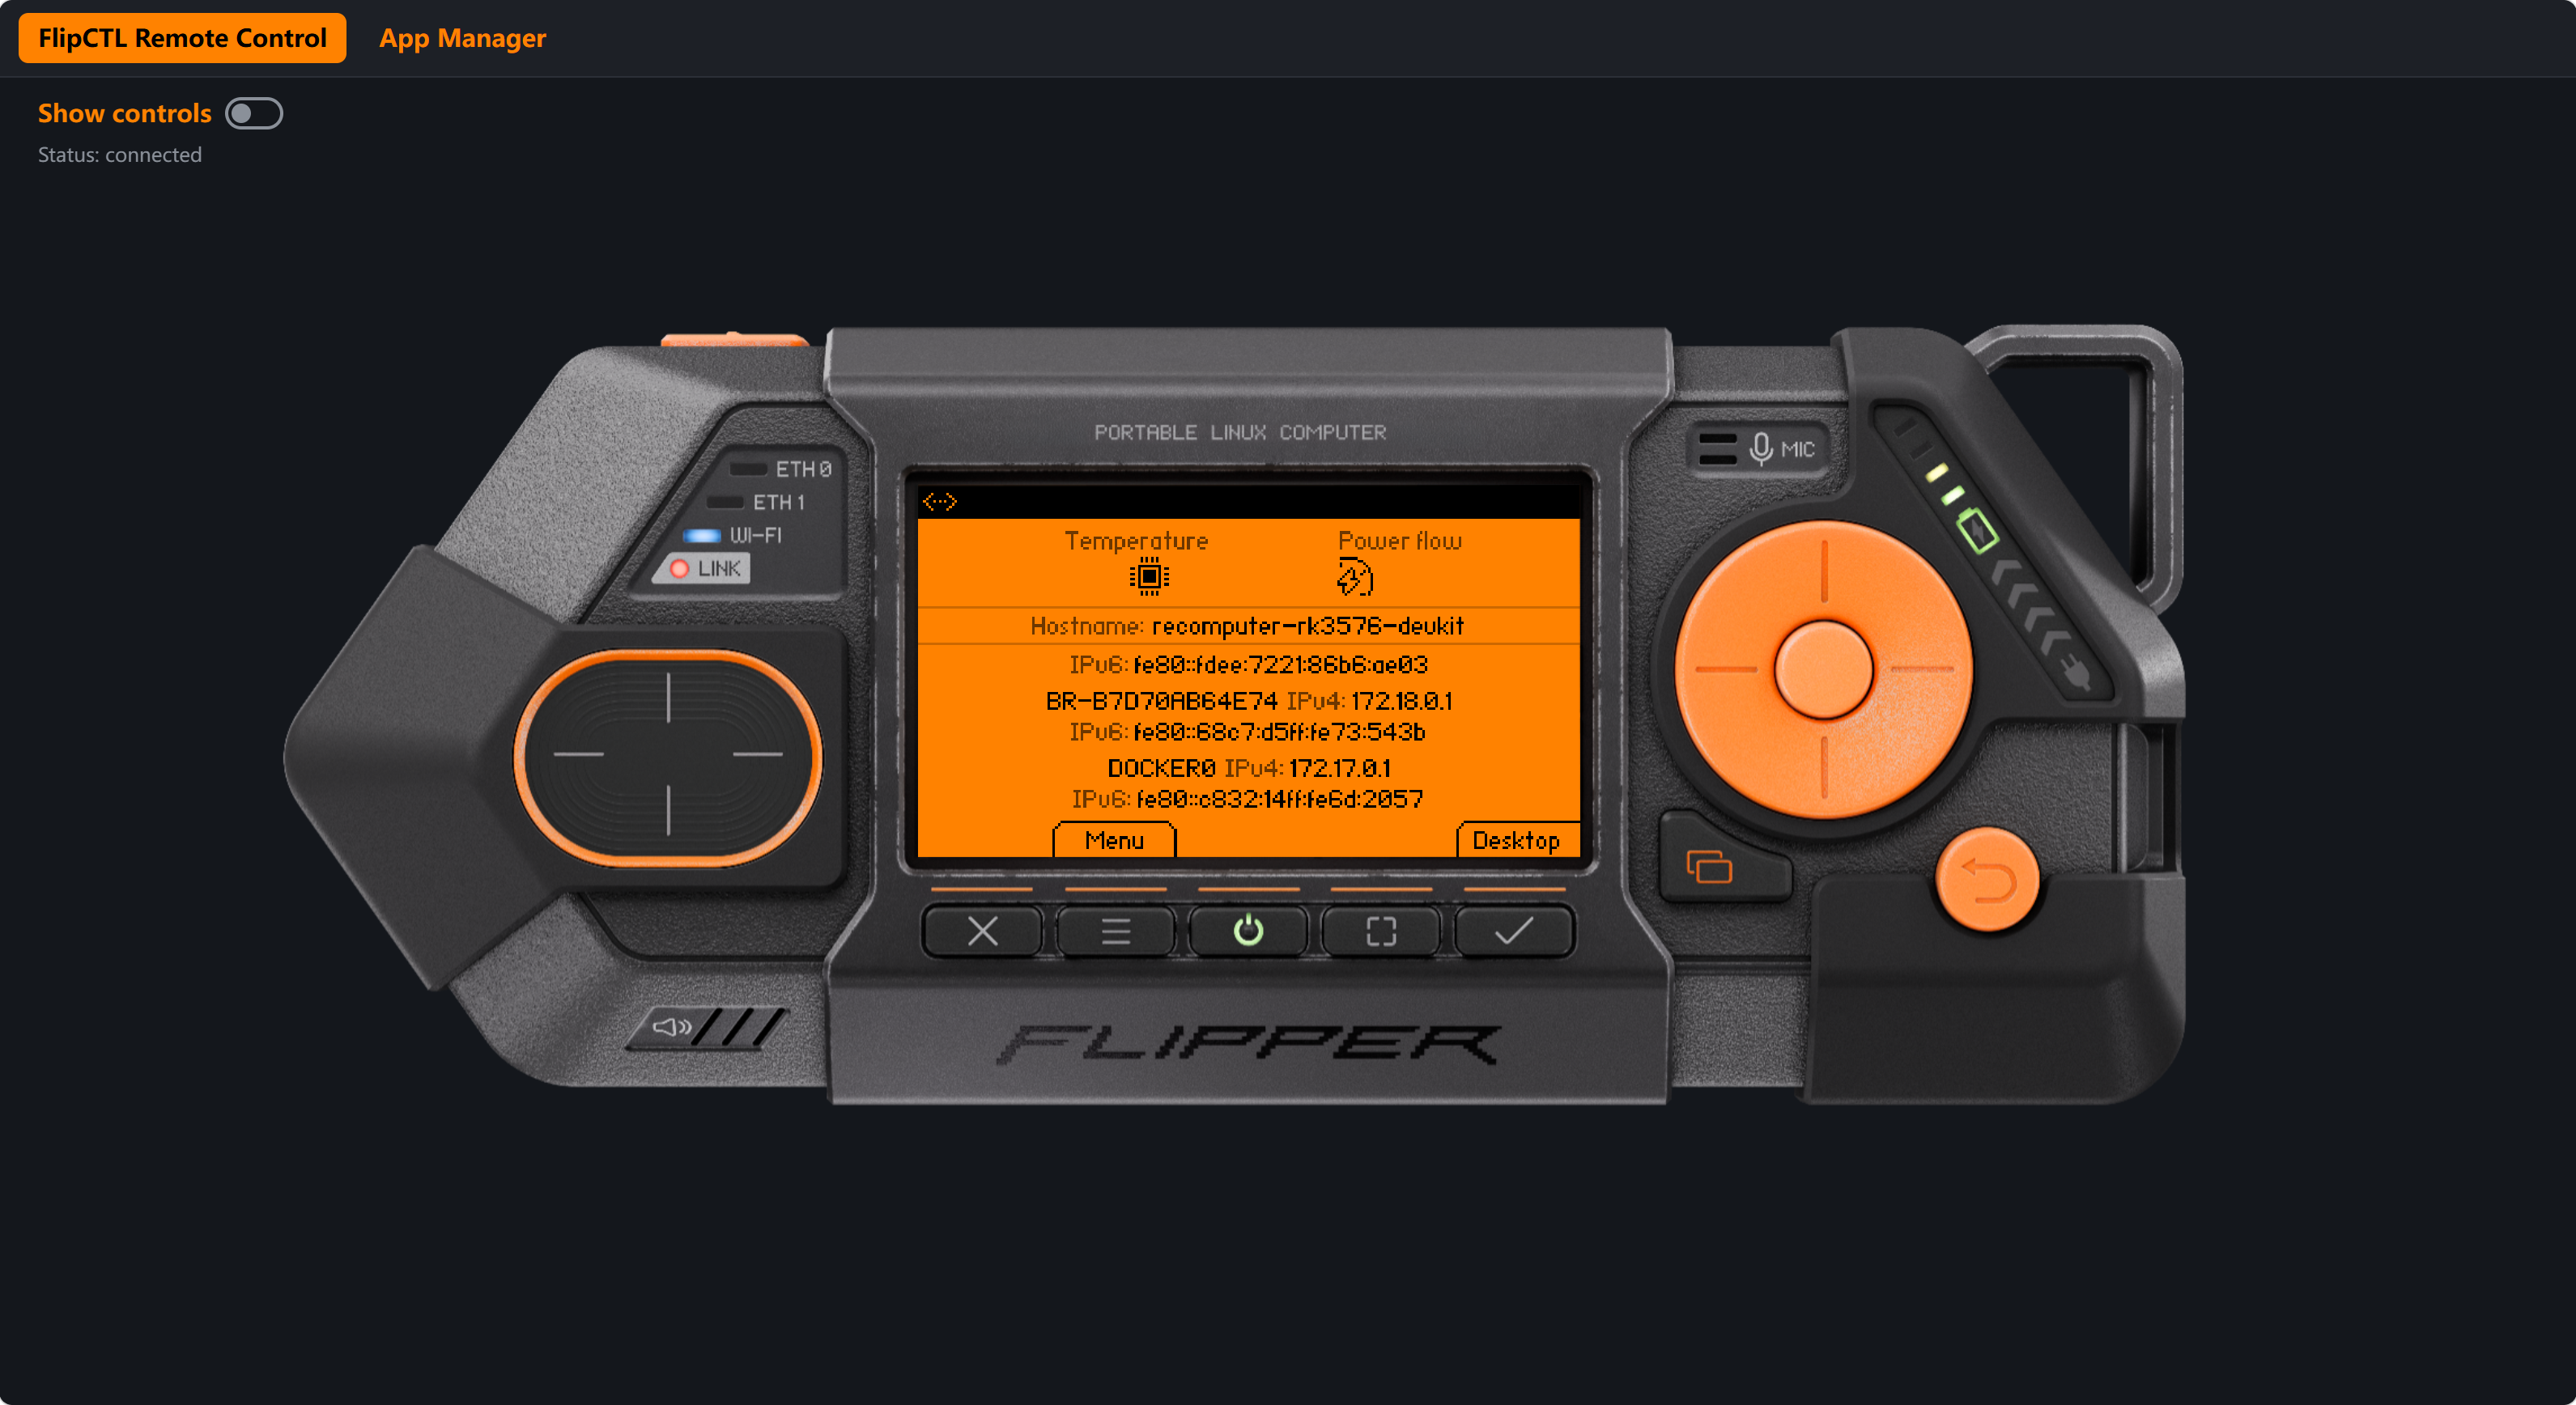
In the UI, check the hostname and network information. In a separate SSH terminal, compare those values with:
hostname
hostname -I
uname -r
df -h /
Confirm that the hostname and Ethernet address in the UI match the command output. For example, if the device hostname is recomputer-rk3576-devkit, the UI should display that same name.
You can also explore read-only menu entries such as:
- Settings → System info
- Settings → Disk info
- Network → Ethernet
Availability varies with the source version and the underlying Linux system.
Wait for the information to finish loading after opening a detail page. Values may briefly appear as - or 0 before the first update arrives.
Return to the FlipCTL home screen after checking device information, before starting the next step.
Step 6: Launch and Test Hello World
- On the FlipCTL home screen, click X, the soft key corresponding to Menu.
- Use ↑ / ↓ to select Apps, then press Enter.
- Select Hello World and press Enter again.
- Wait for the application to finish opening. You should see Hello, Flipper One!, Presses, and Progress.
Press Enter three times. Presses should increase from 0 to 3, and the progress bar should fill to 30%, matching the result at the beginning of this project.
| Control | Action |
|---|---|
| Enter or Add | Increases the counter by one and the progress bar by 10 percentage points, up to a full bar |
| Draw | Switches to the application's drawing page |
| Close | Exits the application |
| Back | Returns to the previous FlipCTL screen or backgrounds the application, depending on context |