Run CNN and Transformer Models on RK182x with RKNN3
Convert, cross-compile, deploy, and run RKNN3 models on an RK182x M.2 accelerator connected to an RK3588 host.
Run CNN and Transformer Models on an RK182x Accelerator
This guide uses an Ubuntu x86_64 PC to convert models and cross-compile applications. It then deploys the application over SSH/SCP to an RK3588 host running Debian, where an RK182x M.2 accelerator connected over PCIe performs inference. The components work together as follows:
Ubuntu PC: ONNX → RKNN3-Toolkit → .rknn + .weight
                                      │ SCP
                                      ▼
RK3588: C++ Demo ────────────────→ RKNN3 Runtime
        Python / Toolkit Lite ──→ RKNN3 Runtime
                                      │ Communication service + PCIe driver
                                      ▼
RK182x M.2 accelerator#1. Resolve a Missing RK182x Driver
#1.1 Identify the Problem Layer
Run on the RK3588 host:
uname -r
lspci -nnk
ls -l /dev/pcie-rkep-*
Before the driver was installed in this example, PCIe enumeration already produced the following result. However, the device had no Kernel driver in use entry and /dev/pcie-rkep-* did not exist:
0000:01:00.0 Processing accelerators [1200]:
Rockchip Electronics Co., Ltd Device [1d87:182a] (rev 01)
Running the proxy also produced:
List of ntb devices attached
No pcie-rkep devices found
This means that the host has enumerated the PCIe endpoint, but the pcie-rkep driver still needs to be installed and loaded.
rknn-smi: command not found means that the management utility is not installed or is not in PATH.
Note: If the PCIe endpoint itself is missing, first check power delivery, the M.2 connection, and the host PCIe configuration. The remaining installation steps assume that the endpoint has already been enumerated.
#1.2 Download and Install the M.2 Package
Download the following package from the official RK1820/RK1828 prebuilt software package:
rknn3-rk182x-m2_1.1.0_arm64.debSelect m2 and arm64. Do not substitute sodimm or sodimm-net, and do not flash the RK3588 EVB10 board image mentioned in the package documentation onto the reComputer.
Upload rknn3-rk182x-m2_1.1.0_arm64.deb to the device's Downloads directory.
Run on the RK3588 host:
sudo dpkg -i ~/Downloads/rknn3-rk182x-m2_1.1.0_arm64.debWhen the installer detects DKMS, it should display Engine: DKMS, build and install the driver for the running kernel, and configure the driver to load at boot.
This DEB package includes the PCIe driver source and DKMS configuration, M.2 firmware, Runtime shared libraries, rknn3_transfer_proxy, rknn-smi, and the RKNN3 startup service. You do not need to overwrite the system Runtime again in the next section.
#1.3 Verify the Driver and Reboot
Run on the RK3588 host:
sudo dkms status
sudo modinfo pcie-rkep
lspci -nnk -s 0000:01:00.0
ls -l /dev/pcie-rkep-*
Expected output:
pcie-rkep/3.3.1, 6.1.115-vendor-seeed-rk3588, aarch64: installed

filename: /lib/modules/6.1.115-vendor-seeed-rk3588/updates/dkms/pcie-rkep.ko
vermagic: 6.1.115-vendor-seeed-rk3588 SMP mod_unload modversions aarch64

0000:01:00.0 Processing accelerators [1200]: Rockchip Electronics Co., Ltd Device [1d87:182a] (rev 01)
        Kernel driver in use: pcie-rkep

/dev/pcie-rkep-0000:01:00.0
A regular user's PATH might not include /usr/sbin, so this guide runs dkms and modinfo with sudo. Do not conclude that the software is missing solely because either command reports "command not found" when run as a regular user.
After confirming that the driver is installed, reboot the device:
sudo reboot#2. Install and Verify the Runtime and Toolkit Lite
#2.1 Runtime: Installed by the M.2 DEB Package
The M.2 package installed in Section 1 already provides the Runtime required by this guide. The key files are:
| File | Purpose |
|---|---|
/usr/lib/librknn3_api.so | Runtime API entry point |
/usr/lib/librknn3_api_rkcp.so | Coprocessor-mode backend |
/usr/bin/rknn3_transfer_proxy | Communication proxy between the RK3588 and the accelerator |
/usr/lib/firmware/rknn3_rk1820.img | Accelerator firmware installed by this package |
/usr/bin/rknn-smi | Status and version query utility |
rknn3.service | Firmware loading and Runtime service at boot |
The rk1820 component in the firmware path is the actual package naming convention. Use the same M.2 package when the accelerator is an RK1828.
Run on the RK3588 host:
systemctl status rknn3.service --no-pager -l
sudo rknn3_transfer_proxy devices
sudo rknn-smi info
sudo rknn-smi -v
Expected output:
Active: active (running)

List of ntb devices attached
0000:01:00.0        b98e6c51    PCIE

Device: 0     Status: Online     Health: OK
Chip: RK1828  Bus-Id: 0000:01:00.0
Memory-Usage(MB): 36 / 5120

rknn-smi version              : 1.3.0
PCIe driver version           : 3.3.1
RC chips connect version      : 3.3.2
EP chips connect version      : 0.0.2
PCIe Device 0 firmware version: 1.1.0
rknn3 API version             : 1.1.0
Device indices, temperatures, and memory usage vary with runtime conditions. Each component is versioned independently, so the version numbers do not need to match. The C/C++ Runtime is now ready.
#2.2 Prepare the Toolkit Lite Installation Files
Clone the official repositories on the PC, then transfer only the Toolkit Lite installation files to the RK3588 host. The same repositories are used to install the PC Toolkit in the next section.
Run on the PC:
sudo apt update
sudo apt install git wget cmake make gcc g++ openssh-client
mkdir -p ~/RKNN3_Project
cd ~/RKNN3_Project

git clone https://github.com/airockchip/rknn3-toolkit.git
git -C rknn3-toolkit checkout 2136cc54fa79ad289c43e56ed9cf7e63ef56439b

git clone https://github.com/airockchip/rknn3-model-zoo.git
git -C rknn3-model-zoo checkout 174e44c77230735b1458946debb62b3982c1ee58
These repositories are pinned to the commits verified for this guide so that later changes to filenames or APIs on main do not affect reproducibility. Clone them only once in a new environment; later sections reuse both directories.
Run on the PC:
ssh rk3588@ip 'mkdir -p ~/RKNN3_Project/lite-packages'
cd ~/RKNN3_Project/rknn3-toolkit/rknn3-toolkit-lite/packages

scp requirements.txt \
  rknn3_toolkit_lite-1.1.0-cp311-cp311-manylinux_2_17_aarch64.manylinux2014_aarch64.whl \
  rk3588@ip:~/RKNN3_Project/lite-packages/
The RK3588 host in this guide runs Debian 12 with Python 3.11, so select the cp311 and aarch64 package.
#2.3 Install Toolkit Lite
Run on the RK3588 host:
sudo apt update
sudo apt install python3.11-venv

python3 -m venv ~/venvs/rknn3-lite
source ~/venvs/rknn3-lite/bin/activate

cd ~/RKNN3_Project/lite-packages
python -m pip install -r requirements.txt
python -m pip install \
  ./rknn3_toolkit_lite-1.1.0-cp311-cp311-manylinux_2_17_aarch64.manylinux2014_aarch64.whl

python -m pip check
python -c "from rknn3lite.api import RKNN3Lite; print('RKNN3 Toolkit Lite import OK')"
Output from the verified setup:
No broken requirements found.
RKNN3 Toolkit Lite import OK
Next, query the accelerator through the Python API:
sudo "$HOME/venvs/rknn3-lite/bin/python" - <<'PY'
from rknn3lite.api import RKNN3Lite
rknn = RKNN3Lite()
print(rknn.get_devices_id())
rknn.release()
PY
The verified setup returned:
[b'0000:01:00.0']The command deliberately uses the absolute path to the virtual environment's Python executable. Running sudo python3 usually switches to the system Python, which cannot find the Toolkit Lite package installed in the virtual environment. Section 4 runs a C++ application and does not depend on the Toolkit Lite environment being active.
#3. Configure the Toolkit and Convert YOLOv6 on an Ubuntu PC
#3.1 Create a Python 3.10 Environment
Run on the PC. Use Miniforge to create an isolated environment from scratch. The PC used for verification already had Conda under ~/miniconda3, and conversion was performed in its toolkit3 environment.
mkdir -p ~/Downloads
cd ~/Downloads
wget -c https://github.com/conda-forge/miniforge/releases/download/25.3.0-1/Miniforge3-25.3.0-1-Linux-x86_64.sh
bash Miniforge3-25.3.0-1-Linux-x86_64.sh -b -p "$HOME/miniforge3"
source ~/miniforge3/etc/profile.d/conda.sh
conda create -n toolkit3 python=3.10 -y
conda activate toolkit3
After opening a new terminal, run source ~/miniforge3/etc/profile.d/conda.sh and conda activate toolkit3 first. If Conda is already available, use the existing installation path instead of installing another copy.
#3.2 Install RKNN3-Toolkit 1.1.0
Run on the PC:
cd ~/RKNN3_Project/rknn3-toolkit/rknn3-toolkit
python -m pip install -r packages/requirements_cp310-1.1.0.txt
python -m pip install \
  packages/rknn3_toolkit-1.1.0-cp310-cp310-manylinux2014_x86_64.whl

python --version
python -m pip show rknn3-toolkit
python -m pip check
python -c "from rknn.api import RKNN; print('RKNN3 Toolkit import OK')"
Versions and dependency-check output from the verified environment:
Python 3.10.21
Name: rknn3-toolkit
Version: 1.1.0
Summary: Rockchip Neural Network Toolkit. (commit: cdbad21c1)
No broken requirements found.
In this pinned commit, the wheel is located directly under packages/, not under packages/x86_64/ as shown in the PDF example. Do not install Toolkit2 in this dedicated environment. This SDK still uses from rknn.api import RKNN as its PC import entry point, so it can easily be confused with the older toolkit.
#3.3 Download the YOLOv6n ONNX Model
Run on the PC:
cd ~/RKNN3_Project/rknn3-model-zoo/examples/yolov6/model
bash download_model.sh
ls -lh yolov6n_rknn3.onnx
By default, the download script retrieves yolov6n_rknn3.onnx, which is optimized for RK182X. The verified download was 18,644,871 bytes.
This optimized model incorporates YOLO decoding, candidate-box filtering, sorting, NMS, and other processing into the model computation graph. This guide uses only this model and does not mix it with the standard model that lacks the _rknn3 suffix.
#3.4 Perform INT8 Conversion
Run on the PC:
conda activate toolkit3
cd ~/RKNN3_Project/rknn3-model-zoo
export PYTHONPATH="$PWD${PYTHONPATH:+:$PYTHONPATH}"

# Quantization calibration list and image directory used by the official example
ls datasets/COCO/coco_subset_20.txt
ls datasets/COCO/subset

cd examples/yolov6/python
python convert.py ../model/yolov6n_rknn3.onnx rk1820 i8
Parameter descriptions:
| Parameter | Description |
|---|---|
../model/yolov6n_rknn3.onnx | Input ONNX model |
rk1820 | Conversion target used by the official RK182X example; verified with an RK1828 in this guide |
i8 | Enables quantization; the main script uses w8a8 and configures selected subgraphs as w16a16 |
The script configures input normalization, uint8/NHWC input properties, and core_num=1. Keep the default configuration for the first verification; do not modify the ONNX input layout in advance.
Excerpt from the verified conversion log:
I version: rknn3-toolkit 1.1.0(cdbad21c1@2026-08-22T07:33:23)
...
I rknn building ...
...
I rknn building done.
...
--> Export rknn model
done
Confirm that both model files were generated:
ls -lh ../model/yolov6n_rknn3.rknn ../model/yolov6n_rknn3.weightIn the verified conversion, the .rknn file was approximately 249 KB and the .weight file was approximately 5.1 MB. Both files must be deployed together.
#4. Build, Deploy with SCP, and Run the Application
#4.1 Install an ARM64 Cross-Compiler on the PC
Run on the PC:
cd ~/RKNN3_Project
wget -c https://dn.odroid.com/compiler/gcc-linaro-6.3.1-2017.05-x86_64_aarch64-linux-gnu.tar
tar -xf gcc-linaro-6.3.1-2017.05-x86_64_aarch64-linux-gnu.tar

export GCC_COMPILER="$HOME/RKNN3_Project/gcc-linaro-6.3.1-2017.05-x86_64_aarch64-linux-gnu/bin/aarch64-linux-gnu"
"${GCC_COMPILER}-gcc" --version
cmake --version
Compiler version used for verification:
aarch64-linux-gnu-gcc (Linaro GCC 6.3-2017.05) 6.3.1 20170404GCC_COMPILER is the compiler prefix and does not include the trailing -gcc; the build script appends it. The CMake version supplied with Ubuntu 20.04 meets this example's minimum requirement of CMake 3.15.
#4.2 Build the YOLOv6 C++ Demo
Run on the PC:
cd ~/RKNN3_Project/rknn3-model-zoo
./build-linux.sh -t rk3588 -a aarch64 -b Release -d yolov6
Excerpt from the verified build log:
[ 68%] Built target rknn_yolov6_demo
...
[100%] Built target cnpy
Install the project...
-- Install configuration: "Release"
The deployment directory is:
install/rk3588_linux_aarch64/rknn_yolov6_demo/
├── rknn_yolov6_demo
├── dataset_eval
├── lib/
│   ├── librknn3_api.so
│   ├── librknn3_api_rkcp.so
│   ├── librga.so
│   └── libpostprocess_yolov6_rk182x.so
└── model/
    ├── yolov6n_rknn3.rknn
    ├── yolov6n_rknn3.weight
    ├── bus.jpg
    └── coco_80_labels_list.txt
The build script copies the converted model into the deployment directory. Therefore, the required order is: convert first, then build and package.
#4.3 Copy the Entire Deployment Directory with SCP
Run on the PC:
ssh rk3588@ip 'mkdir -p ~/RKNN3_Project'

cd ~/RKNN3_Project/rknn3-model-zoo
scp -r install/rk3588_linux_aarch64/rknn_yolov6_demo \
  rk3588@ip:~/RKNN3_Project/
Copy the entire directory, not only the executable or the .rknn file. This guide uses a new deployment directory to avoid overwriting files from other projects.
#4.4 Run on the RK3588 Host
Run on the RK3588 host:
cd ~/RKNN3_Project/rknn_yolov6_demo

sudo env LD_LIBRARY_PATH="$PWD/lib${LD_LIBRARY_PATH:+:$LD_LIBRARY_PATH}" \
  ./rknn_yolov6_demo \
  ./model/yolov6n_rknn3.rknn \
  ./model/yolov6n_rknn3.weight \
  ./model/bus.jpg \
  1
The final 1 is core_mask=0x01, matching this model's core_num=1. sudo env ... both provides access to the device node and explicitly passes the Demo library path. If you only run export LD_LIBRARY_PATH in the user shell before using sudo, the variable might be removed.
This command uses the Runtime shared libraries in the Model Zoo deployment directory. The host firmware and communication service are still provided by the M.2 package installed in Section 1. This exact version combination was verified together.
Excerpt from an actual inference run:
model input num: 1, output num: 1
model is NHWC input fmt
model input height=640, width=640, channel=3
...
Pre-process time: 4.08 ms
Inference time: 18.10 ms
Post-process time: 0.06 ms
Total time: 22.23 ms
--> inference model done
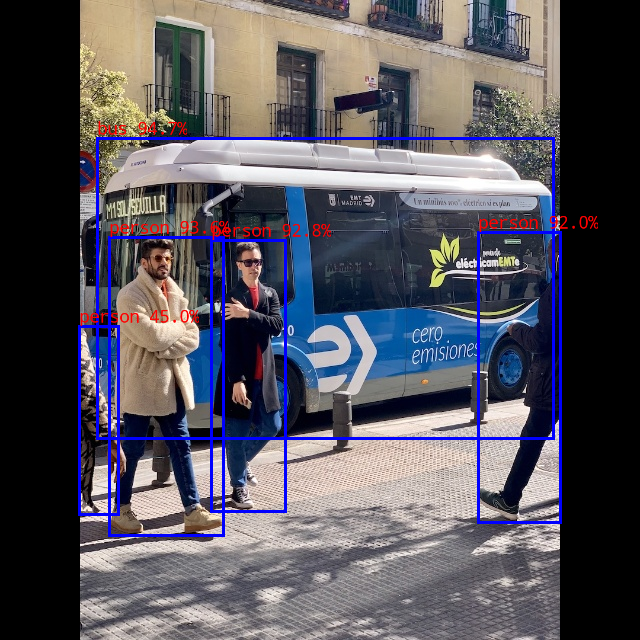
bus @ (97 138 553 438) 0.947
person @ (109 237 223 535) 0.936
person @ (211 240 285 511) 0.928
person @ (478 232 560 522) 0.920
person @ (79 326 118 514) 0.450
write_image path: out.png width=640 height=640 channel=3 ...
These values are measurements from a single run, not a sustained-FPS result or a performance benchmark. Success means that the application exits normally, reports plausible detections, and creates out.png.
#4.5 Retrieve the Result Image
Run on the PC:
mkdir -p ~/RKNN3_Project/results
scp rk3588@ip:~/RKNN3_Project/rknn_yolov6_demo/out.png \
  ~/RKNN3_Project/results/yolov6-out.png
Open the result directly on the Ubuntu desktop. If the RK3588 host has a connected display, you can view the image there instead of copying it back.
The following image was generated during verification:
#5. Troubleshooting the First Run
| Symptom | Resolution in This Guide |
|---|---|
rknn-smi: command not found | Install the M.2 DEB package from Section 1; do not copy only the proxy application |
PCIe lists 1d87:182a, but no driver or device node is present | Verify that the headers match the running kernel, then inspect the DKMS build result |
dpkg completes, but DKMS does not report installed | Inspect /var/lib/dkms/pcie-rkep/3.3.1/build/make.log; do not ignore driver errors |
No pcie-rkep devices found | Verify the driver binding and device node first, then check rknn3.service |
ensurepip is not available | Install python3.11-venv, then recreate the Toolkit Lite virtual environment |
| The wheel is not supported | Select cp310/x86_64 on the PC and cp311/aarch64 on the RK3588 host in this guide |
No module named py_utils | Set PYTHONPATH from the Model Zoo root, then enter the example directory |
| The calibration dataset path does not exist | Run conversion from examples/yolov6/python and check the repository's datasets/COCO directory |
Python cannot find Toolkit Lite after sudo | Use the absolute path to the virtual environment's Python executable |
| The model or shared library cannot be found | Copy the complete deployment directory, run the Demo from that directory, and set the library path with sudo env |
Collect diagnostic information on the RK3588 host:
sudo dkms status
sudo modinfo pcie-rkep
lspci -nnk -s 0000:01:00.0
ls -l /dev/pcie-rkep-*
systemctl status rknn3.service --no-pager -l
sudo journalctl -u rknn3.service -b --no-pager -n 100
sudo dmesg | grep -Ei 'pcie|rkep|rknn|firmware' | tail -n 100#6. Versions and References
Repositories are pinned to the following commits for this verified setup:
rknn3-toolkit   2136cc54fa79ad289c43e56ed9cf7e63ef56439b
rknn3-model-zoo 174e44c77230735b1458946debb62b3982c1ee58
The guide consistently uses ~/RKNN3_Project as the working directory.
- RKNN3 official repository: software component relationships and installation packages.
- Toolkit Lite at the pinned version: ARM64 wheel, requirements, and Python examples.
- Runtime at the pinned version: runtime libraries and communication components.
- YOLOv6 example at the pinned version: download, conversion, and C++ example source.
- Seeed Armbian extensions and package repository: the vendor package repository for the board used in this example; kernel headers must match the running system kernel.